0%

SpringCloud

分布式微服务架构——一整套微服务组件架构的解决方案

SpringCloud——一系列微服务技术的组合和解决方案

SpringCloud升级后主要的组件选择方案

image-20220713141921246

服务注册中心

Eureka

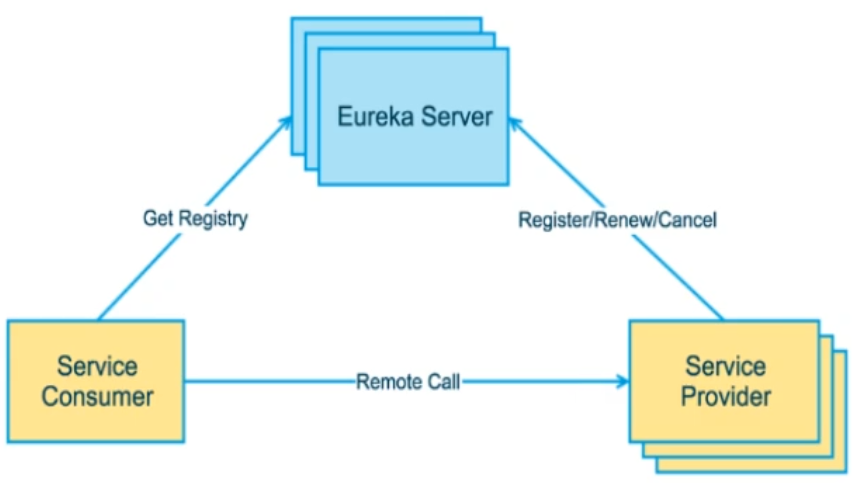
服务注册中心,应用架构图

image-20220714155543557

Eureka Server

即注册中心

1
2
3
4
<dependency>
<groupId>org.springframework.cloud</groupId>
<artifactId>spring-cloud-starter-netflix-eureka-server</artifactId>
</dependency>
1
2
3
4
5
6
7
@SpringBootApplication
@EnableEurekaServer //表明是eureka server
public class EurekaMain7001 {
public static void main(String[] args) {
SpringApplication.run(EurekaMain7001.class, args);
}
}
1
2
3
4
5
6
7
8
9
10
11
12
13
14
15
16
17
18
19
20
server:
port: 7001

spring:
application:
name: cloud-eureka-server7001

eureka:
instance:
hostname: localhost
client:
fetch-registry: false #不注册自己
register-with-eureka: false # 不检索自己
service-url:
# defaultZone: http://eureka7002.com:7002/eureka/ 集群模式,这里注册其他eureka-server
defaultZone: http://${eureka.instance.hostname}:${server.port}/eureka/ # 单机模式,这里注册自己
server:
#关闭自我保护机制,保证不可用服务立即被踢出
enable-self-preservation: false
eviction-interval-timer-in-ms: 2000

多台eureka server之间需要相互注册,启动之后可以用ip+端口来访问对应注册中心结点的控制中心
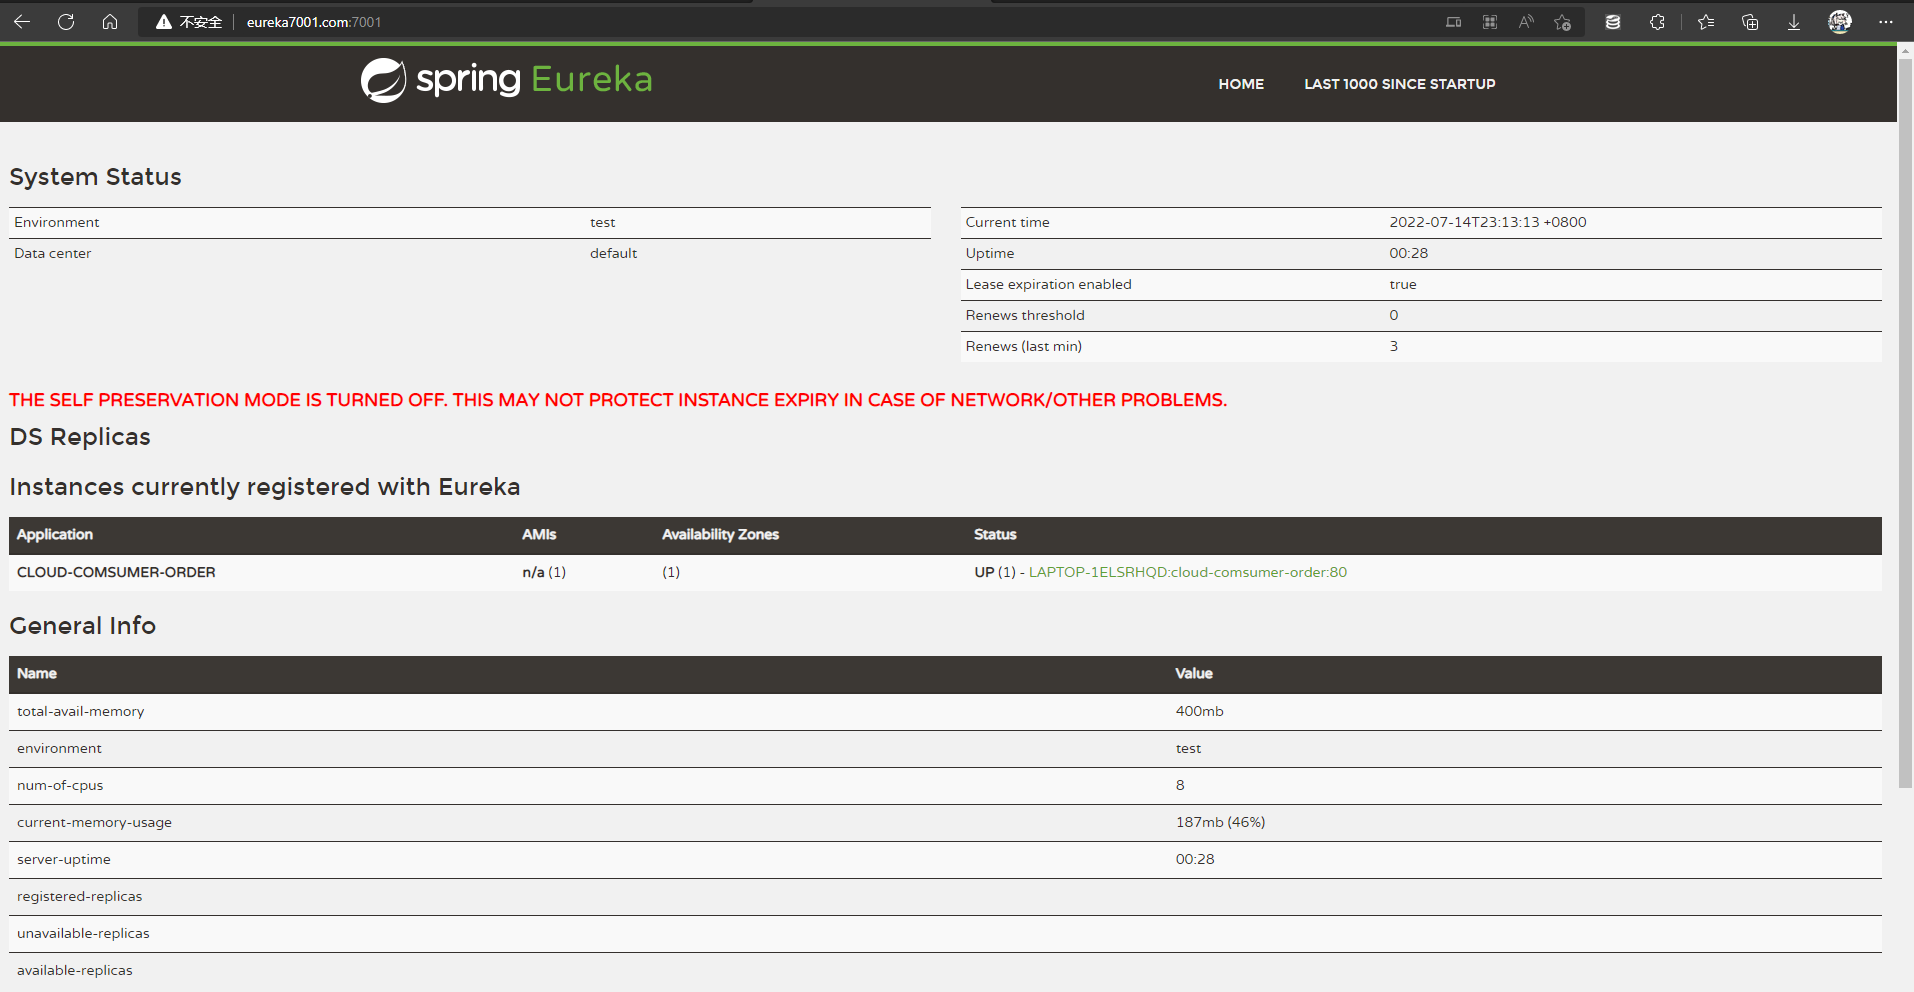
image-20220714233953583

Eureka Client

1
2
3
4
<dependency>
<groupId>org.springframework.cloud</groupId>
<artifactId>spring-cloud-starter-netflix-eureka-client</artifactId>
</dependency>
1
2
3
4
5
6
7
8
@SpringBootApplication
@EnableEurekaClient //表明是EurekaClient
@EnableDiscoveryClient //不只是Eureka,其他的注册中心服务发现也能使用@EnableDiscoveryClient
public class PaymentMain8001 {
public static void main(String[] args) {
SpringApplication.run(PaymentMain8001.class,args);
}
}
1
2
3
4
5
6
7
8
9
10
11
12
13
14
15
16
17
18
19
20
21
22
23
24
25
26
27
28
29
30
31
32
33
34
35
36
37
38
39
40
41
42
43
44
45
46
47
48
49
50
51
@RestController
@RequestMapping("/payment")
@Slf4j
public class PaymentController {
//业务层逻辑
@Resource
private PaymentService paymentService;

@Value("${server.port}")
private String serverPort;

//服务注册发现的封装对象
@Resource
private DiscoveryClient discoveryClient;

/**
* 通过主键查询单条数据
*
* @param id 主键
* @return 单条数据
*/
@GetMapping("/get/{id}")
public CommonResult<Payment> selectOne(@PathVariable("id") Long id) {
Payment payment = this.paymentService.queryById(id);
return new CommonResult<Payment>(200,"select success,port:" + serverPort,payment);
}

@PostMapping("/create")
public CommonResult create(@RequestBody Payment payment) {
Payment insert = this.paymentService.insert(payment);
log.info("插入数据:" + payment);
return new CommonResult(200,"insert success" ,insert);
}

//服务注册发现,
@GetMapping("/discovery")
public Object discovery() {
//获取注册中心注册的所有服务列表
List<String> services = discoveryClient.getServices();
services.forEach(service->{
log.info("----service"+service);
});
//获取某一个服务名所对应的实例结点信息
List<ServiceInstance> instances = discoveryClient.getInstances("CLOUD-PAYMENT-SERVICE");
for (ServiceInstance instance : instances) {
log.info(instance.getServiceId()+"\t" + instance.getHost()+"\t"+ instance.getPort()+"\t"+instance.getUri());;
}

return this.discoveryClient;
}
}
1
2
3
4
5
6
7
8
9
10
11
12
13
14
15
16
17
18
server:
port: 8001

spring:
application:
name: cloud-payment-service
# 添加自己需要的业务配置

eureka:
client:
service-url:
# defaultZone: http://eureka7001.com:7001/eureka/,http://eureka7002.com:7002/eureka/ eureka-server集群模式,需要配置每一个注册中心
defaultZone: http://eureka7001.com:7001/eureka/ # 单机模式
instance:
instance-id: payment8001 #展示的业务id
prefer-ip-address: true #在管理页面展示ip
lease-renewal-interval-in-seconds: 1
lease-expiration-duration-in-seconds: 2

调用方

1
2
3
4
5
<!--调用方仍然属于eureka-server的客户端-->
<dependency>
<groupId>org.springframework.cloud</groupId>
<artifactId>spring-cloud-starter-netflix-eureka-client</artifactId>
</dependency>
1
2
3
4
5
6
7
@SpringBootApplication
@EnableEurekaClient
public class OrderMain80 {
public static void main(String[] args) {
SpringApplication.run(OrderMain80.class,args);
}
}
1
2
3
4
5
6
7
8
@Configuration
public class ApplicationContextConfig {
@Bean
@LoadBalanced //@LoadBalanced表示开启轮询方式的负载均衡
public RestTemplate getRestTemplate() {
return new RestTemplate();
}
}
1
2
3
4
5
6
7
8
9
10
11
12
13
14
15
16
17
18
19
@RestController
@RequestMapping("/consumer")
public class OrderController {
//这里允许使用 http://服务名的方式指定url,之后会由注册中心解析指定具体的服务实例
public static final String PAYMENT_URL = "http://CLOUD-PAYMENT-SERVICE";
//RestTemplate实例允许以http请求的方式调用其他服务
@Resource
private RestTemplate restTemplate;

@PostMapping("payment/create")
public CommonResult<Payment> create(Payment payment) {
return restTemplate.postForObject(PAYMENT_URL+"/payment/create",payment,CommonResult.class);
}

@GetMapping("payment/get/{id}")
public CommonResult<Payment> getPayment(@PathVariable("id") long id) {
return restTemplate.getForObject(PAYMENT_URL+"/payment/get/"+id,CommonResult.class);
}
}
1
2
3
4
5
6
7
8
9
10
11
12
13
14
15
16
17
server:
port: 80

spring:
application:
name: cloud-comsumer-order

eureka:
client:
service-url:
defaultZone: http://eureka7001.com:7001/eureka/
# defaultZone: http://eureka7001.com:7001/eureka/,http://eureka7002.com:7002/eureka/
instance:
instance-id: order80 #展示的业务id
prefer-ip-address: true #在管理页面展示ip
lease-renewal-interval-in-seconds: 1
lease-expiration-duration-in-seconds: 2

Eureka自我保护机制

Eureka服务端会检查最近15分钟内所有Eureka 实例正常心跳占比,如果低于85%就会触发自我保护机制。触发了保护机制,Eureka将暂时把这些失效的服务保护起来,不让其过期,但这些服务也并不是永远不会过期。Eureka在启动完成后,每隔60秒会检查一次服务健康状态,如果这些被保护起来失效的服务过一段时间后(默认90秒)还是没有恢复,就会把这些服务剔除。如果在此期间服务恢复了并且实例心跳占比高于85%时,就会自动关闭自我保护机制。

配置调整

  • eureka server

    1
    2
    3
    4
    5
    6
    eureka:
    server:
    #关闭自我保护机制,保证不可用服务立即被踢出
    enable-self-preservation: false
    #自我保护机制下的检查时间间隔,2000表示2秒,默认90s
    eviction-interval-timer-in-ms: 2000
  • eureka client

    这里的两项配置需要和eureka server的配置相对应,否则可能会自动失效

    1
    2
    3
    4
    5
    6
    eureka:
    instance:
    #服务续约时间,单位s,默认30s
    lease-renewal-interval-in-seconds: 1
    #服务失效时间,单位s,默认90s
    lease-expiration-duration-in-seconds: 2

ZooKeeper

安装Zookeeper

1
2
wget https://dlcdn.apache.org/zookeeper/zookeeper-3.7.1/apache-zookeeper-3.7.1-bin.tar.gz
tar -zxvf apache-zookeeper-3.7.1-bin.tar.gz

到解压后目录下的bin目录中复制配置文件

1
cp zoo_sample.cfg zoo.cfg #复制之后zookeeper默认会以zoo.cfg为配置文件进行启动

启动

1
2
3
4
zkServer.sh start #启动zookeeper
zkServer.sh status #查看zookeeper状态
zkCli.sh -server localhost:2181 #启动zookeeper控制台
zkServer.sh stop #关闭zookeeper

Zookeeper使用者

调用者和服务提供者都需要引入依赖

1
2
3
4
5
<!--注意maven版本和zookeeper服务器版本对应问题-->
<dependency>
<groupId>org.springframework.cloud</groupId>
<artifactId>spring-cloud-starter-zookeeper-discovery</artifactId>
</dependency>
1
2
3
4
5
6
spring:
application:
name: cloud-comsumer-order
cloud:
zookeeper:
connect-string: XX.XX.XX.XX:2181 #这里配置zookeeper的注册中心

使用方法与Eureka类似,使用RestTemplate进行Http请求调用

Consul

默认使用端口8500

1
2
consul --version #检查consul版本
consul agent -dev #启动consul服务注册中心

启动consul之后可以打开对应的http://ip:8500/访问网页控制面板

Consul使用者
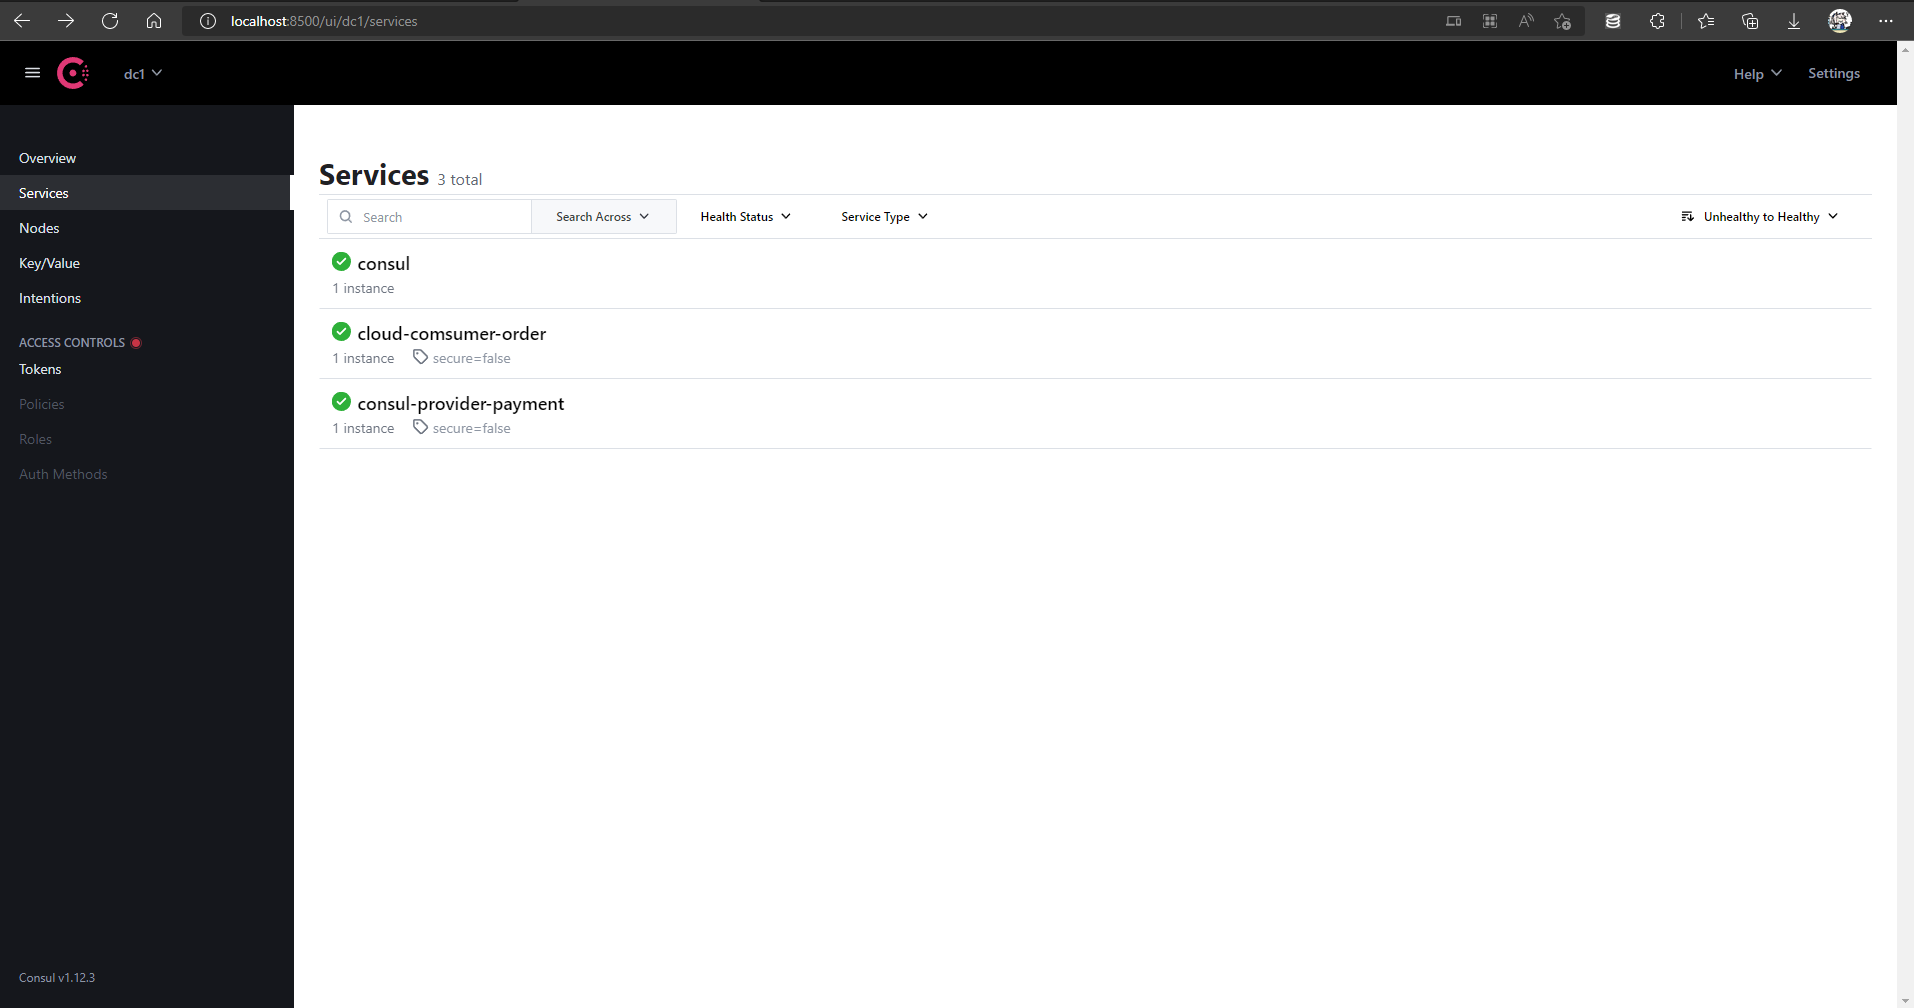
image-20220715221321344

CAP

image-20220715221550847

  • Consistency:强一致性
  • Availability:可用性
  • Partition Tolerance:分区容错性

由于分布式架构都要保证分区容错性,因次只能再CA之中二选一

Eureka AP的体现:Eureka自我保护机制,当服务结点发送心跳请求中断时暂时不删除结点,宁可容忍节点状态的错误可能也要保证可用性

Zookeeper和Consul:结点掉线立刻删除,不保证可用性,而保证节点状态的正确性

小坑

使用Zookeeper和Consul时,如果使用RestTemplate作为调用方式,在注入RestTemplate时必须添加@LoadBalanced注解,否则URL无法被正确解析

服务调用

Ribben + RestTemplate

Ribben作为本地的负载均衡组件工作方式:

消费者端向注册中心获取到所有可用的服务端,根据本地自身设定的负载均衡策略选择某一个服务端进行调用

与Nginx的区别

nginx是服务端的负载均衡,而ribben是客户端的负载均衡;nginx获取到请求自行选择服务端进行处理(反向代理),ribben则是客户端自行进行选择

依赖

1
2
3
4
<dependency>
<groupId>org.springframework.cloud</groupId>
<artifactId>spring-cloud-starter-netflix-ribbon</artifactId>
</dependency>

然而使用eureka时,eureka的依赖已经自动帮我们引入了ribbon依赖,不需要再次手动去引入

Ribben负载均衡策略

  • RoundRobinRule轮询(默认)

  • RandomRule随机

  • RetryRule轮询重试(轮询获取服务失败则重试)

  • WeightedResponseTimeRule响应速度决定权重

  • BestAvailableRule最优可用(并发数最小)

  • AvailabilityFilteringRule可用性过滤规则(先过滤不可用的server实例,再选择并发数最小的实例)

  • ZoneAvoidanceRule区域内可用性能最优(基于AvailabilityFilteringRule,过滤server实例的同时需要判断server所在区域的性能)

更改负载均衡配置

自定义配置类

1
2
3
4
5
6
7
8
9
10
11
12
13
14
15
16
17
//注意,如果只想让某一个springboot应用使用该规则,不能放在主启动类的目录和子目录下(@ComponentScan注解所扫描的范围)
//而需要在主启动类手动指定规则
package com.lan5th.myRule;

import com.netflix.loadbalancer.IRule;
import com.netflix.loadbalancer.RandomRule;
import org.springframework.context.annotation.Bean;
import org.springframework.context.annotation.Configuration;

@Configuration
public class MyselfRule {

@Bean
public IRule myRule() {
return new RandomRule();
}
}

主启动类上添加注解,指定自定义规则

1
@RibbonClient(name = "CLOUD-PAYMENT-SERVICE",configuration = MyselfRule.class)

使用依旧是Ribben配置 + RestTemplate发送Http请求

OpenFeign

不同于之前的RestTemplate调用接口,Feign使用方式有点类似于Dubbo,通过接口调用来实现微服务之间的交互(服务接口绑定器)

OpenFeign的依赖中也包含了Ribben,因此也自然具备负载均衡功能,同样是客户端进行使用

  • 依赖

    1
    2
    3
    4
    <dependency>
    <groupId>org.springframework.cloud</groupId>
    <artifactId>spring-cloud-starter-openfeign</artifactId>
    </dependency>
  • 主启动类添加注解@EnableFeignClients

  • 服务调用这编写Service调用接口

    1
    2
    3
    4
    5
    6
    7
    8
    9
    @Component
    @FeignClient(value = "CLOUD-PAYMENT-SERVICE") //指定对应的服务名
    public interface PaymentFeignService {
    @GetMapping("payment/get/{id}")
    CommonResult<Payment> selectOne(@PathVariable("id") Long id);

    @GetMapping("payment/feign/timeout")
    String getFeignTimeOut();
    }

    Feign会通过@FeignClient@Requestmapping注解去注册中心获取到具体的服务提供者并进行调用

  • 配置

    1
    2
    3
    4
    5
    6
    7
    8
    9
    10
    11
    12
    13
    14
    15
    16
    17
    18
    19
    server:
    port: 80

    eureka:
    client:
    service-url:
    defaultZone: http://www.eureka7002.com:7002/eureka/,http://www.eureka7001.com:7001/eureka/
    register-with-eureka: false

    feign:
    client:
    config:
    default:
    # 超时等待时间
    ReadTimeout: 5000
    # 连接等待时间
    ConnectTimeout: 5000
    # 启用日志
    loggerLevel: FULL

服务降级熔断

Hystrix

Hystrix是一个用于处理分布式系统延迟和容错的开源库,在分布式系统的调用依赖中,Hystrix保证在一个依赖出现问题的情况下不会导致整体服务的失败,避免级联故障,提高分布式系统的弹性

当某个服务单元发生故障后,通过断路器的故障监控,向调用方返回符合预期的、可处理的备选响应(FallBack),而不是长时间的等待或抛出调用方无法处理的异常,保证服务调用方的线程不被长时间不必要的占用,避免故障在分布式系统中的蔓延乃至雪崩

主要功能

  • 服务降级:保证重要或整体服务的正常运行,将非重要服务延迟或暂停使用(FallBack)

  • 服务熔断:通过断路器做代理进行访问,断路器会持续观察服务返回的成功、失败的状态,当失败超过设置的阈值时断路器打开,请求就不能真正地访问到服务了

  • 服务限流

  • 接近实时的监控

启用Hystrix

  • <dependency>
        <groupId>org.springframework.cloud</groupId>
        <artifactId>spring-cloud-starter-netflix-hystrix</artifactId>
    </dependency>
    
    1
    2
    3
    4
    5
    6
    7
    8
    9

    + 客户端和服务端都可以启用Hystrix,主启动类添加注解@EnableHystrix

    + 如果使用的是Feign + Hystrix的组合,需要添加配置

    ```yaml
    feign:
    hystrix:
    enabled: true #在feign中开启hystrix

服务降级

使用方法:

  • 单方法指定降级@HystrixCommand

    1
    2
    3
    4
    5
    6
    7
    8
    9
    10
    11
    12
    13
    14
    @HystrixCommand(fallbackMethod = "paymentInfo_ERROR_Handler", //指定fallBack方法名
    commandProperties = {
    @HystrixProperty(name = "execution.isolation.thread.timeoutInMilliseconds",value = "1500") //超时配置
    })
    public String paymentInfo_ERROR(@PathVariable("id") Integer id){
    //业务逻辑
    return null;
    }

    //fallBack方法,注意入参出参必须与上面调用的原方法完全一致
    //这里运行时会使用Hystrix专用的线程,而不是原方法的Tomcat线程
    public String paymentInfo_ERROR_Handler(Integer id){
    return "80____paymentInfo_ERROR_Handler___异常返回";
    }
  • 类方法统一指定@DefaultProperties

    需要使用服务降级的方法添加@HystrixCommand,否则对应方法不会启用降级

    1
    2
    3
    4
    5
    6
    7
    8
    9
    10
    11
    12
    13
    14
    15
    16
    17
    18
    19
    20
    21
    22
    23
    24
    25
    26
    27
    28
    29
    30
    31
    32
    33
    34
    35
    36
    37
    38
    39
    @RestController
    @RequestMapping("/order")
    //在类名上使用注解统一指定
    @DefaultProperties(defaultFallback = "paymentInfo_ERROR_Handler" ,commandProperties = {
    @HystrixProperty(name = "execution.isolation.thread.timeoutInMilliseconds",value = "1500")
    })
    public class OrderController {
    //使用OpenFeign实现的接口
    @Resource
    private PaymentHystrixService paymentHystrixService;

    @GetMapping("info/ok/{id}")
    public String paymentInfo_OK(@PathVariable("id") Integer id){
    String res = paymentHystrixService.paymentInfo_OK(id);
    System.out.println(res);
    return res;
    };

    @GetMapping("info/error/{id}")
    @HystrixCommand
    public String paymentInfo_ERROR(@PathVariable("id") Integer id){
    return paymentHystrixService.paymentInfo_ERROR(id);
    }

    @GetMapping("/wait")
    @HystrixCommand
    public String waitForBack() {
    return paymentHystrixService.justWait();
    }

    //这里是因为方法入参不同写了两个fallBack方法,入参相同则可以共用fallBack
    public String paymentInfo_ERROR_Handler(Integer id){
    return "80____paymentInfo_ERROR_Handler___异常返回";
    }

    public String paymentInfo_ERROR_Handler(){
    return "80____paymentInfo_ERROR_Handler___异常返回";
    }
    }
  • 面向接口方法的降级措施

    1
    2
    3
    4
    5
    6
    7
    8
    9
    10
    11
    12
    13
    @Component
    //指定对应的fallBack实现类
    @FeignClient(value = "CLOUD-PROVIDER-PAYMENT",fallback = PaymentFallbackHystrixService.class)
    public interface PaymentHystrixService {
    @GetMapping("payment/info/ok/{id}")
    String paymentInfo_OK(@PathVariable("id") Integer id);

    @GetMapping("payment/info/error/{id}")
    String paymentInfo_ERROR(@PathVariable("id") Integer id);

    @GetMapping("payment/wait")
    String justWait();
    }
    1
    2
    3
    4
    5
    6
    7
    8
    9
    10
    11
    12
    13
    14
    15
    16
    17
    @Component //实现对应的接口,根据方法名对应处理fallBack
    public class PaymentFallbackHystrixService implements PaymentHystrixService {
    @Override
    public String paymentInfo_OK(Integer id) {
    return "-------PaymentFallbackService fall back-paymentInfo_OK,o(╥﹏╥)o";
    }

    @Override
    public String paymentInfo_ERROR(Integer id) {
    return "-------PaymentFallbackService fall back-paymentInfo_TimeOut,o(╥﹏╥)o";
    }

    @Override
    public String justWait() {
    return null;
    }
    }

服务熔断

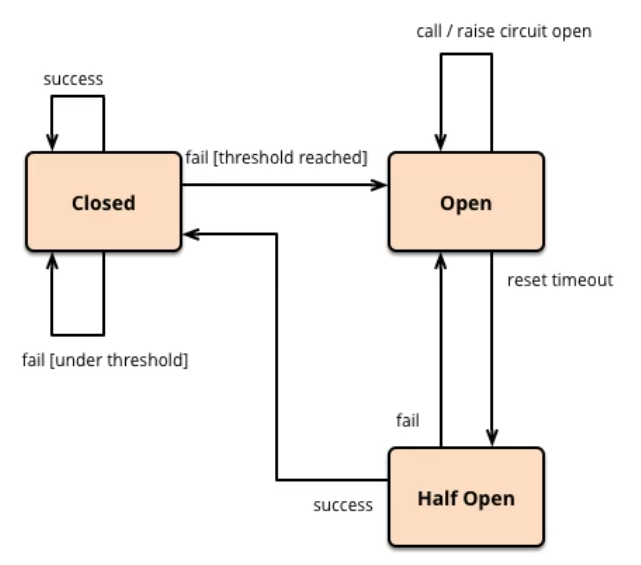
请求降级 -> 请求熔断 -> 超时重试

这里的closed和open类似于电路中的开关闭合,closed表示断路器闭合,正常使用;open表示断路器断开,不能正常响应请求
![TR$BO9@M$N`%D7O}8BI@J(K.png](https://cdn.jsdelivr.net/gh/lan5th/pics/blog_images/20220719165938.png)

sleepWindowInMilliseconds的时间之内,超过requestVolumeThreshold个请求进行了调用,失败率超过errorThresholdPercentage%,则断路器会从closed变成open,一段时间后(默认5s),断路器从open变为halfOpen状态,对于大部分新请求直接进行fallback响应,对于某个请求进行访问尝试,如果请求仍然响应失败,则继续变为open状态,并重试上一步

断路器是在服务端进行配置的

  • 单独方法上@HystrixCommand

    1
    2
    3
    4
    5
    6
    7
    @HystrixCommand(
    fallbackMethod = "paymentCircuitBreaker_fallback",commandProperties = {
    @HystrixProperty(name = "circuitBreaker.enabled",value = "true"), //是否开启断路器
    @HystrixProperty(name = "circuitBreaker.requestVolumeThreshold",value = "10"), //请求次数
    @HystrixProperty(name = "circuitBreaker.sleepWindowInMilliseconds",value = "10000"), //时间窗口期
    @HystrixProperty(name = "circuitBreaker.errorThresholdPercentage",value = "60"),//失败率达到多少后跳闸
    })
  • 统一配置@DefaultProperties + @HystrixCommand

    1
    2
    3
    4
    5
    6
    @DefaultProperties(defaultFallback = "paymentCircuitBreaker_fallback", commandProperties = {
    @HystrixProperty(name = "circuitBreaker.enabled",value = "true"), //是否开启断路器
    @HystrixProperty(name = "circuitBreaker.requestVolumeThreshold",value = "10"), //请求次数
    @HystrixProperty(name = "circuitBreaker.sleepWindowInMilliseconds",value = "10000"), //时间窗口期
    @HystrixProperty(name = "circuitBreaker.errorThresholdPercentage",value = "60"),//失败率达到多少后跳闸
    })

Hystrix仪表盘

  • 新建模块,依赖

    1
    2
    3
    4
    <dependency>
    <groupId>org.springframework.cloud</groupId>
    <artifactId>spring-cloud-starter-netflix-hystrix-dashboard</artifactId>
    </dependency>
  • 配置文件

    1
    2
    3
    4
    5
    6
    server:
    port: 9001

    hystrix:
    dashboard:
    proxy-stream-allow-list: "*"
  • 主启动类添加注解@EnableHystrixDashboard

  • 被监控的服务端需要注入ServletRegistrationBean

    1
    2
    3
    4
    5
    6
    7
    8
    9
    10
    11
    12
    13
    14
    15
    /**
    * 此配置是为了服务监控而配置,与服务容错本身无关,springcloud升级后的坑
    * ServletRegistrationBean因为springboot的默认路径不是/hystrix.stream
    * 只要在自己的项目里配置下面的Servlet就可以了
    * @return
    */
    @Bean
    public ServletRegistrationBean getServlet() {
    HystrixMetricsStreamServlet streamServlet = new HystrixMetricsStreamServlet();
    ServletRegistrationBean registrationBean = new ServletRegistrationBean(streamServlet);
    registrationBean.setLoadOnStartup(1);
    registrationBean.addUrlMappings("/hystrix.stream");
    registrationBean.setName("HystrixMetricsStreamServlet");
    return registrationBean;
    }
  • 访问监控url:http://ip:port/hystrix

    ![$9GL)MSDVA)6TH`]_O6P4NA.png](https://cdn.jsdelivr.net/gh/lan5th/pics/blog_images/20220719183348.png)

    输入被监控的url:http://localhost:8001/hystrix.stream

  • 进入监控页面如果显示loading,需要客户端发送调用请求开始监控

网关

Gateway

核心逻辑:路由转发+过滤处理

  • Route(路由)

  • Predicate(断言)

  • Filter(过滤)

1
2
3
4
<dependency>
<groupId>org.springframework.cloud</groupId>
<artifactId>spring-cloud-starter-gateway</artifactId>
</dependency>
1
2
3
4
5
6
7
8
9
10
11
12
13
14
15
16
17
18
19
server:
port: 9527
spring:
application:
name: cloud-gateway-service
cloud:
gateway:
discovery:
locator:
enabled: true #开启从注册中心动态生成路由的功能,用微服务名进行路由

eureka:
instance:
hostname: cloud_gateway_service
client:
service-url:
defaultZone: http://eureka7001.com:7001/eureka/
register-with-eureka: true
fetch-registry: true

路由+断言

  • 配置文件方式

    1
    2
    3
    4
    5
    6
    7
    8
    9
    10
    11
    12
    spring:
    cloud:
    gateway:
    routes:
    - id: payment_routh
    uri: lb://cloud-payment-service #lb:开头会使用负载均衡模式
    predicates: #断言,满足条件才会进入路由
    - Path=/payment/get/**
    - id: payment_routh2 #可以配置多个路由
    uri: lb://cloud-payment-service
    predicates:
    - Path=/payment/lb/**
  • 配置类方式

    1
    2
    3
    4
    5
    6
    7
    8
    9
    10
    11
    @Configuration
    public class GateWayConfig {
    @Bean
    public RouteLocator customRouteLocator(RouteLocatorBuilder builder) {
    RouteLocatorBuilder.Builder routes = builder.routes();
    routes.route("path_route",
    r->r.path("/guonei") //断言
    .uri("https://www.baidu.com")); //路由
    return routes.build();
    }
    }

过滤

一般用于添加全局日志等,权限鉴定等

1
2
3
4
5
6
7
8
9
10
11
12
13
14
15
16
17
18
19
20
21
22
23
24
@Component
@Slf4j
public class MyGateWayFilter implements GlobalFilter, Ordered {

@Override
public Mono<Void> filter(ServerWebExchange exchange, GatewayFilterChain chain) {
log.info("**************come in MylogGateWayGilter: " + new Date());
String uname = exchange.getRequest().getQueryParams().getFirst("uname");
if (uname == null) {
log.info("********用户名为空,非法用户。");
exchange.getResponse().setStatusCode(HttpStatus.NOT_ACCEPTABLE);
//直接返回,不进行路由
return exchange.getResponse().setComplete();
}
//放行filterChain
return chain.filter(exchange);
}

//设置在filterChain中的执行顺序,越小越先执行
@Override
public int getOrder() {
return 0;
}
}

配置中心

SpringCloud Config

结构:github配置仓库 + 配置服务端 + 配置客户端

启用

  • 新建github仓库,添加配置文件

  • 配置服务端

    1
    2
    3
    4
    <dependency>
    <groupId>org.springframework.cloud</groupId>
    <artifactId>spring-cloud-config-server</artifactId>
    </dependency>
    1
    2
    3
    4
    5
    6
    7
    8
    9
    10
    11
    12
    13
    14
    15
    16
    17
    18
    19
    20
    21
    22
    23
    24
    25
    26
    27
    server:
    port: 3344

    eureka:
    client:
    service-url:
    defaultZone: http://eureka7001.com:7001/eureka/
    instance:
    ip-address: 127.0.0.1
    prefer-ip-address: true

    spring:
    application:
    name: cloud-config-center
    cloud:
    config:
    server:
    git:
    # Jgit低版本读取rsa秘钥有bug,只能用http方式
    # uri: git@gitee.com:lan5th/springcloud-config.git
    uri: https://gitee.com/lan5th/springcloud-config.git
    search-paths:
    - springcloud-config
    force-pull: true
    username: XXX #认证信息
    password: XXX
    label: master

    主启动类只需要添加@SpringBootApplication和@EnableConfigServer注解,作为springboot应用启动即可

    启动完成后可以访问url访问获取到的各个配置文件内容http://config-3344.com:3344/master/config-dev.yml

    当github仓库中的配置文件被修改之后,配置服务端将自动拉取最新的配置文件,访问url得到的内容也随之更新

  • 配置客户端

    1
    2
    3
    4
    5
    6
    7
    8
    <dependency>
    <groupId>org.springframework.cloud</groupId>
    <artifactId>spring-cloud-starter-config</artifactId>
    </dependency>
    <dependency>
    <groupId>org.springframework.boot</groupId>
    <artifactId>spring-boot-starter-actuator</artifactId>
    </dependency>cy>

    bootstrap.yml,springApplication优先加载bootstrap,然后加载application,并和从配置服务端获取到的配置信息合并称为最终的配置文件

    1
    2
    3
    4
    5
    6
    7
    8
    9
    10
    11
    12
    13
    14
    15
    16
    17
    18
    19
    20
    21
    22
    23
    24
    server:
    port: 3355

    spring:
    application:
    name: config-client
    cloud:
    config:
    label: master #分支名称
    name: config #配置文件名称
    profile: dev #读取后缀名称 上述三个综合http://localhost:3344/master/config-dev.yml
    uri: http://config-3344.com:3344 #配置中心的地址

    eureka:
    client:
    service-url:
    defaultZone: http://eureka7001.com:7001/eureka/

    # 暴露actuator接口,用于刷新配置
    management:
    endpoints:
    web:
    exposure:
    include: "*"

    需要用到的Controller

    1
    2
    3
    4
    5
    6
    7
    8
    9
    10
    11
    12
    @RestController
    @RefreshScope //刷新作用域
    public class ConfigController {

    @Value("${config.info}")
    private String configInfo;

    @RequestMapping("/getConfigInfo")
    public String getConfigInfo() {
    return configInfo;
    }
    }

半自动刷新

配置服务客户端必须引入spring-boot-starter-actuator依赖,并在yaml中开启actuator接口

在更新github仓库中的配置文件后,配置服务端会自动拉取最新的配置文件,而配置客户端需要接收一个刷新的post请求才能刷新配置

1
ip:port/actuator/refresh

小坑

  • git仓库必须是public,private仓库会无法访问

  • 低版本Jgit有bug,不能正确读取到生成的rsa文件,导致ssh方式报错Auth fail,只能使用Http方式进行配置

  • 先确认本地terminal能否正常clone远程仓库,正确无误之后再启动配置中心

消息总线

SpringCloud Bus

一般与SpringCloud Config共同使用,用于实现配置的自动更新

需要与MQ搭配使用,这里以RabbitMQ为例

配置步骤

  • 所有需要用到总线的微服务添加依赖

    1
    2
    3
    4
    <dependency>
    <groupId>org.springframework.cloud</groupId>
    <artifactId>spring-cloud-starter-bus-amqp</artifactId>
    </dependency>cy>
  • 配置服务端

    1
    2
    3
    4
    5
    6
    7
    8
    9
    10
    11
    12
    13
    14
    15
    16
    17
    18
    19
    20
    21
    22
    23
    24
    25
    26
    27
    28
    29
    30
    31
    32
    33
    34
    35
    36
    37
    server:
    port: 3344

    eureka:
    client:
    service-url:
    defaultZone: http://eureka7001.com:7001/eureka/
    instance:
    ip-address: 127.0.0.1
    prefer-ip-address: true

    spring:
    application:
    name: cloud-config-center
    cloud:
    config:
    server:
    git:
    uri: https://gitee.com/lan5th/springcloud-config.git
    search-paths:
    - springcloud-config
    force-pull: true
    username: lan5th
    password: Zyh20010605
    label: master
    rabbitmq:
    host: XX.XX.XX.XX
    port: 5672
    username: user
    password: password

    #rabbitmq相关配置,暴露bus刷新配置的端点
    management:
    endpoints: #暴露bus刷新配置的端点
    web:
    exposure:
    include: 'bus-refresh'

    配置客户端

    1
    2
    3
    4
    5
    6
    7
    8
    9
    10
    11
    12
    13
    14
    15
    16
    17
    18
    19
    20
    21
    22
    server:
    port: 3355

    spring:
    application:
    name: config-client
    cloud:
    config:
    label: master #分支名称
    name: config #配置文件名称
    profile: dev #读取后缀名称 上述三个综合http://localhost:3344/master/config-dev.yml
    uri: http://config-3344.com:3344 #配置中心的地址
    rabbitmq:
    host: XX.XX.XX.XX
    port: 5672
    username: user
    password: password

    eureka:
    client:
    service-url:
    defaultZone: http://eureka7001.com:7001/eureka/
  • 配置RabbitMQ,这里注册的user和password就是上面所需填写的user

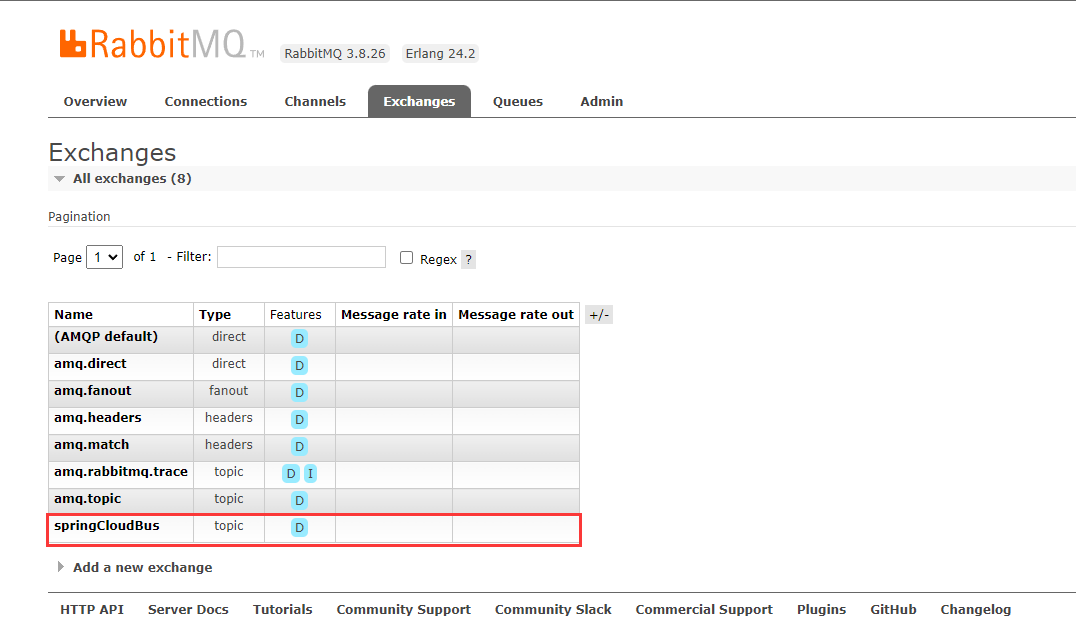
    启动配置服务端,在RabbitMQ的管理界面看到springCloudBus即表示配置服务端连接成功
    0V8JR5SJ6GQ{`H@Z7YLBV`1.png

配置完成后,每当在gitee/github上更新配置文件后,配置服务端自动加载新配置文件,我们只需要手动向配置服务端发送POST请求,即可通过消息总线让所有的监听总线的微服务自动获取新的配置文件

1
localhost:3344/actuator/bus-refresh #高版本为busrefresh

SpringCloud Stream

为了适配底层不同MQ之间的差异,降低切换开发成本,统一的消息编程模型

暂时仅支持以下两种MQ:

  • ActiveMQ

  • RabbitMQ

通过Binder对象实现与底层消息中间件的交互,我们只需要操作Binder对象即可

这里不加以详细介绍

链路监控

Sleuth + zipkin

原理
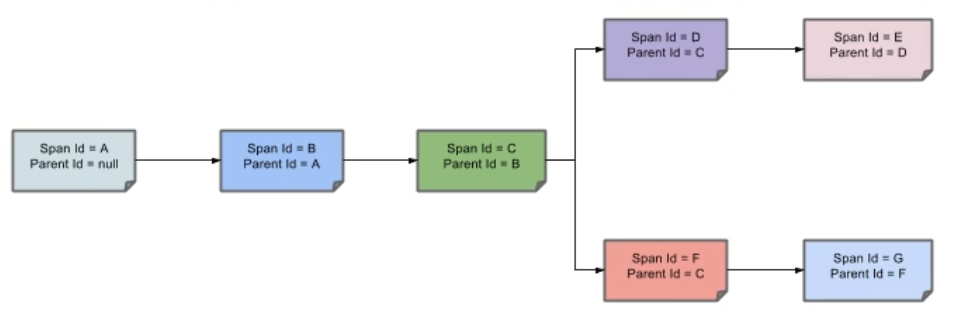
L~Y`I)C05@Z[(Z{RS`AS3$7.png

各个微服务span通过parentId在链路中依次关联

  • TraceId:一次调用链路的唯一id

  • SpanId:各个微服务抽象成span,获得在链路中的微服务唯一id

  • ParentId:上一级调用的SpanId

使用

  • 下载并启动zipkinhttps://repo1.maven.org/maven2/io/zipkin/zipkin-server/

    直接使用java -jar启动即可,之后可以在9411端口看到管理界面

  • 依赖

    1
    2
    3
    4
    5
    <!--包含了sleuth + zipkin-->
    <dependency>
    <groupId>org.springframework.cloud</groupId>
    <artifactId>spring-cloud-starter-zipkin</artifactId>
    </dependency>
  • spring:
      zipkin:
        # 注册到的zipkin监控服务器
        base-url: http://localhost:9411
      sleuth:
        sampler:
          # 取样率在0~1之间,1表示全部取样
          probability: 1

配置好之后全部启动即可在zipkin的监控页面根据不同条件查找到对应的请求记录