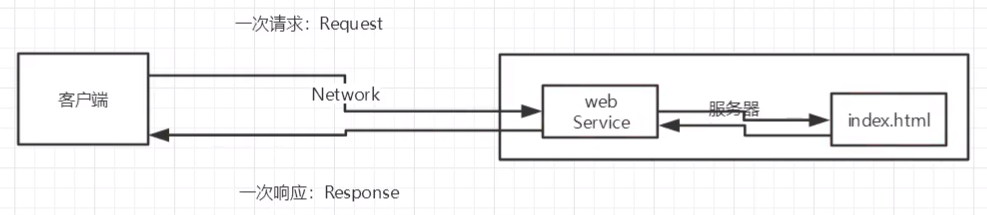
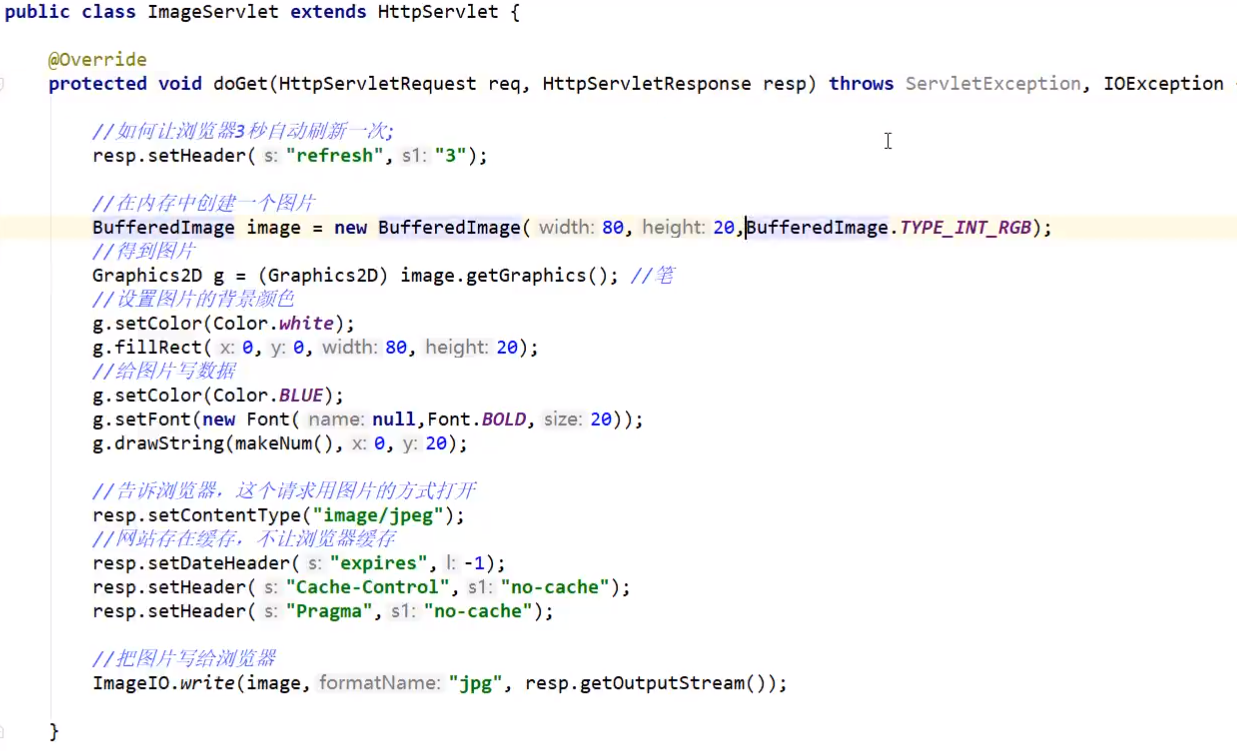
基本概念 定义 :在Java中,动态web资源开发的技术统称为JavaWeb
web应用程序 定义:可以提供浏览器访问的程序
a.html,b.html…多个web资源,可以被外界访问,对外界提供服务
能访问到的任何页面都存在网络上某台计算机上
URL:统一资源定位符
统一的web资源会被放在同一个文件夹下,web应用程序->Tomcat服务
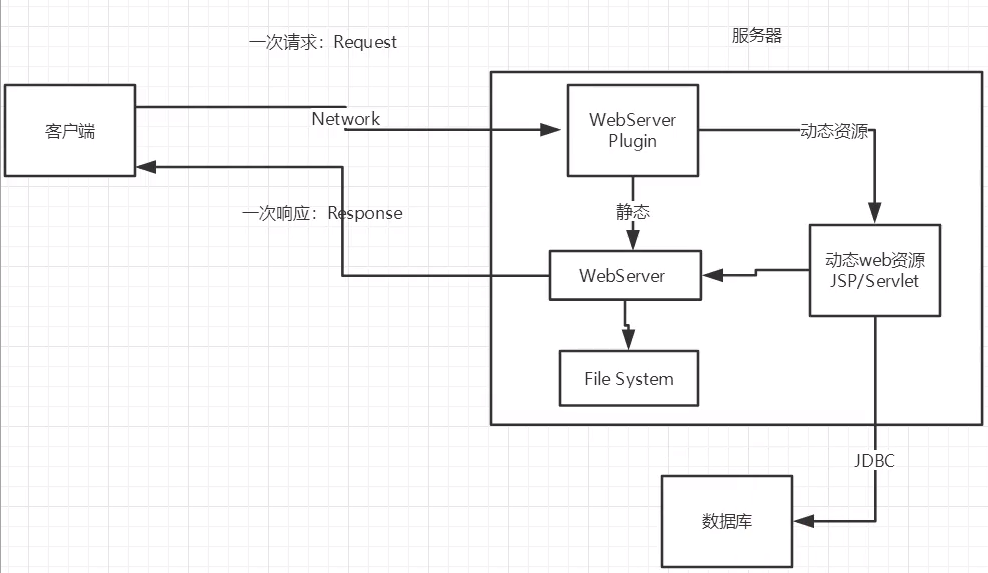
一个web程序由多个部分组成(静态web,动态web)
html,css,js
jsp,servlet
java程序
jar包
配置文件(properties)
web应用程序编写完毕后若想提供给外界访问,需要一个服务器来统一管理
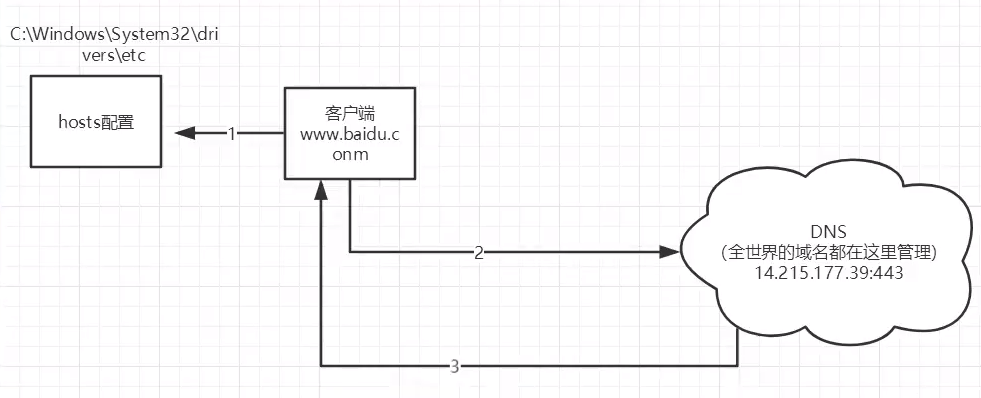
web服务器 问题:请谈谈网站是如何进行访问的?
输入一个域名,回车
检查本机C:\\Windows\System32\drivers\etc\hosts配置文件中有没有该域名映射
有:直接返回对应的ip地址,在该地址中如果有需要访问的web程序则可以直接访问
没有:去DNS服务器查找,找到则返回,找不到则返回找不到
技术讲解
ASP (微软)
国内最早流行的就是ASP
在HTML中嵌入了VB的脚本,ASP+COM
ASP开发中,一个页面都有几千行代码,代码极其混乱,维护成本高
使用C#语言
IIS
PHP
开发速度快,功能强大,跨平台,代码简单
无法承载大访问量情况(局限性)
JSP/Servlet (sun)
sun公司主推的B/S架构(B/S:浏览和服务器;C/S:客户端和服务器)
基于Java语言
可以承载三高问题的影响(高并发,高可用,高性能)
语法接近ASP,加强市场强度
web服务器 服务器是一种被动的操作,用来处理用户的一些请求和给用户一些相应信息
Tomcat Apache软件基金会下的核心项目,免费开源的轻量级服务器
基于java,使用前应配置好java环境变量
Tomcat默认端口号:8080
http默认端口号:80
https默认端口号:443
配置
/conf目录下的server.xml文件:
配置启动的端口号
配置主机名称,配置启动端口号
配置主机名称,默认网络应用存放地址
发布一个web网站
将自己写的网站放置到服务器中指定的web应用文件夹(webapps)下,就可以进行访问了
应有的结构:
1
2
3
4
5
6
7
8
9
10
11
12
13
14
--webapps =ROOT :默认Webapp目录 -kuangstudy :网站目录名 -WEB-INF -classes :java程序 -lib :web应用所依赖的jar包 -web.xml :网站配置文件 -index.html :默认的首页(或jsp文件) -static -css -style.css -js -img -......
HTTP HTTP(超文本传输协议)是一个简单的请求-响应协议,通常运行在TCP之上
文本:html,字符串……
超文本:图片,音乐,视频,定位,地图……
默认端口80
两个时代
http1.0
客户端可以与web服务器连接后,只能获取一个web资源
http1.1
客户端可以与web服务器连接后,可以获取多个web资源
http请求 客户端–发请求–>服务器
请求行
请求方式:Get,Post ,HEAD,DELETE,PUT,TRACT
Get :能够携带的参数较少,大小有限制,会在浏览器的URL地址栏显示数据内容,不安全,但高效Post :能够携带的参数没有限制,大小没有限制,不会在浏览器的URL地址栏显示数据内容,安全,但不高效
1
2
3
4
5
Request URL: https: Request Method: GET Status Code: 200 OK Remote Address: 14.215 .177.38 :443 Referrer Policy: unsafe-url
请求头
1
2
3
4
5
6
Accept: text/plain Accept-Encoding: gzip, deflate, br Accept-Language: zh-CN,zh;q=0.9 ,en;q=0.8 ,en-GB;q=0.7 ,en-US;q=0.6 cache-Control:max-age=0 Connection: keep-alive HOST:
http响应 服务器–响应–>客户端
百度的响应
响应头
1
2
3
4
5
6
7
8
9
Cache-Control: private Connection: keep-alive Content-Encoding: gzip Content-Type: text/html;charset=utf-8
响应体
一部分与请求头相同
1 2 3 4 5 6 7 8 Refresh: 刷新间隔 Location: 重定位
响应码
响应码
含义
200
请求成功
3**
请求重定向
4**
找不到资源(404)
5**
服务器代码错误(500,502)
当浏览器地址栏输入地址并回车的一瞬间到页面能够展示回来,经历了什么?
MAVEN Javaweb开发中需使用大量jar包需要手动导入,而Maven可以帮助我们导入和配置jar包
Maven是一个项目架构管理工具
核心思想:约定大于配置
配置
更改位于/conf目录下的settings.xml配置文件
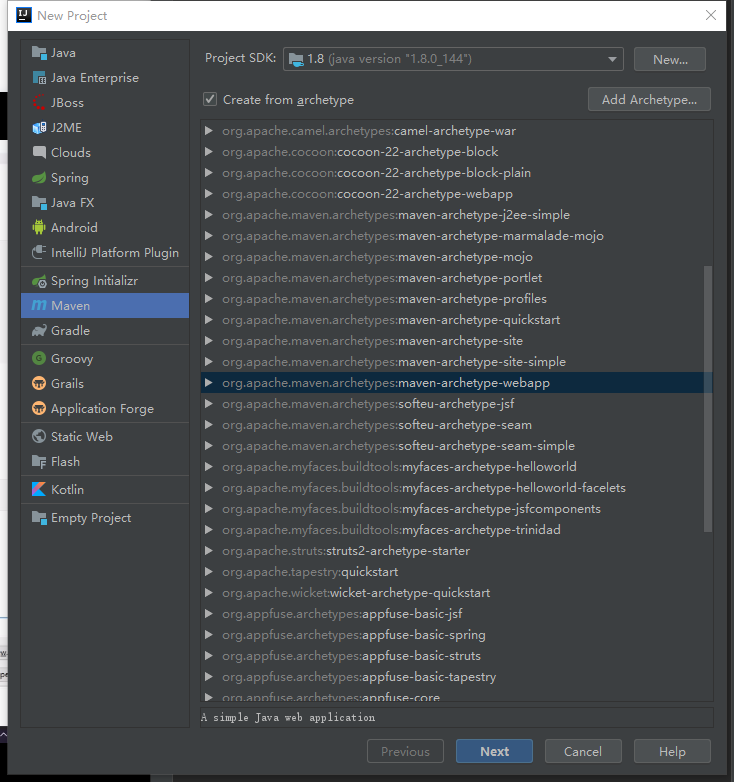
使用idea创建Maven项目
使用maven创建模板
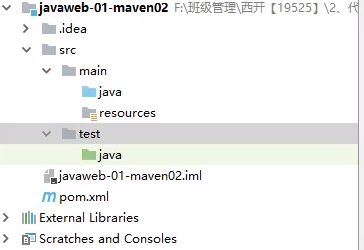
一个干净的maven项目:
maven目录:
pom.xml是maven的核心配置文件:
1 2 3 4 5 6 7 8 9 10 11 12 13 14 15 16 17 18 19 20 21 22 23 24 25 26 27 28 29 30 31 32 33 34 35 36 37 38 39 40 41 42 43 44 45 46 47 <?xml version="1.0" encoding="UTF-8"?> <project xmlns ="http://maven.apache.org/POM/4.0.0" xmlns:xsi ="http://www.w3.org/2001/XMLSchema-instance" xsi:schemaLocation ="http://maven.apache.org/POM/4.0.0 http://maven.apache.org/xsd/maven-4.0.0.xsd" > <modelVersion > 4.0.0</modelVersion > <groupId > org.example</groupId > <artifactId > Javaweb-01-maven</artifactId > <version > 1.0-SNAPSHOT</version > <packaging > war</packaging > <properties > <project.build.sourceEncoding > UTF-8</project.build.sourceEncoding > <maven.compiler.source > 1.7</maven.compiler.source > <maven.compiler.target > 1.7</maven.compiler.target > </properties > <dependencies > <dependency > <groupId > junit</groupId > <artifactId > junit</artifactId > <version > 4.11</version > <scope > test</scope > </dependency > </dependencies > <build > <finalName > Javaweb-01-maven</finalName > <pluginManagement > <plugins > ... </plugins > </pluginManagement > </build > </project >
由于约定大于配置的特性,若要导出位于标记为源码目录下的配置文件,需要在pom.xml的build头中添加配置
以下示例为添加src/main/java路径下的所有properties和xml文件
1 2 3 4 5 6 7 8 9 10 11 12 13 14 15 16 17 18 19 20 21 <build > ...... <resources > <resource > <directory > src/main/resources</directory > <includes > <include > **/*.properties</include > <include > **/*.xml</include > </includes > <filtering > true</filtering > </resource > <resource > <directory > src/main/java</directory > <includes > <include > **/*.properties</include > <include > **/*.xml</include > </includes > <filtering > true</filtering > </resource > </resources > </build >
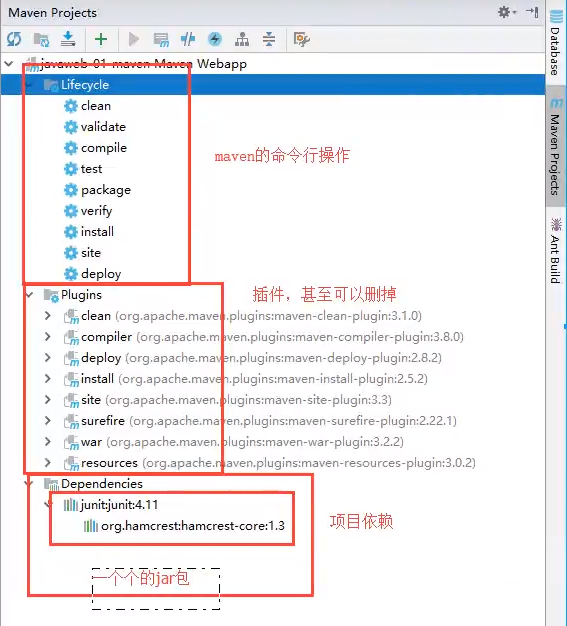
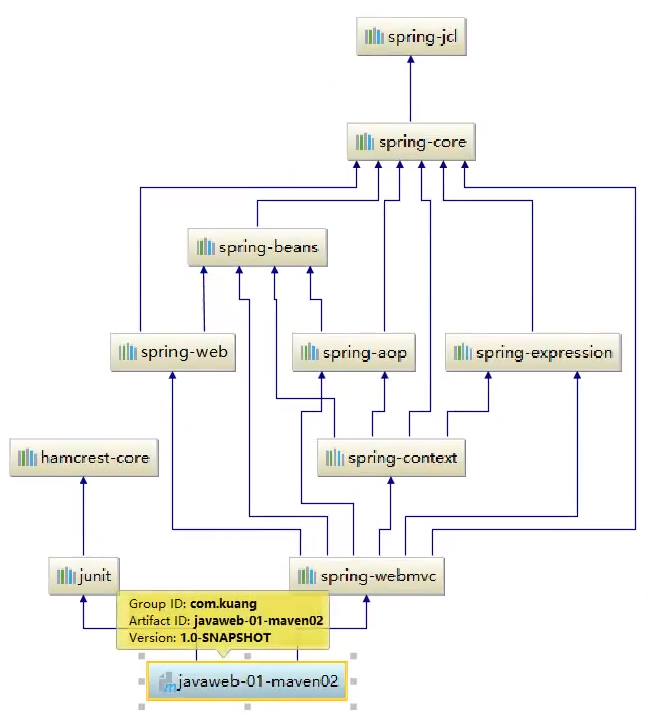
idea生成目录树,代表maven中jar包的结构体系
注意事项
Maven与idea版本不匹配问题(比如2019.3之前的版本无法使用Maven3.6.3)
Tomcat闪退:环境变量问题
替换webapp4.0版本与tomcat一致
java和resources文件夹添加标记
Servlet sun公司开发动态web的一门技术,实现了Servlet接口的Java程序称为Servlet
开发Servlet程序的两个小步骤:
编写一个类实现Servlet接口
把开发好的java类部署到web服务器中
HelloServlet servlet相关依赖
1 2 3 4 5 6 7 8 9 10 11 12 13 14 <dependency > <groupId > javax.servlet</groupId > <artifactId > javax.servlet-api</artifactId > <version > 4.0.1</version > <scope > provided</scope > </dependency > <dependency > <groupId > javax.servlet.jsp</groupId > <artifactId > jsp-api</artifactId > <version > 2.1</version > <scope > provided</scope > </dependency >
Servlet有两个默认的实现类:HttpServlet和GenericServlet
构建一个普通的Maven项目,删掉src目录,在项目中建立moudel,作为夫项目的子工程
父子项目的理解:
父项目中有
1 2 3 <modules > <module > Servlet</module > </modules >
子项目中有
1 2 3 4 5 <parent > <artifactId > Javaweb</artifactId > <groupId > org.example</groupId > <version > 1.0-SNAPSHOT</version > </parent >
父项目中的java子项目可以直接使用
Maven环境优化
编写Servlet程序
编写Sevlet映射
原因:编写的是java程序,要通过浏览器访问,而浏览器要连接web服务器,所以我们需要在web服务中注册编写的Servlet,还需给他一个浏览器能够访问的路径
1 2 3 4 5 6 7 8 9 10 <servlet > <servlet-name > hello</servlet-name > <servlet-class > com.lan5th.servlet.HelloServlet</servlet-class > </servlet > <servlet-mapping > <servlet-name > hello</servlet-name > <url-pattern > /hello</url-pattern > </servlet-mapping >
配置Tomcat(配置项目发布路径)
启动测试
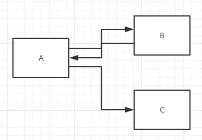
Servlet运行原理 Servlet由web服务器调用,web服务器在收到浏览器请求递交处理请求和响应
Mapping
指定一个映射路径
1 2 3 4 <servlet-mapping > <servlet-name > hello</servlet-name > <url-pattern > /hello</url-pattern > </servlet-mapping >
指定多个映射路径
1 2 3 4 5 6 7 8 9 <servlet-mapping > <servlet-name > hello</servlet-name > <url-pattern > /hello1</url-pattern > </servlet-mapping > <servlet-mapping > <servlet-name > hello</servlet-name > <url-pattern > /hello2</url-pattern > </servlet-mapping >
指定通用映射路径
1 2 3 4 5 <servlet-mapping > <servlet-name > hello</servlet-name > <url-pattern > /hello/*</url-pattern > </servlet-mapping >
默认请求路径
1 2 3 4 5 <servlet-mapping > <servlet-name > hello</servlet-name > <url-pattern > /*</url-pattern > </servlet-mapping >
实现自定义后缀映射路径
1 2 3 4 5 6 7 <servlet-mapping > <servlet-name > hello</servlet-name > <url-pattern > *.lan5th</url-pattern > </servlet-mapping >
优先级:指定了固有映射路径优先级最高,找不到就会走默认(带*的路径)的处理请求
ServletContext web容器在启动时会为每个web程序创建一个对应的ServletContext对象,代表当前的web应用
共享数据
一个Servlet中保存的数据可以在另一个Servlet中拿到
1 2 3 4 5 6 7 8 9 10 11 12 13 14 15 16 17 18 19 protected void doGet (HttpServletRequest req, HttpServletResponse resp) ServletContext context = this .getServletContext(); String username = "lan5th" ; context.setAttribute("username" ,username); System.out.println("进入HelloServlet方法" ); } protected void doGet (HttpServletRequest req, HttpServletResponse resp) throws ServletException, IOException ServletContext context = this .getServletContext(); String username = (String) context.getAttribute("username" ); resp.setContentType("text/html" ); resp.setCharacterEncoding("utf-8" ); resp.getWriter().print("名字:" +username); System.out.println("进入Getc方法" ); }
1 2 3 4 5 6 7 8 9 10 11 12 13 14 15 16 17 <servlet > <servlet-name > hello</servlet-name > <servlet-class > com.lan5th.servlet.HelloServlet</servlet-class > </servlet > <servlet-mapping > <servlet-name > hello</servlet-name > <url-pattern > /hello</url-pattern > </servlet-mapping > <servlet > <servlet-name > getc</servlet-name > <servlet-class > com.lan5th.servlet.Getc</servlet-class > </servlet > <servlet-mapping > <servlet-name > getc</servlet-name > <url-pattern > /getc</url-pattern > </servlet-mapping >
获取初始化参数
1 2 3 4 5 <context-param > <param-name > url</param-name > <param-value > lan5th.github.io</param-value > </context-param >
在Servlet中可用String s = context.getInitParameter("url");来进行特定参数的获取
请求转发
注意和重定向区别
请求
重定向
1 this .getServletContext().getRequestDispatcher("/get" ).forward(req,resp);
读取资源文件
Properties
在java目录下新建.properties
在resources目录下新建.properties
所有项目文件都打包到了同一个路径classes下,称为classpath
1 2 3 4 5 6 InputStream asStream = this .getServletContext().getResourceAsStream("/WEB-INF/classes/db.properties" ); Properties properties = new Properties(); properties.load(asStream); String user = properties.getProperty("username" ); String pwd = properties.getProperty("password" );
HttpServletResponse web服务器接收到客户端的http请求,针对这个请求分别创建一个代表请求的HttpServletRequest对象,代表相应的一个HttpServletResponse
要获取客户端请求过来的参数,查找HttpServletRequest
要给客户端相应信息,查找HttpServletResponse
简单分类 向浏览器发送数据
1 2 ServletOutputStream getOutputStream () throws IOException ;PrintWriter getWriter () throws IOException ;
向浏览器发送响应头
1 2 3 4 5 6 7 8 9 10 11 12 void setDateHeader (String var1, long var2) void addDateHeader (String var1, long var2) void setHeader (String var1, String var2) void addHeader (String var1, String var2) void setIntHeader (String var1, int var2) void addIntHeader (String var1, int var2) void setStatus (int var1) void setCharacterEncoding (String var1) void setContentLength (int var1) void setContentLengthLong (long var1) void setContentType (String var1) void setBufferSize (int var1)
响应码
1 2 3 4 5 6 7 8 9 10 11 12 13 14 15 16 17 18 19 20 21 22 23 24 25 26 27 28 29 30 31 32 33 34 35 36 37 38 39 40 41 int SC_CONTINUE = 100 ; int SC_SWITCHING_PROTOCOLS = 101 ; int SC_OK = 200 ; int SC_CREATED = 201 ; int SC_ACCEPTED = 202 ; int SC_NON_AUTHORITATIVE_INFORMATION = 203 ; int SC_NO_CONTENT = 204 ; int SC_RESET_CONTENT = 205 ; int SC_PARTIAL_CONTENT = 206 ; int SC_MULTIPLE_CHOICES = 300 ; int SC_MOVED_PERMANENTLY = 301 ; int SC_MOVED_TEMPORARILY = 302 ; int SC_FOUND = 302 ; int SC_SEE_OTHER = 303 ; int SC_NOT_MODIFIED = 304 ; int SC_USE_PROXY = 305 ; int SC_TEMPORARY_REDIRECT = 307 ; int SC_BAD_REQUEST = 400 ; int SC_UNAUTHORIZED = 401 ; int SC_PAYMENT_REQUIRED = 402 ; int SC_FORBIDDEN = 403 ; int SC_NOT_FOUND = 404 ; int SC_METHOD_NOT_ALLOWED = 405 ; int SC_NOT_ACCEPTABLE = 406 ; int SC_PROXY_AUTHENTICATION_REQUIRED = 407 ; int SC_REQUEST_TIMEOUT = 408 ; int SC_CONFLICT = 409 ; int SC_GONE = 410 ; int SC_LENGTH_REQUIRED = 411 ; int SC_PRECONDITION_FAILED = 412 ; int SC_REQUEST_ENTITY_TOO_LARGE = 413 ; int SC_REQUEST_URI_TOO_LONG = 414 ; int SC_UNSUPPORTED_MEDIA_TYPE = 415 ; int SC_REQUESTED_RANGE_NOT_SATISFIABLE = 416 ; int SC_EXPECTATION_FAILED = 417 ; int SC_INTERNAL_SERVER_ERROR = 500 ; int SC_NOT_IMPLEMENTED = 501 ; int SC_BAD_GATEWAY = 502 ; int SC_SERVICE_UNAVAILABLE = 503 ; int SC_GATEWAY_TIMEOUT = 504 ; int SC_HTTP_VERSION_NOT_SUPPORTED = 505 ;
常见应用
HttpServletRequest 代表客户端的请求,用户通过Http协议访问服务器,Http请求中的所有信息会被封装到HttpServletRequest,通过这个类的方法可以获得客户端的所有信息
常见应用
获取参数,请求转发
1 2 3 4 5 6 7 8 9 10 11 12 13 14 15 16 17 18 19 20 21 22 23 24 25 public class LoginServlet extends HttpServlet @Override protected void doGet (HttpServletRequest req, HttpServletResponse resp) throws ServletException, IOException req.setCharacterEncoding("utf-8" ); resp.setCharacterEncoding("utf-8" ); String username = req.getParameter("username" ); String password = req.getParameter("password" ); String[] hobbys = req.getParameterValues("hobbys" ); System.out.println("===========================" ); System.out.println(username); System.out.println(password); System.out.println(Arrays.toString(hobbys)); System.out.println("===========================" ); req.getRequestDispatcher("/userpage.jsp" ).forward(req,resp); } @Override protected void doPost (HttpServletRequest req, HttpServletResponse resp) throws ServletException, IOException doGet(req, resp); } }
注意:请求转发时url不会产生变化 307;重定向时地址栏会发生变化 302;
Cookie和Session 会话
定义:用户打开浏览器,点击了很多超链接,访问多个web资源,关闭浏览器的整个过程称之为会话
有状态会话
一个网站如何证明访问过?
服务端给客户端一个信件,客户端下次访问服务器带上信件就可以:Cookie
服务器登记客户端来过,下次来由服务端对其进行匹配:Session
无状态会话
Cookie 客户端技术(响应,请求)
1 2 3 4 5 6 Cookie[] cookies = req.getCookies(); cookie.getName(); cookie.getValue(); new Cookie("lastLoginTime" , System.currentTimeMillis() + "" );cookie.setMaxAge(24 *60 *60 ); resp.addCookie(cookie);
cookie一般会保存在本地用户目录下的appdata中
注意点:
一个cookie只能保存一个信息
一个web站点可以给浏览器发送多个cookie,最多存放20个cookie
cookie大小有限制:4kb
300个cookie浏览器上限
删除cookie
不设置有效期,关闭浏览器自动失效
设置cookie有效期为0
Cookie实例
1 2 3 4 5 6 7 8 9 10 11 12 13 14 15 16 17 18 19 20 21 22 23 24 25 26 27 28 29 30 31 32 33 34 35 36 37 38 39 40 @Override protected void doGet (HttpServletRequest req, HttpServletResponse resp) throws ServletException, IOException req.setCharacterEncoding("utf-8" ); resp.setCharacterEncoding("utf-8" ); resp.setContentType("text/html" ); PrintWriter out = resp.getWriter(); Cookie[] cookies = req.getCookies(); if (cookies != null ){ out.write("您上一次访问的时间是:" ); for (Cookie cookie : cookies){ Cookie cookie1 = cookie; if (cookie1.getName().equals("lastLoginTime" )){ long lastLoginTime = Long.parseLong(cookie.getValue()); Date date =new Date(lastLoginTime); out.write(date.toLocaleString()); } } }else { out.write("这是您第一次访问本站" ); } Cookie cookie2 = new Cookie("lastLoginTime" , System.currentTimeMillis() + "" ); cookie2.setMaxAge(24 *60 *60 ); resp.addCookie(cookie2); }
补充:编码解码解决乱码问题
1 2 URLEncoder.encode("中文" ,"utf-8" ); URLDecoder.decode(cookie,"utf-8" );
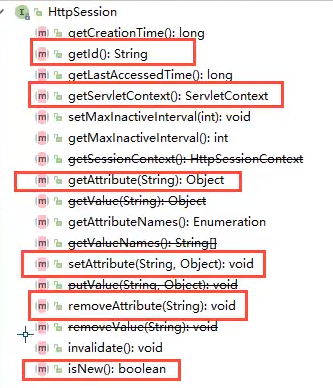
Session 服务器技术,利用这个技术可以保存用户的会话信息,把信息或数据保存在session中
服务器会给每一个用户(浏览器)创建一个Session对象
一个Session独占一个浏览器,只要浏览器没关闭session就一直存在
用户登录后,就可以访问整个网站的用户页面(保存用户、购物车等的信息)
常用函数
删除session
Session和Cookie的区别
Cookie是把用户的数据写给用户的浏览器,浏览器保存(可以保存多个)
Session把用户的数据写到用户独占的Session中,由服务器进行保存(保存重要信息,减少服务器资源的浪费)
Session由服务进行创建
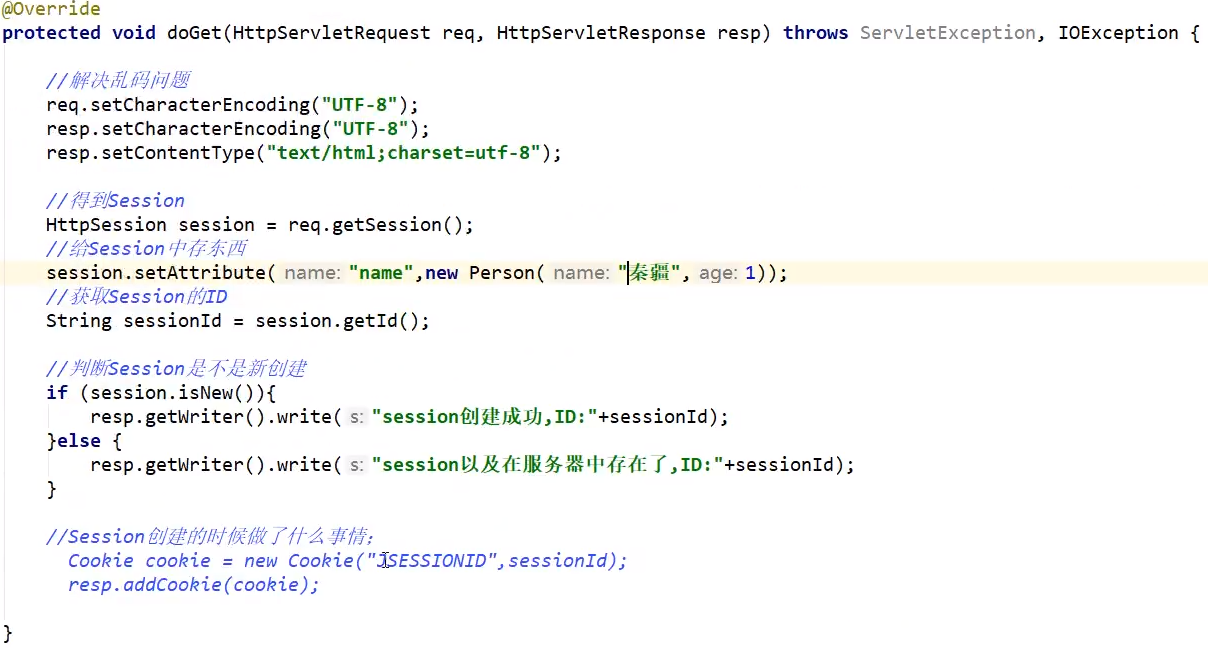
Session实例
Session使用场景
保存一个登陆用户的信息或购物车
整个网站中经常会使用的数据
JSP Java Server Page:Java服务器端页面,和Servlet一样用于动态web技术
特点:
写JSP就像在写HTML
区别:
HTML只给用户提供静态数据
JSP页面中可以嵌入Java代码,为用户提供动态数据
JSP原理
服务器内部工作
tomcat目录下的work目录
在idea中使用Tomcat会在idea的tomcat中生产一个work目录
在idea中的tomcat的目录中可以找到一个index_jsp.java文件
浏览器向服务器发送请求,不管访问什么资源,都是在访问Servlet
jsp类继承了HttpJspBase类,而HttpJspBase类继承了HttpServlet类
JSP本质上就是一个Servlet!!!
1 2 3 4 5 6 public void _jspInit () public void _jspDestroy () public void _jspService (HttpServletRequest request, HttpServletResponse response)
判断请求
内置对象
1 2 3 4 5 6 7 8 final javax.servlet.jsp.PageContext pageContext; javax.servlet.http.HttpSession session = null ; final javax.servlet.ServletContext application; final javax.servlet.ServletConfig config; javax.servlet.jsp.JspWriter out = null ; final java.lang.Object page = this ; HttpServletRequest request; HttpServletResponse response;
输出页面前增加的代码
1 2 3 4 5 6 7 8 response.setContentType("text/html; charset=UTF-8" ); pageContext = _jspxFactory.getPageContext(this , request, response, null , false , 8192 , true ); _jspx_page_context = pageContext; application = pageContext.getServletContext(); config = pageContext.getServletConfig(); out = pageContext.getOut(); _jspx_out = out;
以上对象可以在JSP页面中直接使用
用户访问JSP页面示意图
JSP页面中,只要是Java代码就会原封不动的输出,如果是Html代码就会被转换为out.write("")的格式输出到前端
JSP语法 JSP作为Java技术的一种应用,有一些自己扩充的语法,而Java的所有语法都支持
JSP表达式 1 2 3 4 <%--JSP表达式,用来将程序的输出输出到客户端 格式:<%= 变量或表达式%> --%> <%= new java.util.Date()%>
JSP脚本片段 1 2 3 4 5 6 7 8 <%--JSP脚本片段--%> <% int sum = 0 ;for (int i = 1 ; i<100 ; i++){ sum +=i; } out.write("<h1>Sum=" +sum+"</h1>" ); %>
JSP声明 1 2 3 4 5 6 7 8 9 10 11 <%! static { System.out.println("Loading Servlet!" ); } private int Gvar = 0 ; public void demo () System.out.println("进入了demo方法" ); } %>
JSP声明会被编译到JSP生成的Java的类中,而JSP表达式和脚本片段会被生成到_jspService方法中
JSP指令 1 2 3 4 5 <%--格式: <%@ page args...%> --%> <%@ page contentType="text/html;charset=UTF-8" language="java" %> <%@ page isErrorPage="true" %>
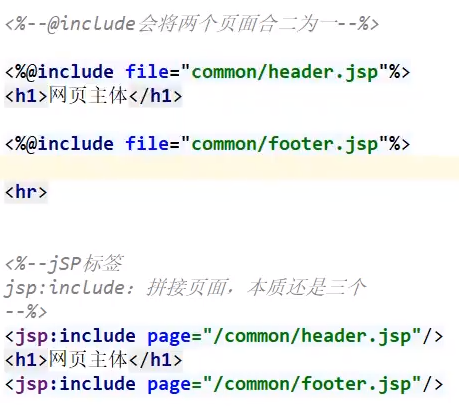
用多个jsp合成页面(比如网站的上下边框):
JSP不会再客户端显示,而Html注释会显示在客户端源文件中
内置对象
PageContext
Request
Response
Session
Application[ServletContext]
config[ServletConfig]
out
page
exception
常用对象的作用域 (可以设置第三个属性自定义作用域)
PageContext实现转发
JSP、JSTL标签、EL表达式 1 2 3 4 5 6 7 8 9 10 11 12 13 14 <dependency > <groupId > jstl</groupId > <artifactId > jstl</artifactId > <version > 1.2</version > <scope > provided</scope > </dependency > <dependency > <groupId > taglibs</groupId > <artifactId > standard</artifactId > <version > 1.1.2</version > <scope > provided</scope > </dependency >
EL表达式 :${}
JSP标签
1 2 3 4 5 6 <%--拼接html页面--%> <jsp:include page="" /> <%--请求转发--%> <jsp:forward page="" /> <%--设置参数--%> <jsp:param name="name" value="lan5th" />
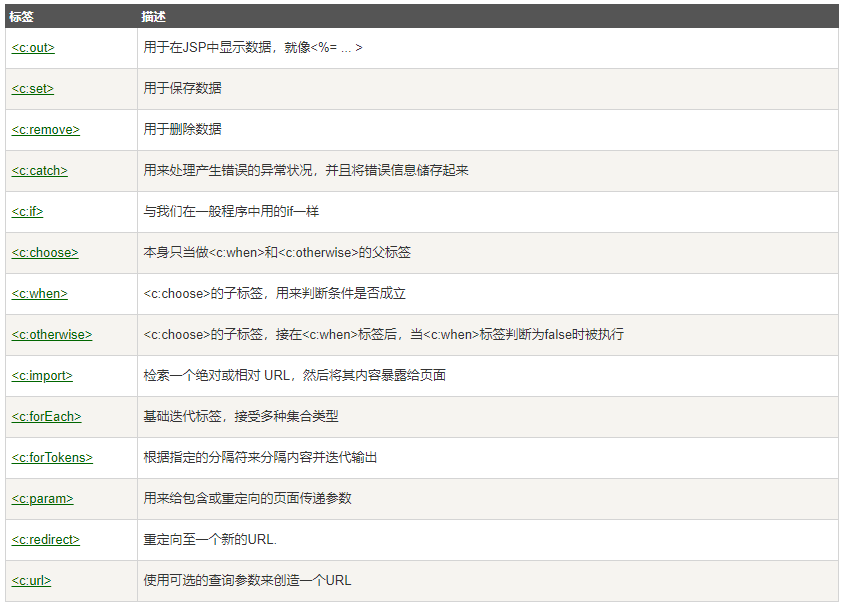
JSTL标签
JSP文件头加入如下代码
1 <%@taglib prefix="c" uri="http://java.sun.com/jsp/jstl/core" %>
JSTL标签库的使用就是为了弥补Html标签的不足,自定义了许多标签,功能和java代码一样
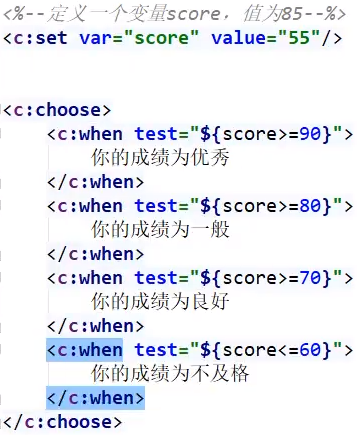
核心标签
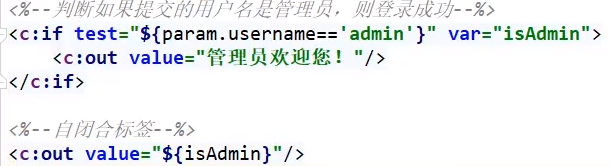
条件语句
选择语句
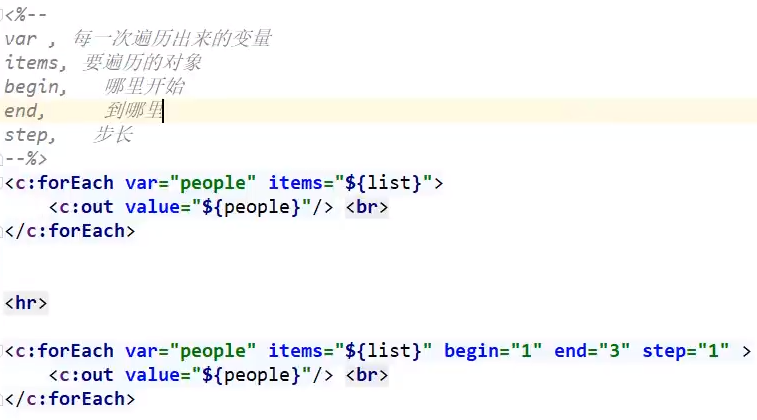
循环语句
此外格式化标签 /SQL标签 /XML标签 加以了解
Javabean 实体类
JavaBean特有写法
必须要有一个无参构造
属性必须私有化
必须有get/set方法
一般用来和数据库的字段作映射:ORM(对象关系映射)
people表
id
name
age
address
1
user1
17
A市
2
user2
18
B市
3
user3
19
C市
对应实体类People
1 2 3 4 5 6 7 8 9 10 11 12 class People private int id; private String name; private int id; private String address; } class A new People(1 ,user1,17 ,A市); new People(2 ,user2,18 ,B市); new People(3 ,user3,19 ,C市); }
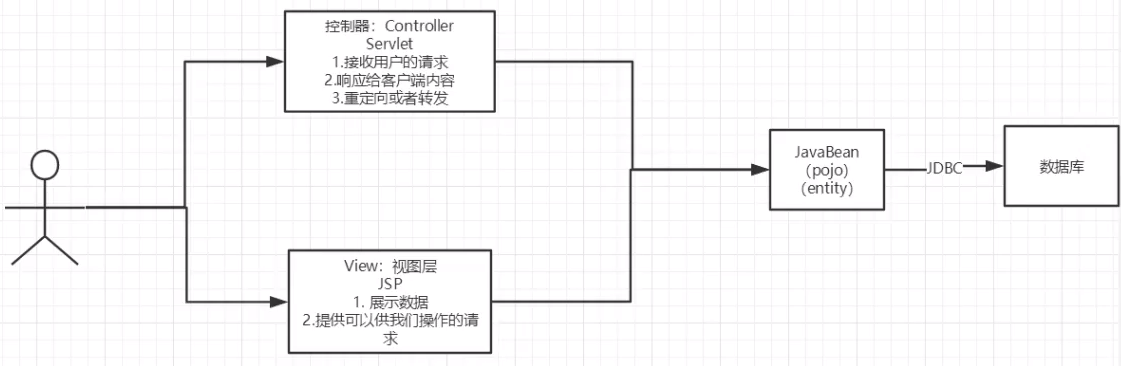
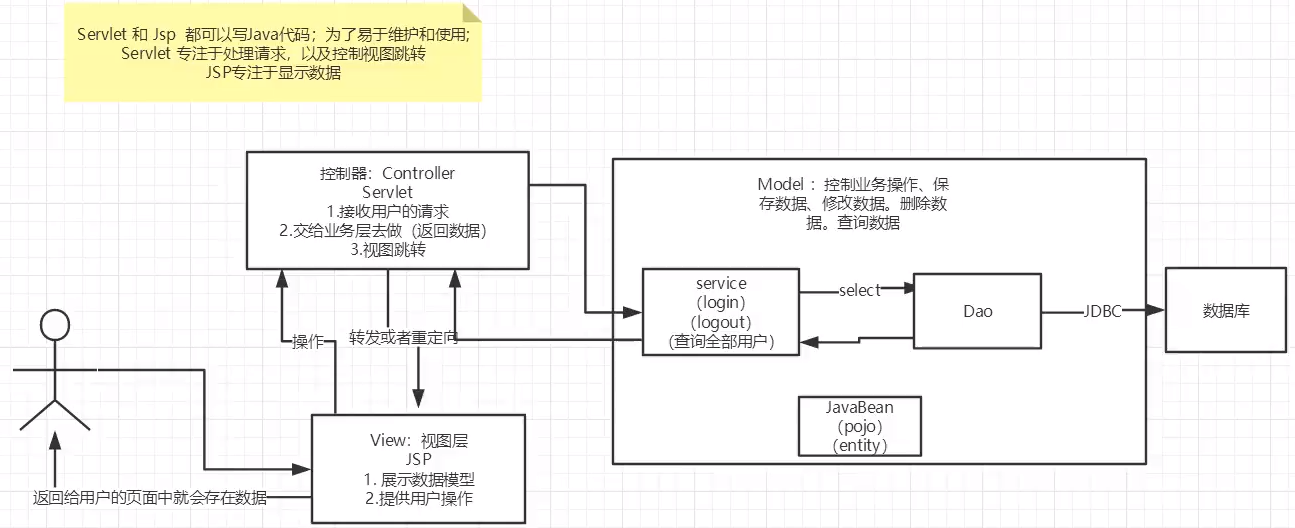
MVC三层架构 什么是MVC:Model View Controller 模型视图控制器
早期结构
servlet代码中需要处理请求,响应,视图跳转,处理JDBC,处理业务代码,处理逻辑代码
弊端:程序十分臃肿,不利于维护
MVC架构
Model
业务处理:业务逻辑(Service)
数据持久层:CRUD(Dao)
View
Controller(Servlet)
接收用户请求(req,请求参数,session信息等)
交给业务层对应的处理代码
控制视图的跳转
登录过程示例:
登录-接受用户的登录请求->处理用户的请求(获取用户登录的参数)->交给业务层处理登录业务(判断用户名和密码正确,事务)->Dao层查询用户名和密码是否正确
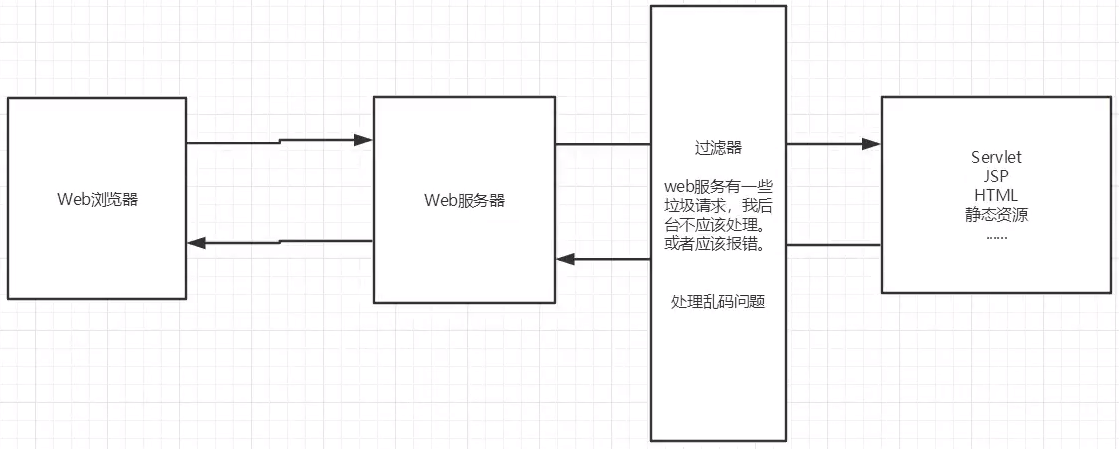
Filter&Listener Filter 用来过滤网站数据
mysql-connector-java依赖(注意要对应版本)
1 2 3 4 5 6 <dependency > <groupId > mysql</groupId > <artifactId > mysql-connector-java</artifactId > <version > 5.1.31</version > </dependency >
注意实现类的包名
1 2 3 4 5 6 7 8 9 10 11 12 13 14 15 16 17 18 19 20 21 22 23 24 25 26 27 public class CharacterEncodingFilter implements Filter public void init (FilterConfig filterConfig) throws ServletException System.out.println("Filter初始化" ); } public void doFilter (ServletRequest servletRequest, ServletResponse servletResponse, FilterChain filterChain) throws IOException, ServletException servletRequest.setCharacterEncoding("utf-8" ); servletResponse.setCharacterEncoding("utf-8" ); servletResponse.setContentType("text/html;charset=UTF-8" ); System.out.println("Filter执行前" ); filterChain.doFilter(servletRequest,servletResponse); System.out.println("Filter执行后" ); } public void destroy () System.out.println("Filter销毁" ); } }
同servlet一样,需要在web.xml中配置路径
1 2 3 4 5 6 7 8 <filter > <filter-name > CharacterEncodingFilter</filter-name > <filter-class > com.lan5th.filter.CharacterEncodingFilter</filter-class > </filter > <filter-mapping > <filter-name > CharacterEncodingFilter</filter-name > <url-pattern > /*</url-pattern > </filter-mapping >
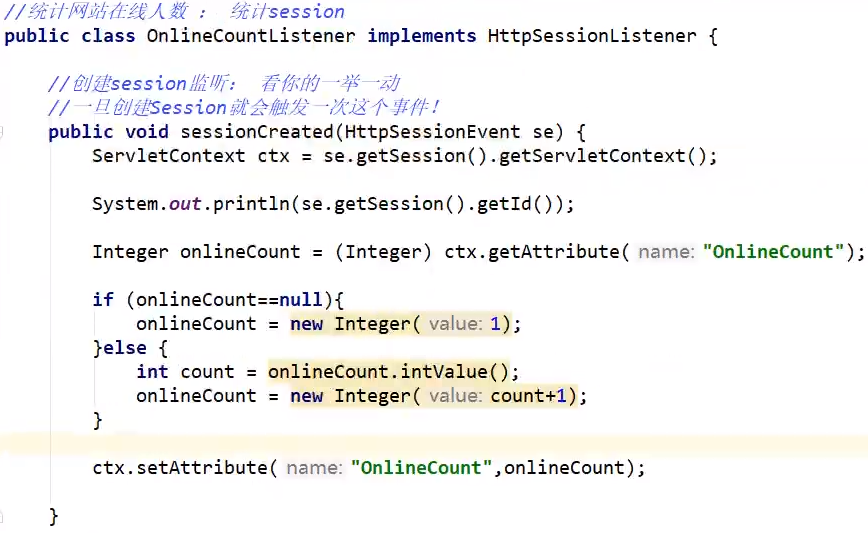
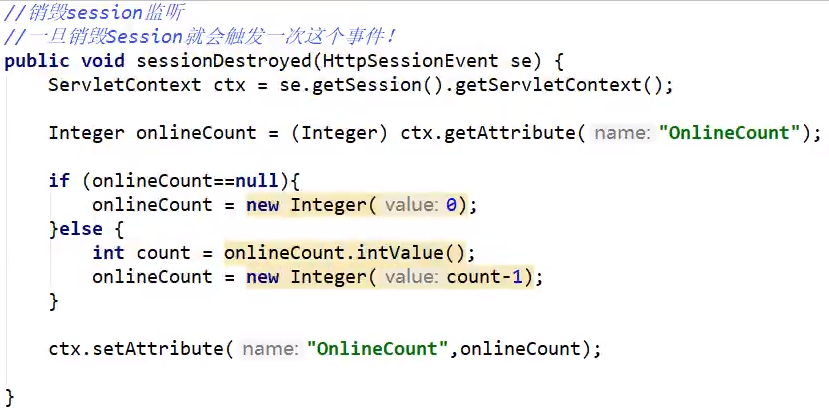
Listener 监听器在GUI编程中经常使用
实现监听器类并重写方法
实现网站在线人数监听
配置路径
1 2 3 <listener > <listener-class > com.lan5th.listener.listnerDemo</listener-class > </listener >
常见应用 用户登陆之后才能进入主页,未登录状态不能进入主页
用户登录后向Session中放入用户数据
进入主页时要判断用户是否登录(在过滤器中实现)
1 2 3 4 5 6 7 8 HttpServletRequest request = (HttpServletRequest) req; HttpServletResponse response = (HttpServletResponse) resp; if (request.getSession().getAttribute(Constant.USER_SESSION)==null ){ response.send("/error.jsp" ); } chain.doFilter(requset.reponse);
具体功能实例 下载/上传文件实例 下载文件 具体方法
1 2 3 4 5 6 7 8 9 10 11 12 13 14 15 16 17 18 19 20 21 22 23 24 25 26 27 28 29 30 31 public class ServletDown extends HttpServlet @Override protected void doGet (HttpServletRequest req, HttpServletResponse resp) throws IOException String realPath = "D:\\code\\code-resp\\projects\\Javaweb\\Servlet\\target\\classes\\test.png" ; System.out.println("下载文件路径" +realPath); String filename = realPath.substring(realPath.lastIndexOf("\\" ) + 1 ); resp.setHeader("Content-Disposition" ,"attachment;filename=" + URLEncoder.encode(filename,"UTF-8" )); FileInputStream in = new FileInputStream(realPath); int len = 0 ; byte [] buffer = new byte [1024 ]; ServletOutputStream out = resp.getOutputStream(); while (in.read(buffer)>0 ){ out.write(buffer,0 ,len); } in.close(); out.close(); } @Override protected void doPost (HttpServletRequest req, HttpServletResponse resp) throws ServletException, IOException super .doGet(req, resp); } }
上传文件 注意点
预先导包
1 2 3 4 5 6 7 8 9 10 <dependency > <groupId > commons-io</groupId > <artifactId > commons-io</artifactId > <version > 2.6</version > </dependency > <dependency > <groupId > commons-fileupload</groupId > <artifactId > commons-fileupload</artifactId > <version > 1.4</version > </dependency >
具体方法
前端页面表单增添enctype属性
1 2 3 4 5 6 <form action="${pageContext.request.contextPath}/fileUpload.do" enctype="multipart/form-data" method="post" > 上传者:<input type="text" name="username" ><br> <input type="file" name="file1" ><br> <input type="file" name="file2" ><br> <input type="submit" > </form>
FileUploadServlet
1 2 3 4 5 6 7 8 9 10 11 12 13 14 15 16 17 18 19 20 21 22 23 24 25 26 27 28 29 30 31 32 33 34 35 36 37 38 39 40 41 42 43 44 45 46 47 48 49 50 51 52 53 54 55 56 57 58 59 60 61 62 63 64 65 66 67 68 69 70 71 72 73 74 75 76 77 78 79 80 81 82 83 84 85 86 87 88 89 90 91 92 93 94 95 96 97 98 99 100 101 102 103 104 105 106 107 108 109 110 111 112 113 114 115 116 117 118 119 120 121 122 123 124 125 126 public class FileUploadServlet extends HttpServlet @Override protected void doGet (HttpServletRequest req, HttpServletResponse resp) throws ServletException, IOException System.out.println("进入目标Servlet" ); if (!ServletFileUpload.isMultipartContent(req)){ System.out.println("直接return" ); return ; } try { String savePath = this .getServletContext().getRealPath("/WEB-INF/upload" ); File saveFile = new File(savePath); if (!saveFile.exists()){ saveFile.mkdir(); } String tmpPath = this .getServletContext().getRealPath("/WEB-INF/tmp" ); File file = new File(tmpPath); if (!file.exists()){ file.mkdir(); } DiskFileItemFactory factory = getDiskFileItemFactory(file); ServletFileUpload upload = getServletFileUpload(factory); String msg = uploadParseRequest(upload,req,savePath); req.setAttribute("msg" ,msg); req.getRequestDispatcher("info.jsp" ).forward(req,resp); } catch (FileUploadException e) { e.printStackTrace(); } } @Override protected void doPost (HttpServletRequest req, HttpServletResponse resp) throws ServletException, IOException doGet(req, resp); } protected static DiskFileItemFactory getDiskFileItemFactory (File file) DiskFileItemFactory factory = new DiskFileItemFactory(); factory.setSizeThreshold(10240 *1024 ); factory.setRepository(file); return factory; } protected static ServletFileUpload getServletFileUpload (DiskFileItemFactory factory) ServletFileUpload upload = new ServletFileUpload(factory); upload.setProgressListener(new ProgressListener() { public void update (long pBytesRead, long pContentLength, int pItems) float degree = (float )(Math.round((float )pBytesRead/(float ) pContentLength*1000 ))/10 ; System.out.println("总大小:" +pContentLength+"进度:" +degree+"%" ); } }); upload.setHeaderEncoding("UTF-8" ); return upload; } protected static String uploadParseRequest (ServletFileUpload upload,HttpServletRequest req, String uploadPath) throws FileUploadException, IOException String msg = "" ; List<FileItem> fileItems = upload.parseRequest(req); for (FileItem fileItem:fileItems){ if (fileItem.isFormField()){ String name = fileItem.getFieldName(); String value = fileItem.getString("UTF-8" ); System.out.println(name+":" +value); }else { String uploadFileName = fileItem.getName(); System.out.println("上传的文件名:" +uploadFileName); if (uploadFileName.trim().equals("" )||uploadFileName==null ){ continue ; } String fileName = uploadFileName.substring(uploadFileName.lastIndexOf("/" )+1 ); String fileExName = uploadFileName.substring(uploadFileName.lastIndexOf("." )+1 ); System.out.println("文件信息[文件名:" +fileName+"---文件类型" +fileExName+"]" ); String uuidPath = UUID.randomUUID().toString(); String realPath = uploadPath+"/" +uuidPath; File realPathFile = new File(realPath); if (!realPathFile.exists()){ realPathFile.mkdir(); } InputStream inputStream = fileItem.getInputStream(); FileOutputStream fos = new FileOutputStream(realPath + "/" + fileName); System.out.println(realPath + "/" + fileName); byte [] buffer = new byte [1024 *1024 ]; int len = 0 ; while ((len=inputStream.read(buffer))>0 ){ fos.write(buffer,0 ,len); } fos.close(); inputStream.close(); msg = "文件上传成功" ; fileItem.delete();; } } return msg; } }
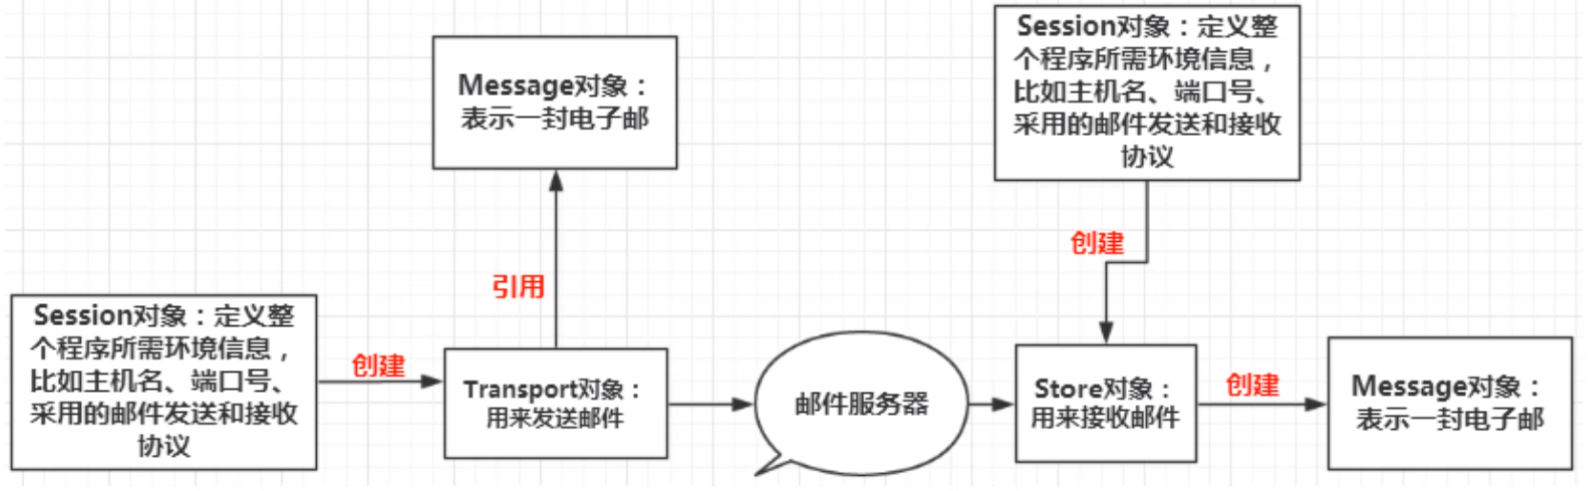
邮件功能
1 2 3 4 5 6 7 8 9 10 <dependency > <groupId > javax.mail</groupId > <artifactId > mail</artifactId > <version > 1.4.7</version > </dependency > <dependency > <groupId > javax.activation</groupId > <artifactId > activation</artifactId > <version > 1.1.1</version > </dependency >
JavaMail包支持一些常用的邮件协议,如SMTP,POP3,IMAP,MIME等
注意过程中的session和前面所用到的session不同,适用于具体的环境
普通邮件 注:不一定需要在Servlet中实现,普通的java类也能进行实现
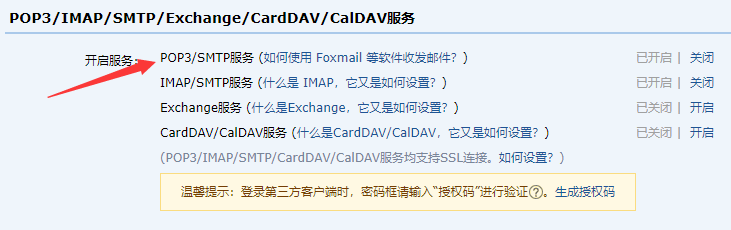
若使用qq邮箱,首先在设置里开启POP3/SMTP服务并获取授权码
1 2 3 4 5 6 7 8 9 10 11 12 13 14 15 16 17 18 19 20 21 22 23 24 25 26 27 28 29 30 31 32 33 34 35 36 37 38 39 40 41 42 43 44 45 46 47 48 49 50 51 52 53 54 public class Mail public static void main (String[] args) throws Exception Properties prop = new Properties(); prop.setProperty("mail.host" ,"smtp.qq.com" ); prop.setProperty("mail.transport.protocol" ,"smtp" ); prop.setProperty("mail.smtp.auth" ,"true" ); MailSSLSocketFactory sf = new MailSSLSocketFactory(); sf.setTrustAllHosts(true ); prop.put("mail.smtp.ssl.enable" ,"true" ); prop.put("mail.smtp.ssl.socketFactory" , sf); Session session = Session.getDefaultInstance(prop, new Authenticator() { @Override protected PasswordAuthentication getPasswordAuthentication () return new PasswordAuthentication("576247105@qq.com" ,"************" ); } }); session.setDebug(true ); Transport ts = session.getTransport(); ts.connect("smtp.qq.com" ,"576247105@qq.com" ,"************" ); MimeMessage message = new MimeMessage(session); message.setFrom(new InternetAddress("576247105@qq.com" )); message.setRecipient(Message.RecipientType.TO, new InternetAddress("576247105@qq.com" )); message.setSubject("测试邮件" ); message.setContent("<h1 style='color:red'>测试邮件文本</h1>" ,"text/html;charset=utf-8" ); ts.sendMessage(message,message.getAllRecipients()); ts.close(); } }
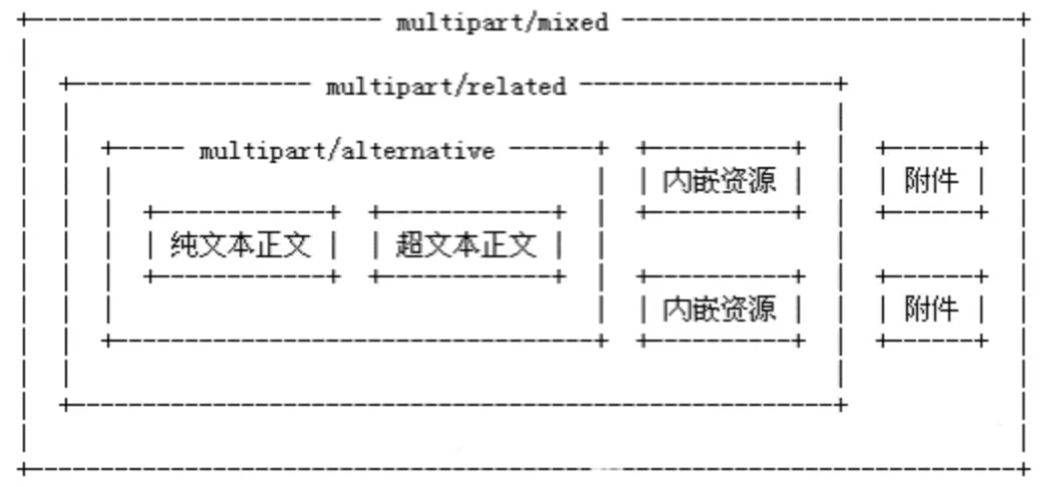
带附件的邮件
1 2 3 4 5 6 7 8 9 10 11 12 13 14 15 16 17 18 19 20 21 22 23 24 25 26 27 28 29 30 31 32 33 34 35 36 37 38 39 40 41 42 43 44 45 46 47 48 49 50 51 52 53 54 55 public void sendMimeEmail () throws Exception Properties prop = new Properties(); prop.setProperty("mail.host" ,"smtp.qq.com" ); prop.setProperty("mail.transport.protocol" ,"smtp" ); prop.setProperty("mail.smtp.auth" ,"true" ); MailSSLSocketFactory sf = new MailSSLSocketFactory(); sf.setTrustAllHosts(true ); prop.put("mail.smtp.ssl.enable" ,"true" ); prop.put("mail.smtp.ssl.socketFactory" , sf); Session session = Session.getDefaultInstance(prop, new Authenticator() { @Override protected PasswordAuthentication getPasswordAuthentication () return new PasswordAuthentication("576247105@qq.com" ,"************" ); } }); session.setDebug(true ); Transport ts = session.getTransport(); ts.connect("smtp.qq.com" ,"576247105@qq.com" ,"************" ); MimeMessage message = new MimeMessage(session); message.setFrom(new InternetAddress("576247105@qq.com" )); message.setRecipient(Message.RecipientType.TO, new InternetAddress("576247105@qq.com" )); message.setSubject("测试邮件" ); MimeBodyPart image = new MimeBodyPart(); DataHandler dataHandler = new DataHandler(new FileDataSource("D:\\code\\code-resp\\projects\\Javaweb\\Servlet\\src\\main\\resources\\image\\test.png" )); image.setDataHandler(dataHandler); image.setContentID("bz.jpg" ); MimeBodyPart text = new MimeBodyPart(); text.setContent("这是一封带图片的邮件<img src='cid:bz.jpg'>" ,"text/html;charset=utf-8" ); MimeMultipart mimeMultipart = new MimeMultipart(); mimeMultipart.addBodyPart(text); mimeMultipart.addBodyPart(image); mimeMultipart.setSubType("related" ); message.setContent(mimeMultipart); message.saveChanges(); ts.sendMessage(message,message.getAllRecipients()); ts.close(); }
在发送邮件时使用多线程提高用户体验
1 2 3 4 5 6 7 8 9 10 11 12 13 14 15 16 17 18 19 public class Demo extends HttpServlet @Override protected void doGet (HttpServletRequest req, HttpServletResponse resp) throws ServletException, IOException User user = new User(username,password,email); SendMail send = new SendMail(user); send.start(); req.setAttribute("messege" ,"显示信息" ); req.getRequestDispatcher("info.jsp" ).forward(req,resp); } @Override protected void doPost (HttpServletRequest req, HttpServletResponse resp) throws ServletException, IOException doGet(req,resp); } }
1 2 3 4 5 6 public class SendMail extends Thread public void run () } }