ssm:mybatis+Spring+SpringMVC
SpringMVC特点
轻量级,简单易学
高效,基于响应请求的MVC框架
与Spring兼容性高,无缝结合
约定大于配置
功能强大:Restful,数据验证,格式化,本地化,主题
依赖
1 2 3 4 5 6 7 8 9 10 11 12 13 14 15 16 17 18 19 20 21 22 23 24 25 26 27 28 29 30 31 32 33 <dependencies > <dependency > <groupId > junit</groupId > <artifactId > junit</artifactId > <version > 4.12</version > <scope > test</scope > </dependency > <dependency > <groupId > org.springframework</groupId > <artifactId > spring-webmvc</artifactId > <version > 5.2.12.RELEASE</version > </dependency > <dependency > <groupId > javax.servlet</groupId > <artifactId > servlet-api</artifactId > <version > 2.5</version > </dependency > <dependency > <groupId > javax.servlet.jsp</groupId > <artifactId > jsp-api</artifactId > <version > 2.2</version > </dependency > <dependency > <groupId > javax.servlet</groupId > <artifactId > jstl</artifactId > <version > 1.2</version > </dependency > </dependencies >
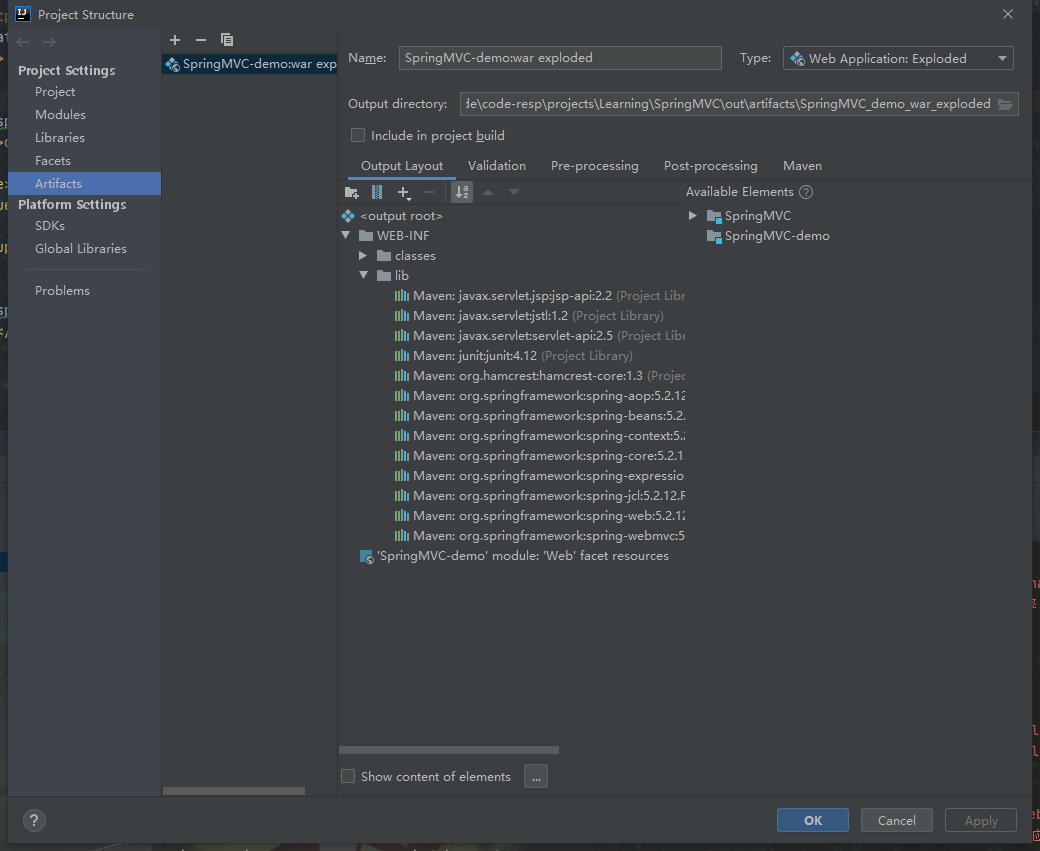
HelloSpringMVC 遇到404问题时可能是Tomcat没有成功导入jar包,需要在在Project Structure里手动添加
通过配置文件实现(不推荐,为了了解原理而学习)
缺点:
一个Controller实现类只能编写一个方法,多个方法则需要定义多个Controller,较为麻烦
web配置文件web.xml
1
2
3
4
5
6
7
8
9
10
11
12
13
14
15
16
17
18
19
20
21
22
23
24
25
<?xml version="1.0" encoding="UTF-8"?> <web-app xmlns ="http://xmlns.jcp.org/xml/ns/javaee" xmlns:xsi ="http://www.w3.org/2001/XMLSchema-instance" xsi:schemaLocation ="http://xmlns.jcp.org/xml/ns/javaee http://xmlns.jcp.org/xml/ns/javaee/web-app_4_0.xsd" version ="4.0" > <servlet > <servlet-name > springmvc</servlet-name > \ <servlet-class > org.springframework.web.servlet.DispatcherServlet</servlet-class > <init-param > <param-name > contextConfigLocation</param-name > <param-value > classpath:springmvc-servlet.xml</param-value > </init-param > <load-on-startup > 1</load-on-startup > </servlet > <servlet-mapping > <servlet-name > springmvc</servlet-name > <url-pattern > /</url-pattern > </servlet-mapping > </web-app >
控制器HelloController.java代替之前的servlet
1
2
3
4
5
6
7
8
9
public class HelloController implements Controller public ModelAndView handleRequest (HttpServletRequest httpServletRequest, HttpServletResponse httpServletResponse) throws Exception ModelAndView mv = new ModelAndView(); mv.addObject("msg" ,"HelloSpringMVC" ); mv.setViewName("hello" ); return mv; } }
Spring配置文件springmvc-servlet.xml
1
2
3
4
5
6
7
8
9
10
11
12
13
14
15
16
17
18
19
20
21
22
23
24
25
26
27
28
29
<?xml version="1.0" encoding="UTF-8"?> <beans xmlns ="http://www.springframework.org/schema/beans" xmlns:xsi ="http://www.w3.org/2001/XMLSchema-instance" xsi:schemaLocation ="http://www.springframework.org/schema/beans https://www.springframework.org/schema/beans/spring-beans.xsd" > <bean class ="org.springframework.web.servlet.view.InternalResourceViewResolver" id ="internalResourceViewResolver" > <property name ="prefix" value ="/WEB-INF/jsp/" /> <property name ="suffix" value =".jsp" /> </bean > <bean class ="com.lan5th.controller.HelloController" id ="/hello" /> </beans >
测试页面hello.jsp
1
2
3
4
5
6
7
8
9
<%@ page contentType="text/html;charset=UTF-8" language="java" %> <html> <head> <title>hello</title> </head> <body> ${msg} </body> </html>
通过注解实现
web.xml和hello.jsp文件与之前一样
HelloController.java
1 2 3 4 5 6 7 8 9 10 11 12 13 14 15 @Controller @RequestMapping("/hello") public class HelloController @RequestMapping("/h1") public String hello (Model model) model.addAttribute("msg" ,"Hello,SpringMVC-annotation" ); return "hello" ; } }
springmvc-servlet.xml
1
2
3
4
5
6
7
8
9
10
11
12
13
14
15
16
17
18
19
20
21
22
23
24
25
26
27
28
<?xml version="1.0" encoding="UTF-8"?> <beans xmlns ="http://www.springframework.org/schema/beans" xmlns:xsi ="http://www.w3.org/2001/XMLSchema-instance" xmlns:context ="http://www.springframework.org/schema/context" xmlns:mvc ="http://www.springframework.org/schema/mvc" xsi:schemaLocation ="http://www.springframework.org/schema/beans https://www.springframework.org/schema/beans/spring-beans.xsd http://www.springframework.org/schema/context https://www.springframework.org/schema/context/spring-context.xsd http://www.springframework.org/schema/mvc https://www.springframework.org/schema/mvc/spring-mvc.xsd" > <context:component-scan base-package ="com.lan5th.controller" /> <mvc:default-servlet-handler /> <mvc:annotation-driven /> <bean class ="org.springframework.web.servlet.view.InternalResourceViewResolver" id ="internalResourceViewResolver" > <property name ="prefix" value ="/WEB-INF/jsp/" /> <property name ="suffix" value =".jsp" /> </bean > </beans >
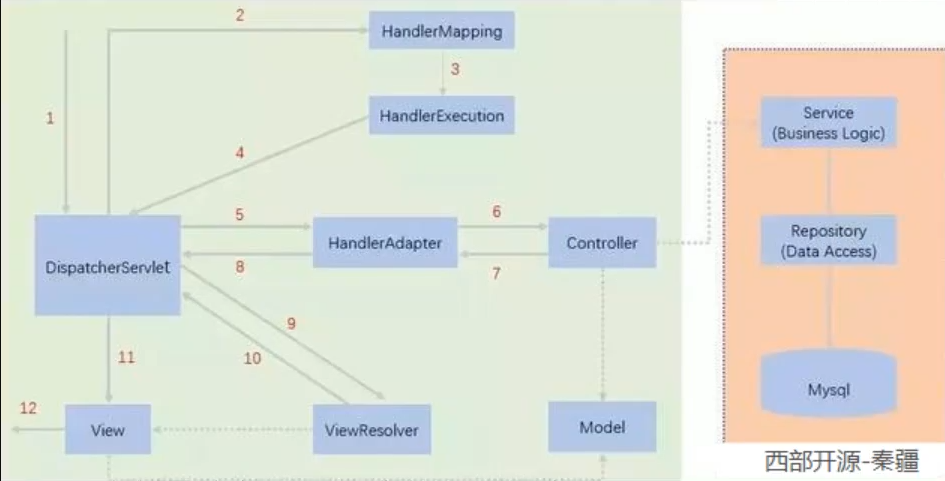
SpringMVC执行原理 Spring的web框架围绕DispatcherServlet设计,这个类可以将请求分发到不同的处理器,Spring2.5之后可以采用基于注解的Controller声明方式
实线由SpringMVC自动实现的部分,虚线是我们需要手动编写代码实现的部分
DispatcherServlet表示前置控制器,是SpringMVC的控制中心,用户发出请求,DispatcherServlet接收并拦截请求
HandlerMapping处理器映射,由DispatcherServlet自动调用,HandlerMapping根据请求url查找Handler
HandlerExecution表示具体的Handler,主要作用是根据url查找控制器
HandlerExecution将解析后的信息传递给DispatcherServlet,如解析控制器映射等
HandlerAdapter表示处理器适配器,按照特定的规则去执行Handler
Handler让具体的Controller执行
Controller将具体的执行信息返回给HandlerAdapter,如ModelAndView
HandlerAdapter将ModelAndView传给DispatcherServlet
DispatcherServlet调用ViewResolver(视图解析器)来解析逻辑视图名
ViewResolver将逻辑视图名传给DispatcherServlet
DispatcherServlet根据ViewResolver解析结果调用具体视图
将视图呈现给用户
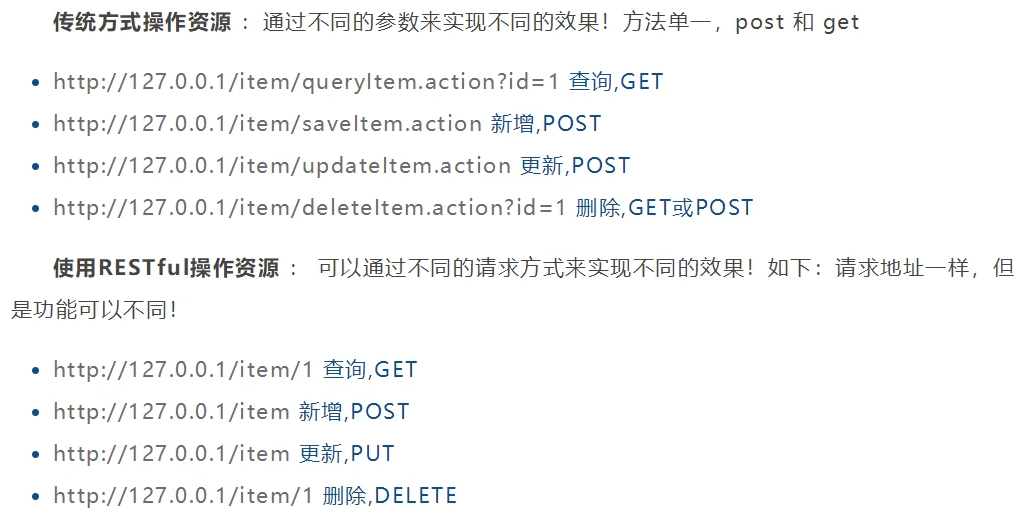
RestFul风格
通过一个地址可以实现多个方法,且用不同的请求方法请求这个地址会有不同的效果
特点:
简洁(url地址)
高效
安全(不会暴露服务器中的参数名)
RestFulController.java
1
2
3
4
5
6
7
8
9
10
11
12
13
14
15
16
17
18
19
20
21
22
23
24
25
26
27
28
29
@Controller public class RestFulController @RequestMapping("/add") public String Origin (int a, int b, Model model) int res = a + b; model.addAttribute("msg" , "结果1为" + res); return "hello" ; } @RequestMapping("/add/{a}/{b}") public String RestFulGet (@PathVariable int a, @PathVariable int b, Model model) int res = a + b; model.addAttribute("msg" , "结果2为" + res); return "hello" ; } @PostMapping("/add") public String Post (Model model) model.addAttribute("msg" , "输出结果3" ); return "hello" ; } }
转发与重定向
传给视图解析器默认转发
在我们之前使用model向视图解析器传参时默认是通过转发实现的
1
2
3
4
5
@RequestMapping("/h1") public String hello1 (Model model) model.addAttribute("msg" , "hello1" ); return "hello" ; }
使用Controller注解时,可以给函数传入参数请求和响应
使用这种方式时我们写函数就可以像最开始写Servlet那样进行不同操作,如rsp.getWriter().println()
1
2
3
4
5
6
7
8
9
10
11
@RequestMapping("/h2") public void hello2 (HttpServletRequest req, HttpServletResponse rsp) throws IOException rsp.sendRedirect("/SpringMVC/index.jsp" ); } @RequestMapping("/h3") public void hello3 (HttpServletRequest req, HttpServletResponse rsp) throws IOException, ServletException req.getRequestDispatcher("/index.jsp" ).forward(req,rsp); }
直接回传url地址
这种方式在没有视图解析器时仍然能够正常工作(手动添加前后缀)
1
2
3
4
5
6
7
8
9
10
11
12
@RequestMapping("/h4") public String hello4 (Model model) model.addAttribute("msg" ,"hello4" ); return "forward:/WEB-INF/jsp/hello.jsp" ; } @RequestMapping("/h5") public String hello5 (Model model) return "redirect:/index.jsp" ; }
参数传递
提交的参数名与方法的参数名一致
与之前相同,会自动接收参数名相匹配的参数
提交的参数名与方法的参数名不一致
如请求urlhttp://localhost:8080/SpringMVC/hello?username=lan5th
1
2
3
4
5
6
7
8
9
@RequestMapping("/hello") public String hello (@RequestParam("username") name, Model model) System.out.println(name); return "hello" ; }
提交一个类
1
2
3
4
5
6
@Data public class User private String id; private String name; private int age; }
1
2
3
4
5
6
@RequestMapping("/hello") public String hello (User user, Model model) System.out.println(user); return "hello" ; }
当url参数名与实体类参数名相匹配时,如http://localhost:8080/SpringMVC/hello?id=101&name=Bob&age=18
所有值都被正常注入,输出结果User(id=101, name=Bob, age=18)
当有url参数名与实体类参数名不匹配时,如http://localhost:8080/SpringMVC/hello?id=101&username=Bob&age=18
所有参数名匹配的值正常注入,不匹配的值无法注入为null,输出结果User(id=101, name=null, age=18)
Model&ModelMap&ModelAndView初见
乱码问题 在web.xml中配置SpringMVC自带过滤器
但是在有些情况下这个过滤器对get的支持不好
1 2 3 4 5 6 7 8 9 10 <filter > <filter-name > encoding</filter-name > <filter-class > org.springframework.web.filter.CharacterEncodingFilter</filter-class > </filter > <filter-mapping > <filter-name > encoding</filter-name > <url-pattern > /*</url-pattern > </filter-mapping >
Json Json:JavaScript Object Notation用于前后端对象数据的传递,json相当于是javascript对象的字符串表示法
js中json用法 1 2 var obj = {a :'Hello' , b :'world' };var json = '{"a":"Hello", "b":"world"}' ;
json字符串转javascript对象
1 var obj = JSON .parse('{"a":"Hello", "b":"world"}' );
javascript对象转json字符串
1 var json = JSON .stringify({a :'Hello' , b :'world' });
java程序解析json
Jackson
导包
1 2 3 4 5 <dependency > <groupId > com.fasterxml.jackson.core</groupId > <artifactId > jackson-databind</artifactId > <version > 2.11.4</version > </dependency >
UserController.java
1 2 3 4 5 6 7 8 9 10 11 12 13 14 15 16 17 18 19 20 21 22 23 24 25 26 27 28 29 30 31 32 33 34 35 36 37 38 39 40 41 42 43 44 45 46 47 48 49 50 51 52 53 54 55 56 57 58 59 60 61 62 63 64 65 66 @Controller public class UserController @RequestMapping("/j1") @ResponseBody public String json1 () return new User("张三" ,3 ,"男" ).toString(); } @RequestMapping("/j2") @ResponseBody public String json2 () throws JsonProcessingException ObjectMapper mapper = new ObjectMapper(); String str = mapper.writeValueAsString(new User("张三" , 3 , "男" )); return str; } @RequestMapping("/j3") @ResponseBody public String json3 () throws JsonProcessingException ObjectMapper mapper = new ObjectMapper(); ArrayList<User> userList = new ArrayList<User>(); User user1 = new User("张三" , 3 , "男" ); User user2 = new User("李四" , 3 , "男" ); User user3 = new User("王五" , 3 , "男" ); User user4 = new User("王麻子" , 3 , "男" ); userList.add(user1); userList.add(user2); userList.add(user3); userList.add(user4); String str = mapper.writeValueAsString(userList); return str; } @RequestMapping("/j4") @ResponseBody public String json4 () throws JsonProcessingException ObjectMapper mapper = new ObjectMapper(); SimpleDateFormat sdf = new SimpleDateFormat("yyyy-MM-dd HH:mm:ss" ); Date date = new Date(); return mapper.writeValueAsString(sdf.format(date)); } @RequestMapping("/j5") @ResponseBody public String json5 () throws JsonProcessingException ObjectMapper mapper = new ObjectMapper(); mapper.configure(SerializationFeature.WRITE_DATES_AS_TIMESTAMPS,false ); SimpleDateFormat sdf = new SimpleDateFormat("yyyy-MM-dd HH:mm:ss" ); mapper.setDateFormat(sdf); Date date = new Date(); return mapper.writeValueAsString(date); } }
Fastjson
导包
1 2 3 4 5 <dependency > <groupId > com.alibaba</groupId > <artifactId > fastjson</artifactId > <version > 1.2.76</version > </dependency >
主要函数
JSON.toJSONString()将java对象转为json字符串
JSON.parseObject()json字符串转java对象,参数:(json字符串,java类名)
JSON.toJSON()java对象转json对象
JSON.toJavaObject()json字符串转java对象,参数:(json对象,java类名)
Json处理乱码 在springmvc-servlet.xml中处理json乱码
一般直接在配置文件中设置,但也可以在注解中实现@RequestMapping(value = "/json", produces = "application/json;charset=utf-8")
1 2 3 4 5 6 7 8 9 10 11 12 13 14 <mvc:annotation-driven > <mvc:message-converters register-defaults ="true" > <bean class ="org.springframework.http.converter.StringHttpMessageConverter" > <constructor-arg value ="UTF-8" /> </bean > <bean class ="org.springframework.http.converter.json.MappingJackson2HttpMessageConverter" > <property name ="objectMapper" > <bean class ="org.springframework.http.converter.json.Jackson2ObjectMapperFactoryBean" > <property name ="failOnEmptyBeans" value ="false" /> </bean > </property > </bean > </mvc:message-converters > </mvc:annotation-driven >
Ajax Asynchronous JavaScript and XML(异步的JavaScript和xml)
即在无需重新加载整个网页得情况下,更新部分网页的请求。
JQuery Ajax本质解释XMLHttpRequest,封装后便于调用
1
2
3
4
5
6
7
jQuery.ajax(...) 部分参数: url:请求地址 data:携带参数 type:请求方法 success:请求成功回调函数 error:请求失败回调函数
ajax初见 需要提前导入jquery文件
FrontController.java
1 2 3 4 5 6 7 8 9 10 11 12 13 14 @RestController public class FrontController @RequestMapping("/ajax1") public void ajax1 (String name, HttpServletResponse response) throws IOException System.out.println("username=>" +name); if (name.equals("lan5th" )){ response.getWriter().print("true" ); } else { response.getWriter().print("false" ); } } }
ajaxTest.jsp
1
2
3
4
5
6
7
8
9
10
11
12
13
14
15
16
17
18
19
20
21
22
23
24
25
26
27
28
<%@ page contentType="text/html;charset=UTF-8" language="java" %> <html> <head> <script src="${pageContext.request.contextPath}/statics/js/jquery-3.6.0.js"></script> <script> function a () { $.post({ url:"${pageContext.request.contextPath}/ajax1" , data:{"name" :$("#username" ).val()}, success:function (data) { alert(data); }, error:function (data) { alert(data); } }) } </script> <title>AjaxTest</title> </head> <body> <div> username: <input type="text" id="username" onblur="a()" > </div> </body> </html>
ajax异步加载数据 需要提前导入Jackson包以将返回的对象等转化为json字符串
FrontController.java新增方法
1
2
3
4
5
6
7
@RequestMapping("/ajax2") public List<Books> ajax2 () List<Books> booksList = bookService.queryAllBook(); System.out.println(booksList); return booksList; }
ajaxTest.jsp
1
2
3
4
5
6
7
8
9
10
11
12
13
14
15
16
17
18
19
20
21
22
23
24
25
26
27
28
29
30
31
32
33
34
35
36
37
38
39
40
41
42
<%@ page contentType="text/html;charset=UTF-8" language="java" %> <html> <head> <script src="${pageContext.request.contextPath}/statics/js/jquery-3.6.0.js"></script> <script> $(function () { $("#btn" ).click(function () { $.post("${pageContext.request.contextPath}/ajax2" , function (data) { let html = "" ; for (let i = 0 ; i < data.length; i++) { html += "<tr>" + "<td>" + data[i].bookID + "</td>" + "<td>" + data[i].bookName + "</td>" + "<td>" + data[i].bookCounts + "</td>" + "<td>" + data[i].detail + "</td>" + "</tr>" } $("#content" ).html(html); }) }) }) </script> <title>AjaxTest</title> </head> <body> <div> <input type="button" value="加载数据" id="btn" > <table> <tr> <th>id</th> <th>书名</th> <th>数量</th> <th>详情</th> </tr> <tbody id="content" > <!--ajax填充数据--> </tbody> </table> </div> </body> </html>
ajax异步验证表单 FrontController.java新增方法
1
2
3
4
5
6
7
8
9
10
11
12
13
14
15
16
17
18
19
@RequestMapping("/ajax3") public String ajax3 (String name, String pwd) String msg = "" ; if (name != null ){ if (name.equals("lan5th" )){ msg = "ok" ; } else { msg = "用户名错误" ; } } if (pwd != null ){ if (pwd.equals("123456" )){ msg = "ok" ; } else { msg = "密码错误" ; } } return msg; }
ajaxTest.jsp
1
2
3
4
5
6
7
8
9
10
11
12
13
14
15
16
17
18
19
20
21
22
23
24
25
26
27
28
29
30
31
32
33
34
35
36
37
38
39
40
41
42
43
44
45
46
47
48
49
<%@ page contentType="text/html;charset=UTF-8" language="java" %> <html> <head> <script src="${pageContext.request.contextPath}/statics/js/jquery-3.6.0.js"></script> <script> function a1 () { $.get({ url:"${pageContext.request.contextPath}/ajax3" , data:{"name" :$("#username" ).val()}, success:function (data) { if (data.toString()==='ok' ){ $("#userInfo" ).css("color" ,"green" ); } else { $("#userInfo" ).css("color" ,"red" ); } $("#userInfo" ).html(data); } }) } function a2 () { $.post({ url:"${pageContext.request.contextPath}/ajax3" , data:{"pwd" :$("#pwd" ).val()}, success:function (data) { if (data.toString()==='ok' ){ $("#pwdInfo" ).css("color" ,"green" ); } else { $("#pwdInfo" ).css("color" ,"red" ); } $("#pwdInfo" ).html(data); } }) } </script> <title>AjaxTest</title> </head> <body> <div> <p> 用户名:<input type="text" id="username" onblur="a1()" > <span id="userInfo"></span> </p> <p> 用户名:<input type="text" id="pwd" onblur="a2()" > <span id="pwdInfo"></span> </p> </div> </body> </html>
拦截器 拦截器和过滤器的区别:
过滤器
是servlet规范中的一部分,任何java web工程都能使用
url-pattern中配置了/*后,会对任何要访问的资源作拦截
拦截器
是框架本身自带的,只有使用了SpringMVC或同类型框架才能使用
拦截器只会拦截访问的控制器方法,对jsp/html/css/image/js等静态资源不会进行拦截
自定义拦截器 springmvc-servlet.xml配置
1 2 3 4 5 6 7 8 <mvc:interceptors > <mvc:interceptor > <mvc:mapping path ="/**" /> <bean class ="com.lan5th.interceptor.MyInterceptor" /> </mvc:interceptor > </mvc:interceptors >
MyInterceptor.java实现HandlerInterceptor接口
1
2
3
4
5
6
7
8
9
10
11
12
13
14
15
16
17
18
19
20
21
public class MyInterceptor implements HandlerInterceptor @Override public boolean preHandle (HttpServletRequest request, HttpServletResponse response, Object handler) throws Exception System.out.println("================处理前==============" ); return true ; } @Override public void postHandle (HttpServletRequest request, HttpServletResponse response, Object handler, @Nullable ModelAndView modelAndView) throws Exception System.out.println("================处理后==============" ); } @Override public void afterCompletion (HttpServletRequest request, HttpServletResponse response, Object handler, @Nullable Exception ex) throws Exception System.out.println("================执行后==============" ); } }
文件上传/下载 文件上传 导包
1 2 3 4 5 <dependency > <groupId > commons-fileupload</groupId > <artifactId > commons-fileupload</artifactId > <version > 1.4</version > </dependency >
1 2 3 4 5 6 7 <bean class ="org.springframework.web.multipart.commons.CommonsMultipartResolver" id ="multipartResolver" > <property name ="defaultEncoding" value ="utf-8" /> <property name ="maxUploadSize" value ="10485760" /> <property name ="maxInMemorySize" value ="40960" /> </bean >
upload.jsp
1
2
3
4
5
6
7
8
9
10
11
12
13
14
15
<%@ page contentType="text/html;charset=UTF-8" language="java" %> <html> <head> <title>文件上传</title> </head> <body> <div> <!--上传和下载文件必须使用enctype="multipart/form-data" 二进制编码--> <form action="${pageContext.request.contextPath}/upload2" enctype="multipart/form-data" method="post" > <input type="file" name="file" /> <input type="submit" value="upload" /> </form> </div> </body> </html>
FileController.java
1
2
3
4
5
6
7
8
9
10
11
12
13
14
15
16
17
18
19
20
21
22
23
24
25
26
27
28
29
30
31
32
33
34
35
36
37
38
39
40
41
42
43
44
45
46
47
@Controller public class FileController @RequestMapping("/upload") public String upload (@RequestParam("file") CommonsMultipartFile file, HttpServletRequest request) throws IOException String uploadFilename = file.getOriginalFilename(); if (uploadFilename.equals("" )) { return "redrect:/upload.jsp" ; } System.out.println("上传文件名:" + uploadFilename); String path = request.getSession().getServletContext().getRealPath("/upload" ); File realPath = new File(path); if (!realPath.exists()) { realPath.mkdir(); } System.out.println("上传路径保存位置:" + realPath); InputStream inputStream = file.getInputStream(); FileOutputStream outputStream = new FileOutputStream(new File(realPath, uploadFilename)); int len = 0 ; byte [] buffer = new byte [1024 ]; while ((len = inputStream.read(buffer)) != -1 ) { outputStream.write(buffer, 0 , len); outputStream.flush(); } System.out.println("函数执行末尾====================" ); outputStream.close(); inputStream.close(); return "redrect:/upload.jsp" ; } @RequestMapping("/upload2") public String upload2 (@RequestParam("file") CommonsMultipartFile file, HttpServletRequest request) throws IOException String path = request.getSession().getServletContext().getRealPath("/upload" ); File realPath = new File(path); if (!realPath.exists()) { realPath.mkdir(); } System.out.println("上传文件路径:" + realPath); file.transferTo(new File(realPath + "/" + file.getOriginalFilename())); return "redirect:/upload.jsp" ; } }
文件下载 upload.jsp新增标签
1 <a href="${pageContext.request.contextPath}/download">下载图片</a>
FileController.java新增方法
1
2
3
4
5
6
7
8
9
10
11
12
13
14
15
16
17
18
19
20
21
22
23
24
@RequestMapping("/download") public String download (HttpServletRequest request, HttpServletResponse response) throws IOException String path = request.getSession().getServletContext().getRealPath("/WEB-INF/static" ); String fileName = "1.jpg" ; response.reset(); response.setCharacterEncoding("UTF-8" ); response.setContentType("multipart/form-data" ); response.setHeader("Content-Disposition" ,"attachment;fileName=" + URLEncoder.encode(fileName,"UTF-8" )); File file = new File(path, fileName); FileInputStream inputStream = new FileInputStream(file); ServletOutputStream outputStream = response.getOutputStream(); byte [] buffer = new byte [1024 ]; int len = 0 ; while ((len = inputStream.read(buffer))!=-1 ){ outputStream.write(buffer,0 ,len); outputStream.flush(); } outputStream.close(); inputStream.close(); return "redirect:/upload.jsp" ; }