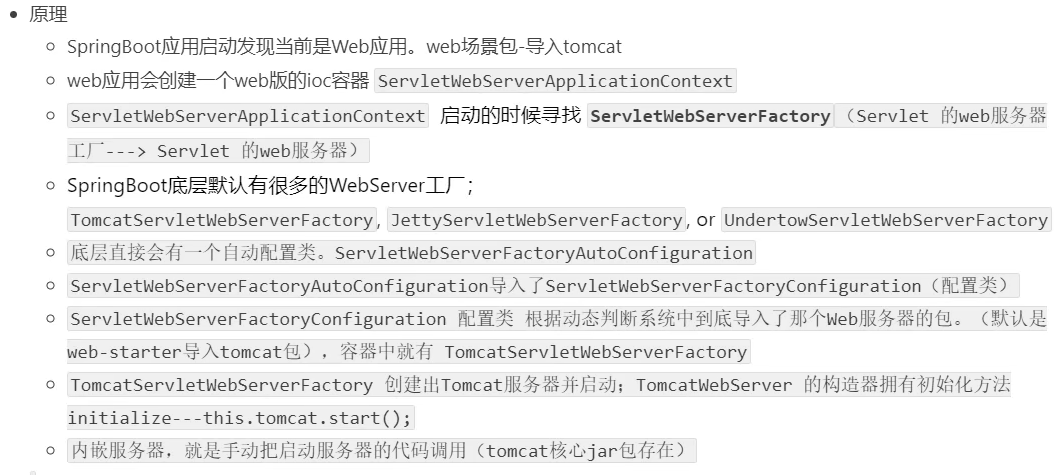
微服务阶段
Springboot:jar包,内嵌tomcat
最大特点:自动装配
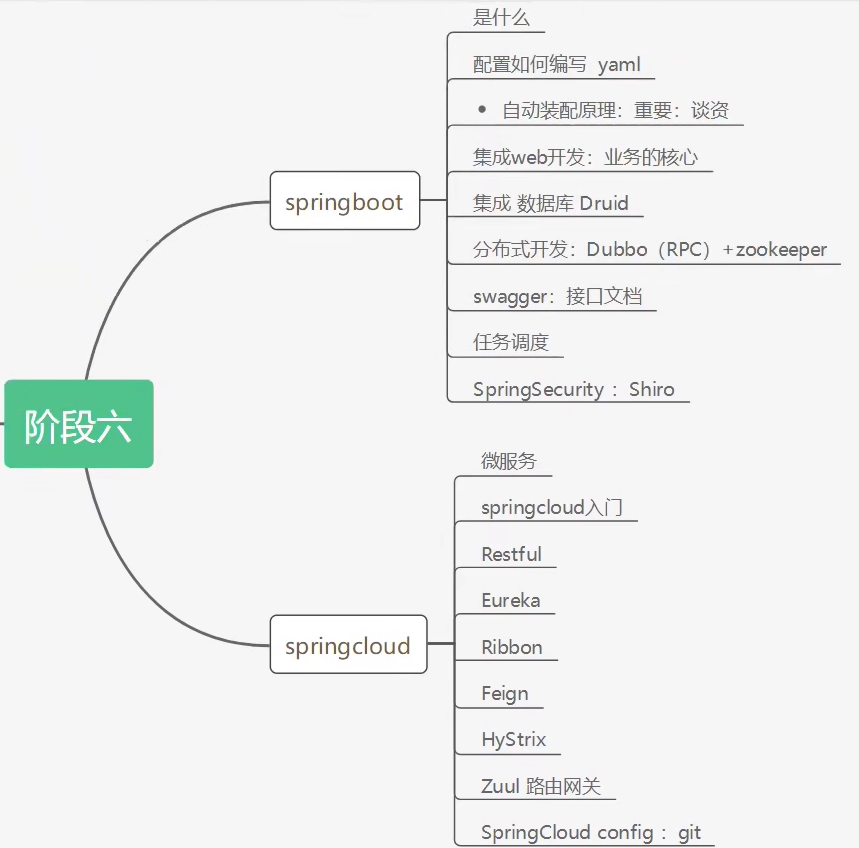
Springboot原理简析
创建项目
- 从官网Spring Initializr进行配置并下载压缩文件
- idea直接集成,实现原理同上
Springboot新功能
自动配置好SpringMVC
- 引入SpringMVC全套组件
- 自动配好SpringMVC常用组件(功能)
自动配号Web常见功能:如字符集编码问题
默认包结构
主程序所在包及以下的所有子包内的组件会被默认扫描出来
无需手动配置包路径
如果要在上层目录也进行扫描,则可以配置注解属性
@SpringBootApplication(scanBasePackages = "com.lan5th")
各种配置拥有默认值
- 默认配置最终映射到MultipartProperties
- 配置文件的值最终绑定到每个类上,并在容器中创建对象
按需加载所有自动配置项
- starter启动器,引入哪些启动器就启动哪些场景的依赖
- springboot所有自动配置功能都在
spring-boot-autoconfigure包中
自动装配原理
@SpringBootApplication标识这个类是springboot的应用- springboot项目启动时会从
spring-boot-autoconfigure-2.x.x.jar\META-INF\spring.factories下自动获取指定的值 - 它会把所有需要导入的组件一类名的方式返回,以添加到springboot容器中
- 这个文件中存在大量xxxAutoConfigiration的类名,提供了当前starter所需的所有组件
- springboot项目启动时会从
SpringApplication.run()运行过程:
- 推断应用类型(是否为web项目)
- 查找并加载所有可用初始化器,设置到initializers属性中
- 找出所有应用程序监听器,添加到listeners属性中
- 团短并设置main方法的定义类,找到运行主类
简单案例
spring.factories中配置以下自动配置类HttpEncodingAutoConfiguration.java,我们以它为例更进一步了解原理
HttpEncodingAutoConfiguration.java
1 | //标识是一个配置类 |
ServerProperties.java1
2
3//这与我们在配置文件中所标写的前缀所绑定,并在实例化时进行自动注入
public class ServerProperties{...}ConditionalOn注解

HttpEncodingAutoConfiguration开启自动装配,并给ServerProperties一些属性赋默认值,ServerProperties从yml配置文件中读取前缀相关的属性,替换默认值,从而加载相关组件。
总结
- springboot先加载所有的自动动配置类xxxAutoConfiguration
- 每个自动配置类按照条件进行生效,默认绑定配置文件所指定的值,通过xxxProperties与配置文件进行绑定
- 生效的配置类为容器中注入相应的组建环境
- 用户如果自己进行了某些组建的配置,就以用户的配置为优先
- 自定义配置方法
- 用户自定义@Bean进行注入,替换底层代码
- 用户查看组件绑定的配置文件前缀进行修改
请求映射原理
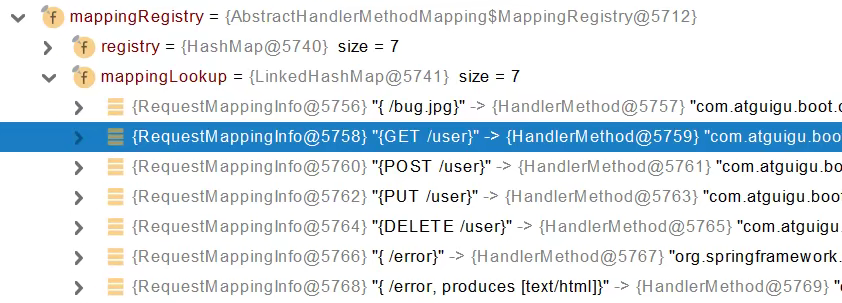
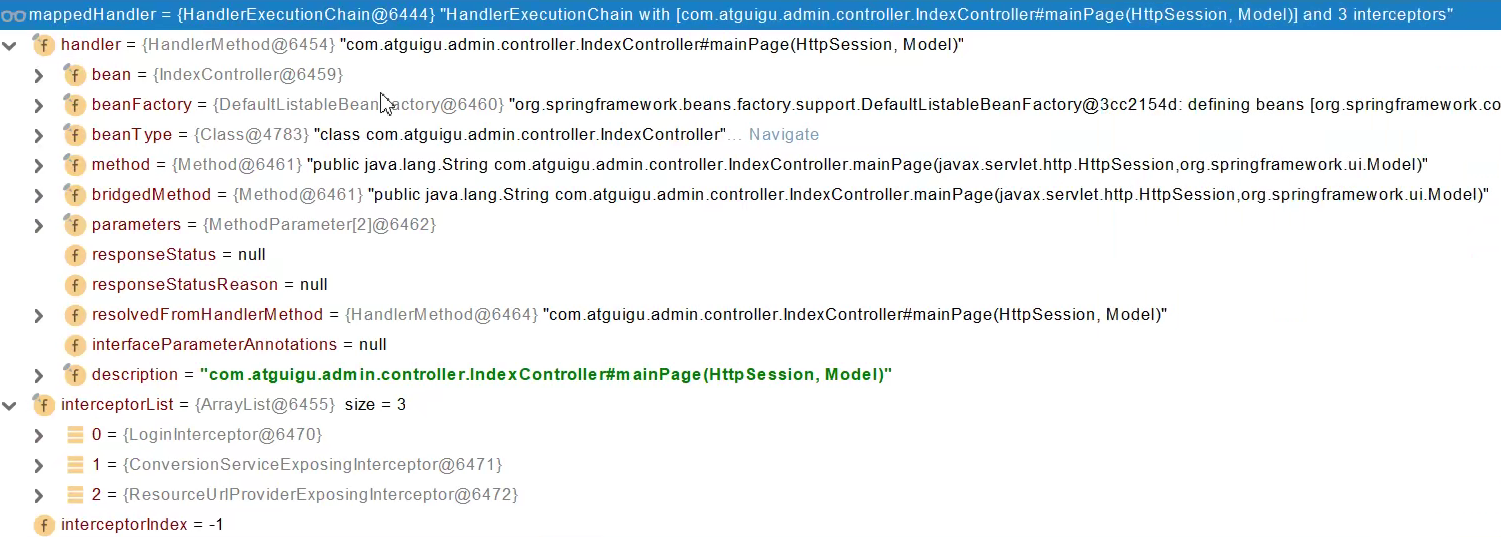
DispatcherServlet.java中由doDispatch()方法进行请求处理,并调用getHandler()方法进行处理器映射器的选择
1 | // Determine handler for the current request. |
1 |
|
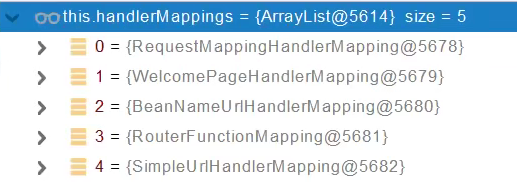
其中,RequestMappingHandlerMapping为SpringBoot帮我们配置的映射器,在mappingRegistry属性中注册了我们所有在Controller中配置的请求url和执行方法的匹配映射
同理,WelcomePageHandlerMapping会在RequestMappingHandlerMapping匹配url失败后进行匹配,并且仅匹配/路径,用于web应用首页的跳转
参数处理原理
参数处理流程
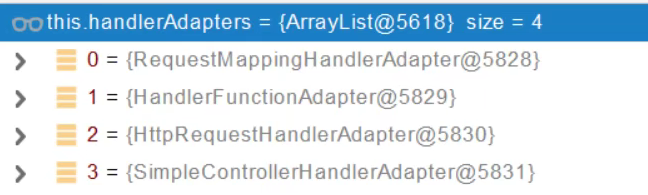
处理器适配器HandlerAdapter
1
2
3
4
5
6
7
8
9
10
11
12//DispatcherServlet
protected HandlerAdapter getHandlerAdapter(Object handler) throws ServletException {
if (this.handlerAdapters != null) {
for (HandlerAdapter adapter : this.handlerAdapters) {
if (adapter.supports(handler)) {
return adapter;
}
}
}
throw new ServletException("No adapter for handler [" + handler +
"]: The DispatcherServlet configuration needs to include a HandlerAdapter that supports this handler");
}
执行目标方法
1
2
3//DispatcherServlet
// Actually invoke the handler.
mv = ha.handle(processedRequest, response, mappedHandler.getHandler());1
2
3//RequestMappingHandlerAdapter(具体的handlerAdapter)
//执行目标方法
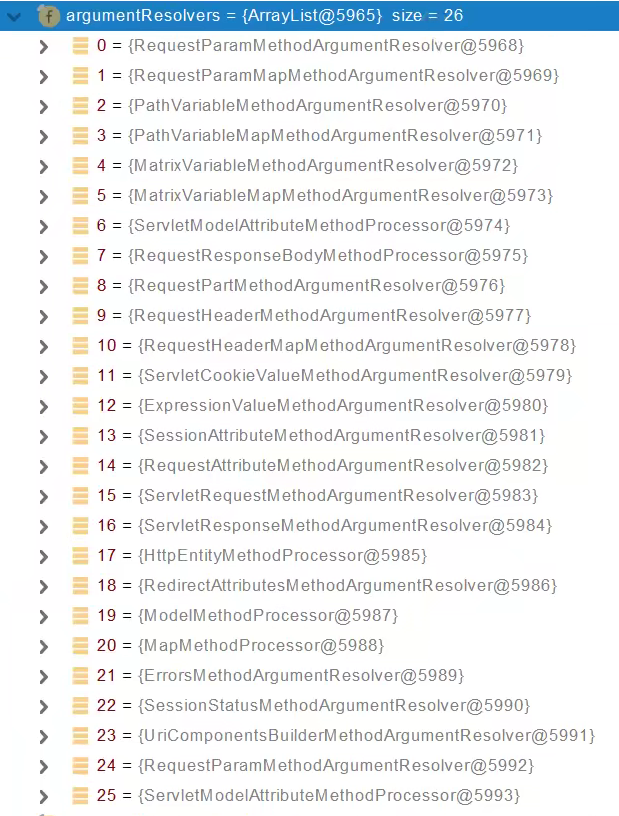
mav = invokeHandlerMethod(request, response, handlerMethod);参数解析器ArgumentResolver
目标方法能够写的参数类型都取决于参数解析器
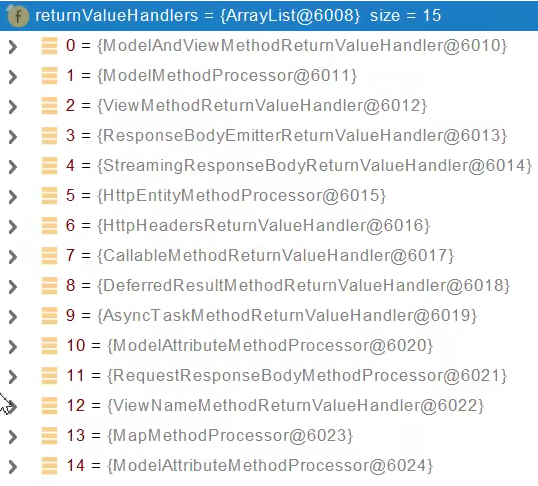
返回值处理器ReturnValueHandler
目标方法能够写的返回值类型都取决于返回值处理器
复杂参数

给Map或Model对象里面添加数据相当于给HttpServletRequest中setAttribute。
Map和Model在实际解析参数时都会返回mavContainer.getModel();其中的BindingAwareModelMap能够同时实现Map和Model的具体功能
在执行具体方法时如果同时传入Map和Model对象,实际运行时只有同一个BindingAwareModelMap对象
目标方法执行完成时将所有的数据都放在ModelAndViewContainer(mavContainer)中,包含目标视图VIew和相关数据Model
ModelAndView转移流程
- Map和Model被BindingAwareModelMap实现
- BindingAwareModelMap被封装于ModelAndViewContainer
- BindingAwareModelMap被取出分封装于ModelAndView
- BindingAwareModelMap数据被取出封装于ModelMap(新对象)中
exposeModelAsRequestAttributes(model, request);暴露模型作为请求域属性- 对ModelMap进行遍历并将其添加到请求域参数中
自定义对象参数
由ServletModelAttributeMethodProcessor参数处理器(有重名)进行解析
根据实体类判断是否为简单类型
创建出一个对象实例JavaBean
WebDataBinder binder = binderFactory.createBinder(webRequest, attribute, name)Web数据绑定器,可以将请求的参数封装在指定的JavaBean(方法中指attribute)中WebDataBinder底层有非常多的数据转换器Converters来帮助我们转换常见的参数类型
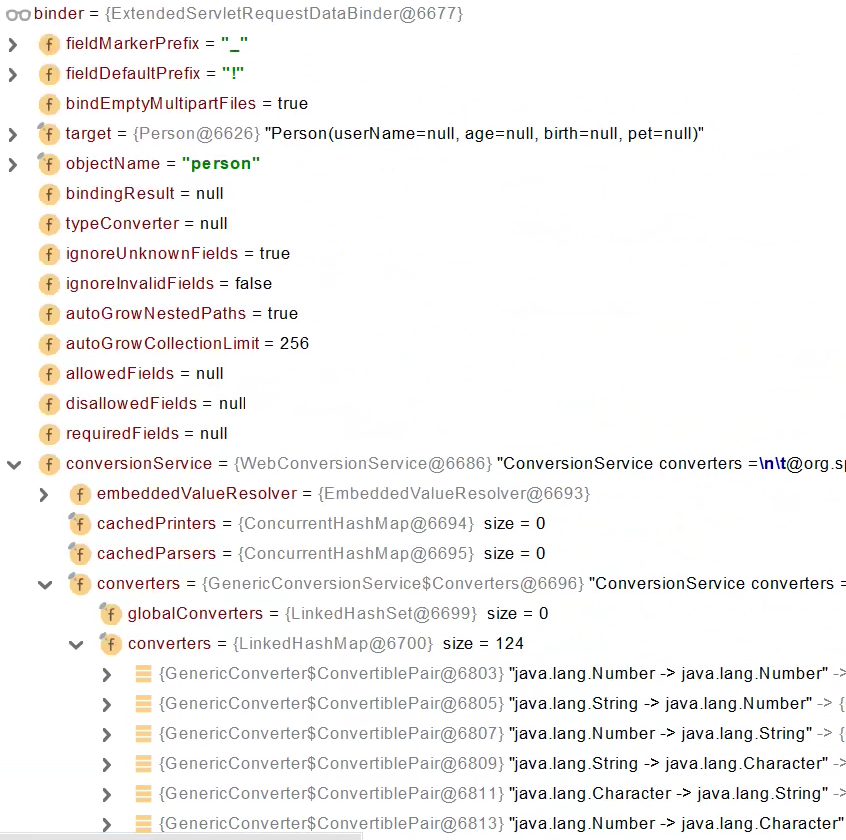
GenericConversionService在设置每一个值时,会遍历所有Converter,寻找能将转换指定数据类型的转换器,转换器底层利用反射获取实体类数据类型并进行相应转换
我们也可以自定义Converter:实现WebMvcConfigurer中的addFormatters方法,用于添加我们自己的Converter
上层接口

数据响应原理
返回参数
springboot已经帮我们导入了jackson的相关依赖
returnValueHandler返回值处理器对不同的返回值类型进行处理,其上层接口结构:

执行流程:
supportsReturnType判断是否支持该类型返回值
handleReturnType进行处理
利用MessageConverters处理返回值
内容协商:浏览器默认会以请求头的方式高速服务能够就接受怎样的内容类型
服务器根据自身能力决定能生产出什么样类型的内容数据
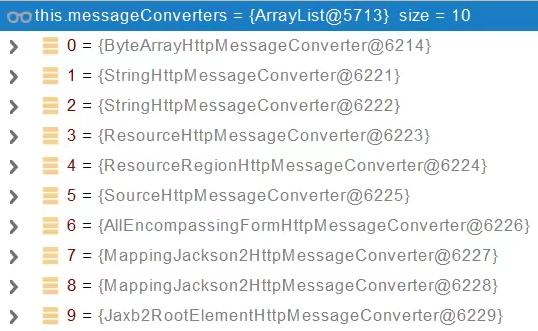
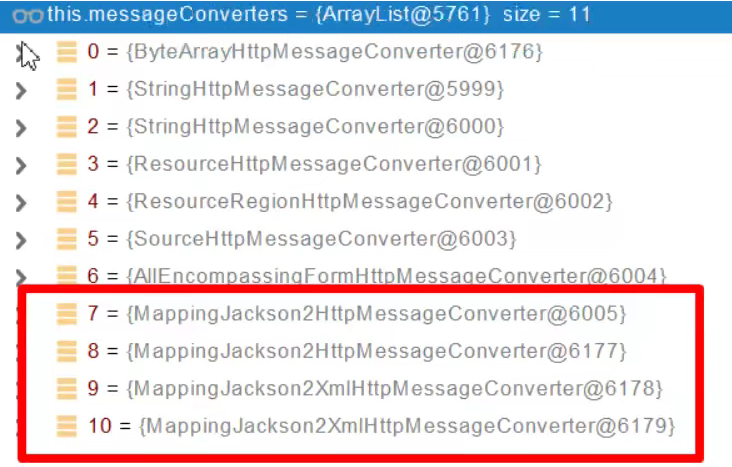
遍历所有容器底层的HttpMessageConverter,得到MappingJackson2HttpMessageConverter可以将对象转为Json格式

内容协商
流程:
判断当前响应头中是否已经有了确定的媒体类型
获取客户端中支持的内容类型(请求头accept字段,如
application/json,一般都带有权重)遍历循环所有的MessageConverter,寻找支持操作对象的Converter列表
将Converter支持的媒体类型统计出来
客户端需要
application/json,服务端可以处理的类型列表: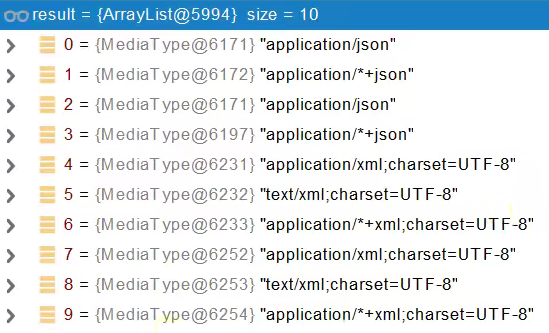
进行内容协商的最佳匹配
1
2
3
4
5
6
7for (MediaType requestedType : acceptableTypes) {
for (MediaType producibleType : producibleTypes) {
if (requestedType.isCompatibleWith(producibleType)) {
mediaTypesToUse.add(getMostSpecificMediaType(requestedType, producibleType));
}
}
}用支持将对象转为最佳匹配媒体类型的converter进行内容转化
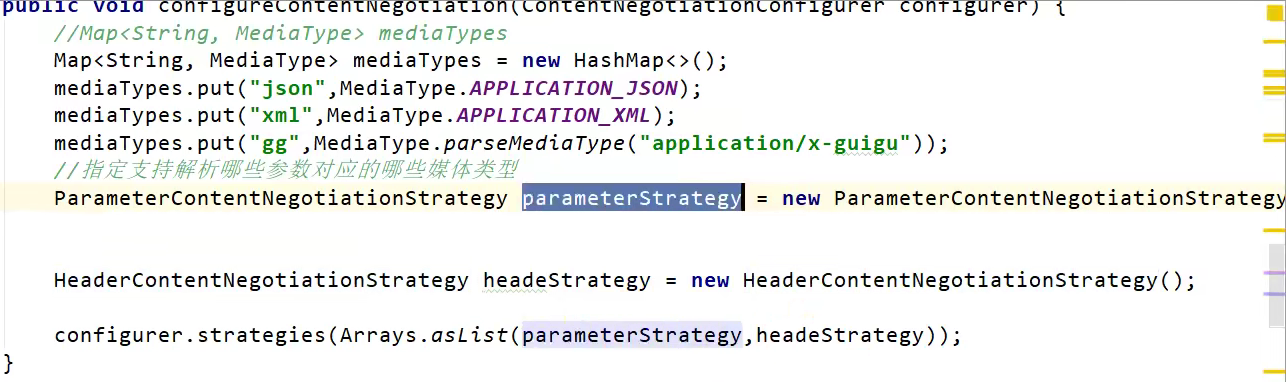
开启参数方式的内容协商
配置文件
1 | =true |
使用方式url?format=相应格式,如http://localhost:8080/test/user?format=xml
进行自定义Convertor实现HttpMessageConverter<支持操作的数据类型>接口,并在WebMvcConfigurer中添加进容器

或自定义协议
模板引擎与视图解析原理
目标方法处理的过程中,所有数据都会被放在ModelAndViewContainer中,包括数据和试图抵制
方法的参数是自定义对象时(从请求参数中获取),也会将其放在ModelAndViewContainer中
任何目标方法执行完成后都会返回ModelAndView对象
processDispatcherResult处理派发结果(页面响应方式)
render(mv,request,response)页面渲染逻辑根据方法的String返回值得到View对象(定义了页面的渲染逻辑)
所有的视图解析器尝试是否能通过当前返回值得到View对象
如返回值
redirect:/main.html由ThymeleafViewResolver进行相关判断并new了一个RedirectView对象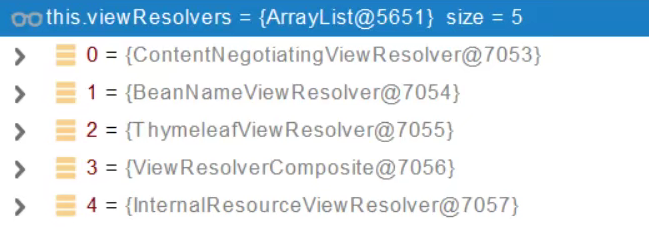
ContentNegotiatingViewResolver包含了下面的所有视图解析器,原理还是利用这些视图解析器获取View对象
VIew视图对象调用自身的render方法对页面进行渲染
View视图对象如何进行页面渲染?
返回值以forward开始:
new InternalResourceView(forwardUrl)->request.getRequestDispatcher(path).forward(request, response)返回值以redirect开始:
new RedirectView()->response.sendRedirect(encodedURL)返回值是普通字符串:
new ThymeleafView()->ThymeleafView调用自己底层的输出流方法对页面进行渲染
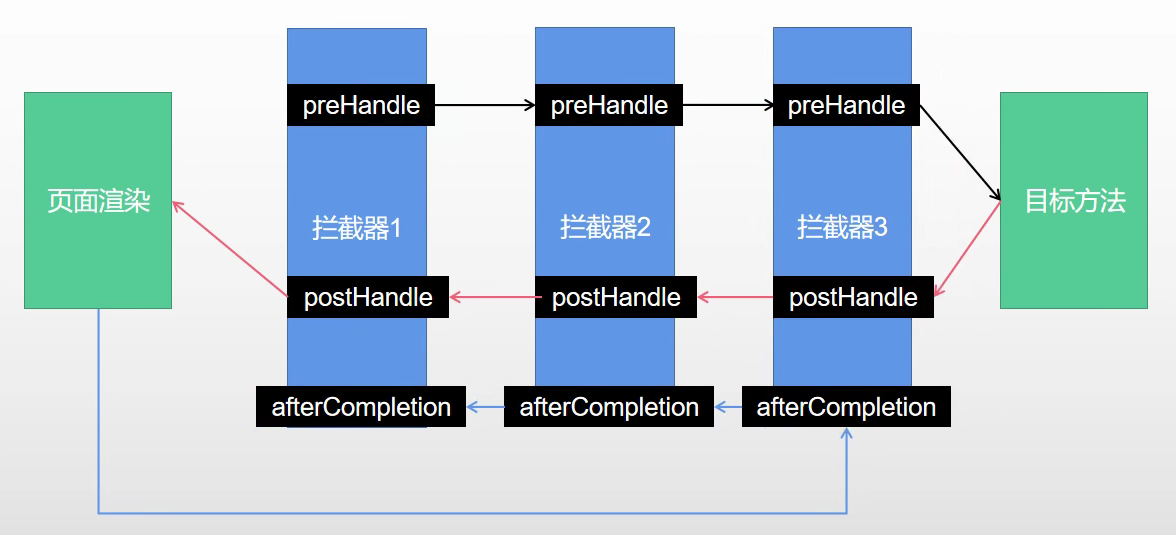
拦截器原理
根据前当前请求找到可以处理请求的handler和handler的所有拦截器
- 先顺序执行所有拦截器的preHandle方法
- 如果有某个拦截器返回为false,则倒序执行所有已经执行了的拦截器的afterCompletion
如果任何一个拦截器返回为false,则会跳出不执行目标方法
- 如果所有拦截器都返回为true,则执行目标方法
- 倒序执行所有拦截器的postHandle方法
页面成功渲染之后也会倒序触发afterCompletion方法
以上任何一步出现异常也会直接倒序触发afterCompletion方法
文件上传原理
文件上传自动配置类MultipartAutoConfiguration自动配置好了StandardServletMultipartResolver文件上传解析器
- 文件上传解析器判断是否为Multipart请求,并封装为MultipartHttpServletRequest文件上传请求
- 参数解析器来解析请求中的文件内容封装成MultipartFIle
- 将request中的文件信息封装为Map:
MultiValueMap<String, MultipartFile> - FileCopyUtils可以实现文件流的拷贝
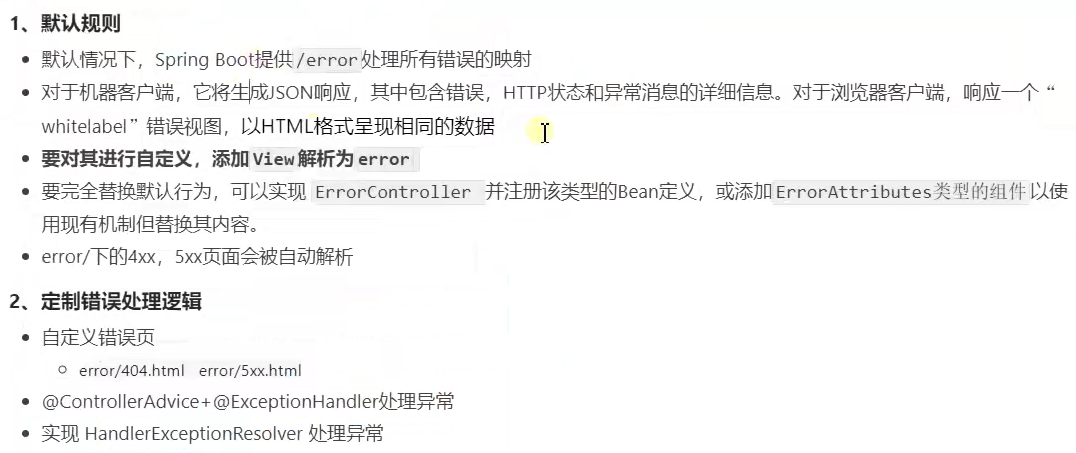
错误处理原理
异常处理自动配置类ErrorMvcAutoConfiguration
异常处理自动配置原理
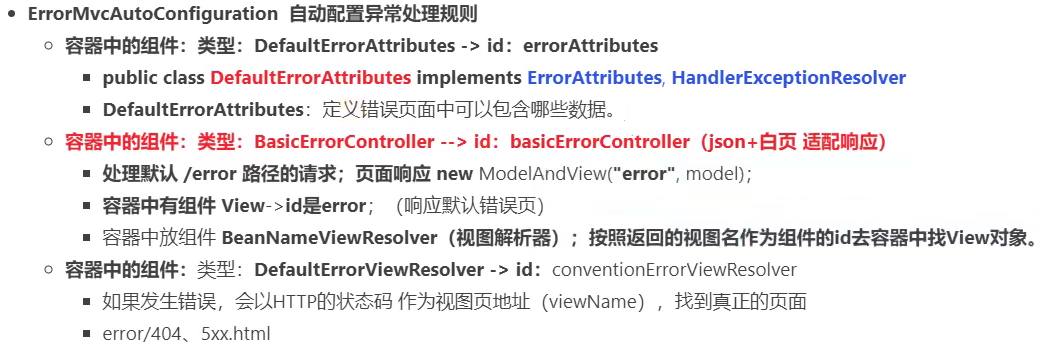
如果想要返回页面,就会找到error视图(staticView),默认为空白页
异常处理流程
目标方法运行期间任何异常,都会被catch,并被dispatchException封装
进入视图解析流程(页面渲染)
processDispatchResult(processedRequest, response, mappedHandler, mv, dispathcerException)processHandlerException方法处理handler发生的异常,处理完成返回ModelAndView
遍历所有的handlerExceptionResolvers,看谁能处理当前异常

系统默认的异常解析器
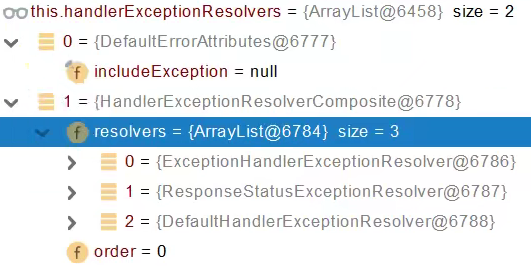
- defaultErrorAttribute现来处理异常,把异常信息保存到request域,并且返回null
- 默认没有任何handlerExceptionResolvers能够处理,因此直接抛出异常
- 如果这种情况,则spring会自动发送一个/error请求,会被底层的BasicErrorController处理
- 解析错误视图,遍历所有的ErrorViewResolver看谁能够解析
- 默认DefaultErrorViewResolver作用是把响应状态码作为错误页的地址,如error/500.html
- 模板引擎最终响应这个页面
定制错误处理逻辑
在/error路径下添加404.html,5xx.html错误页
@ControllerAdvice+@ExceptionHandler处理全局异常:底层由ExceptionHandlerExceptionResolver支持
1
2
3
4
5
6
7
8
public class GlobalExceptionHandler {
//处理计算错误异常
public String handleArithException(Exception e){
return "login";
}
}ResponseStatus+自定义异常:底层由ResponseStatusExceptionResolver支持,把responsestatus注解的信息调用
response.sendError(statusCode,resolvedReason)给Tomcat发送/error请求1
2
3
4
5
public class UserTooManyException extends RuntimeException{
public UserTooManyException(){}
public UserTooManyException(String msg){super(msg);}
}DefaultHandlerExceptionResolver为Spring处理框架底层的异常
response.sendError(HttpServletResponse.SC_BAD_REQUEST,ex.getMessage)自定义实现HandlerExceptionResolver处理异常,可以作为全局磨人的异常处理规则
1
2
3
4
5
6
7
8
9
10
11
12
13
14
15
16//优先级设置为最高,否则会由其他三个HandlerExceptionResolver接管异常的处理
public class CustomerHandlerExceptionResolver implements HandlerExceptionResolver {
public ModelAndView resolveException(HttpServletRequest request, HttpServletResponse response, Object handler, Exception ex) {
try {
response.sendError(511,"自定义的错误类型");
} catch (IOException e){
e.printStackTrace();
}
//尽管我们未对ModelAndView作任何处理,但只要返回值不为空
//都会直接跳出循环,不再进行HandlerExceptionResolver的遍历
return new ModelAndView();
}
}
ErrorViewResolver
- response.sendError,error请求就会转给Controller
- 当一个异常没有任何handlerExceptionResolvers能够处理,error请求也会转给Controller
- basicErrorController要去的页面地址是ErrorViewResolver解析的
嵌入式Servlet容器
切换容器类型
1 | <dependency> |
自定义Servlet容器
- 修改配置文件server.xxx
- 注入ConfigurableServletWebServerFactory
- 实现
WebServerFactoryCustomizer<ConfigurableServletWebServerFactory>接口
定制化原理
定制化的常见方式
修改配置文件
xxxCustomizer
编写自定义配置类 xxxConfig +
@Bean增加组件来替换默认配置Web应用实现WebMvcConfigurer定制化Web功能
WebMvcConfigurer+
@EnableWebMvc:全面接管Mvc,自动配置全部失效,所有配置项都需要我们进行配置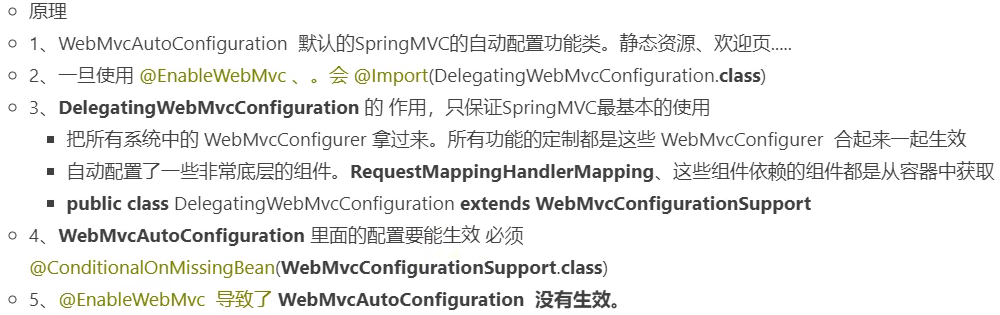
原理分析常用方式
场景starter -> xxxAutoConfiguration -> 导入xxx组件 -> 绑定xxxProperties -> 绑定配置文件项
SpringBoot配置
Maven in SpringBoot
pom.xml中规定了springboot项目的府项目,而在父项目中规定了许多常用依赖的版本号,我们进行依赖导入时一般不需要再手动指定版本号,减少了版本不兼容的发生频率
在进行依赖导入时通常直接导入启动器,一个启动器包含了多个相关的maven依赖,使用起来更为方便,一般格式为
1 | <dependency> |
一般来说,spring-boot-starter-XXX格式为springboot官方启动器,不需要指定版本,而XXX-spring-boot-starter为第三方启动器,版本管理文件中是否有而决定是否需要手动配置
所有场景启动器有一个共同的依赖spring-boot-starter
1 | <dependency> |
yaml
springboot配置文件application.yml可以后缀使用.yml .yaml .properties(yml是yaml的缩写)
其中yml作为springboot的推荐配置文件类型,可以存储多种数据类型
yaml还可以获取pom.xml配置文件中的信息,如:
1 | info: |
1 | #key-value键值对 |
并且yml可以注入到我们的配置之中
User.java
1 |
|
Dog.java
1 |
|
application.yml
1 | person: |
注意:yaml的字符串转义问题
1 | myString: 'string1 /n string2' |
单引号会输出
string1 /n string2原字符串双引号会进行转义,变为
1
2string1
string2
yml与properties功能对比
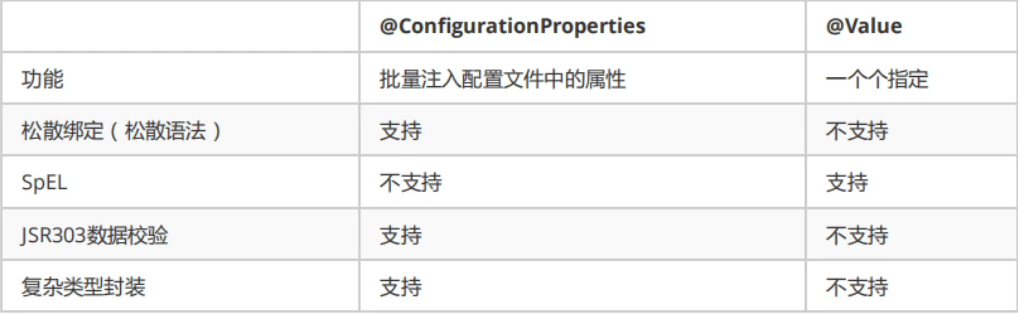
松散绑定:yml文件中
-后的字母默认大写,如yml中的last-name注入式会变成lastNameSpEL:使用properties文件时用于给属性赋值
1
2
private String name;JSR303数据校验
需要导入starter环境
1
2
3
4<dependency>
<groupId>org.springframework.boot</groupId>
<artifactId>spring-boot-starter-validation</artifactId>
</dependency>使用方式如下,可以只接受email格式的注入
1
2
3
4
5
public class User {
private String email;
}部分校验功能
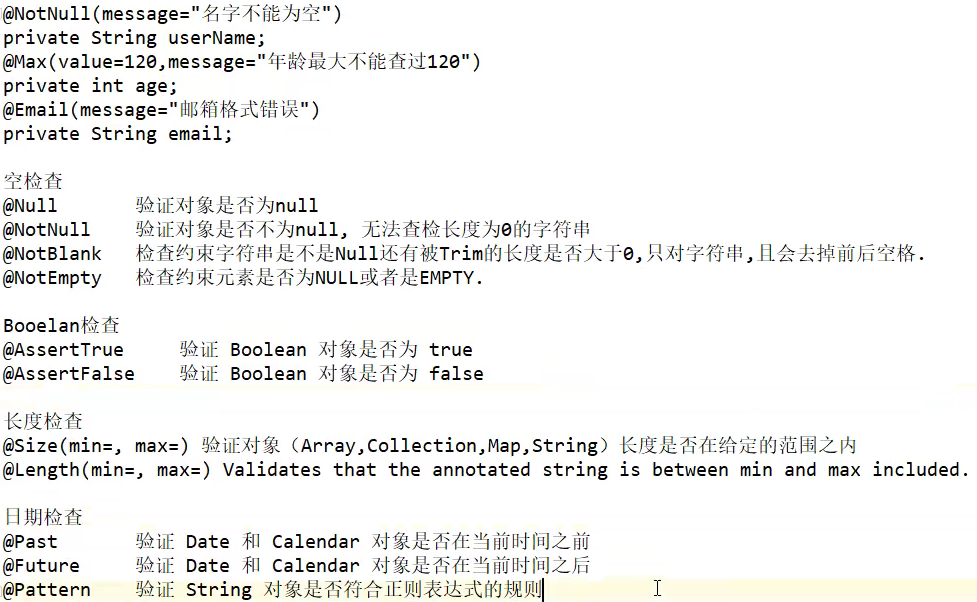
复杂类型封装:如对象
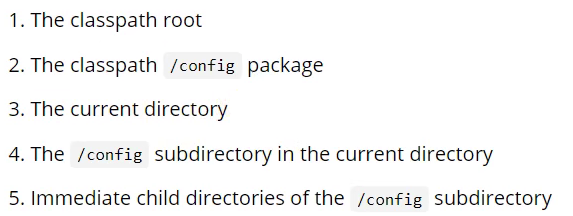
共有四处可以配置application.yml配置文件
按优先级从高到低排序如下:
file:./config/:项目根路径下的config文件夹file:./:项目根路径下直接创建文件classpath:/congfig/:resources目录下的config文件夹classpath:/:resources目录下直接创建文件(idea创建springboot项目默认于此)
yaml提示依赖
1 | <build> |
多环境配置文件
新建多套配置文件
application.properties
application-dev.properties生产环境
application-test.properties测试环境
通过配置文件激活多环境(properties或yaml)
1
2#直接指定后缀可直接切换
=dev在部署时命令行激活(命令行最为优先)
1
java -jar springboot-0.0.1-SNAPSHOT.jar --spring.profiles.active=test
yml单文件激活环境
单文件多环境
1
2
3
4
5
6
7
8
9
10
11
12
13
14
15
16server:
port: 8080
spring:
profiles:
active: dev
#---用于分割不同的生产环境
server:
port: 8081
spring:
profiles: dev
server:
port: 8082
spring:
profiles: test自定义类按环境切换
@Profile可以标注在类上和方法上1
2
3
4
5
6
//只有dev环境才会启用
public class User{
private String name;
private String password;
}1
2
3
//只有test环境才会启用
public class MyConfig{...}指定激活多个配置文件
现在有四个配置文件
application.propertiesapplication-dev.propertiesapplication-prod.propertiesapplication-test.properties1
2
3
4
5
6=myenv
# 自定义环境myenv
=dev
=prod
# 自定义环境mytest
=test当激活myenv时,
application.properties, application-dev.properties, application-prod.properties会全部生效,实现多个配置文件的加载
高级自定义配置
1 |
|
通过向容器中注入WebMvcConfigurer来实现一些自定义的组件,这个接口有许多添加组件的默认方法,借由此可以进行添加
配置加载规则
常见外部配置源
java属性文件,yaml,环境变量,命令行参数
配置文件加载优先级
从上至下优先级依次变高
总结:指定环境优先,外部优先,后项覆盖前项同名项
Web开发
常用注解
@Configuration标识是一个配置类@Bean,方法级别的注解,代替xml向容器中添加组件,组件的id默认为方法名1
2
3
4
5
6
7
public class Myconfig {
public User userRegist(){
return new User("lan5th","123456");
}
}- 配置类本身也是组件
@Configuration注解中的属性proxyBeanMethods默认为true,表示配置类在容器中以代理对象形式所存在,只能拿到单例的Bean实例。同时以此区分Full模式与Lite模式
1
2
3
4
5
6
7
public MultipartResolver multipartResolver(MultipartResolver resolver) {
// Detect if the user has created a MultipartResolver but named it incorrectly
return resolver;
}- 这个方法中添有@Bean注解,而且有传入值,表示执行方法时会从容器中自动寻找一个与
MultipartResolver类型相匹配的组件,将它的属性赋值给新的multipartResolver
@Import必须放置在组件类型的注解上:@Component,@Configuration,@Controller,@Service,@Repository等用于给容器中导入自己所需要的组件或第三方组件,如
1
2
3
public class Myconfig{...}@Conditional满足指定条件时再进行注入1
2
3
4
5
6//常见注解
//指定Bean在容器中存在
//指定Bean在容器中不存在
//指定Class在容器中存在
//项目路径中存在指定资源
//当前运行环境为Web环境@ImportResource在某个配置类上导入xml类型的Bean资源,如@ImportResource(classpath:beans.xml)@ConfigurationProperties必须配合组件类型的注解使用,将配置文件中指定前缀的kv自动注入实体类中的属性。,如@ConfigurationProperties(prefix = "user")或在配置类中使用
@EnableConfigurationProperties(User.class)来代替@Component + @ConfigurationProperties的组合
Controller请求参数
注解参数
1 | //Restful获取url参数 |
导入静态资源
WebMvcProperties.java中定义了
1 | private String staticPathPattern = "/**"; |
WebProperties.java中定义了
1 | private static final String[] CLASSPATH_RESOURCE_LOCATIONS = { "classpath:/META-INF/resources/", |
这4处即为一般默认能够引入静态资源的位置(classpath:/META-INF/resources/即为WebJars下的相关路径)
访问方式
- webjars
localhost:8080/webjars/+fileName - public, static, resources
localhost:8080/+fileName
优先级:resources>static(默认)>public
可以通过在配置文件中配置spring.mvc.static-path-pattern来更改静态资源访问url前缀,配置spring.resources.static-locations来更改静态资源存储位置
原理探究
1 | //如果一个类只有一个有参构造器,那么所有的参数都会自动从容器中匹配获取 |
模板引擎Thymeleaf
代替了之前学习的jsp,允许在html页面中写入逻辑语法
直接导入相应启动器
1 | <!--Thymeleaf本体--> |
ThymeleafProperties.java中规定了Thymeleaf保存文件的位置和后缀
1 | public static final String DEFAULT_PREFIX = "classpath:/templates/"; |
使用时需要导入命名空间xmlns:th="http://www.thymeleaf.org"
基础语法
表达式
取值方法
扩展装配SpringMVC
自定义视图解析器
1 |
|
注册到Spring容器之后,我们就可以使用我们自定义的视图解析器相关配置
国际化
配置
i18n文件夹(internationalization的缩写)其中保存.properties文件并以键值对的形式保存不同翻译
语言切换,例:
- 中文
login_zh_CN.properties - 英文
login_en_US.properties
- 中文
如果需要进行按钮切换,需要自定义组件实现
LocaleResolver,并将其添加到spring容器中使用
#{}进行取值
拦截器
实现拦截器接口
HandlerInterceptor,实现preHandle和postHandle接口的方法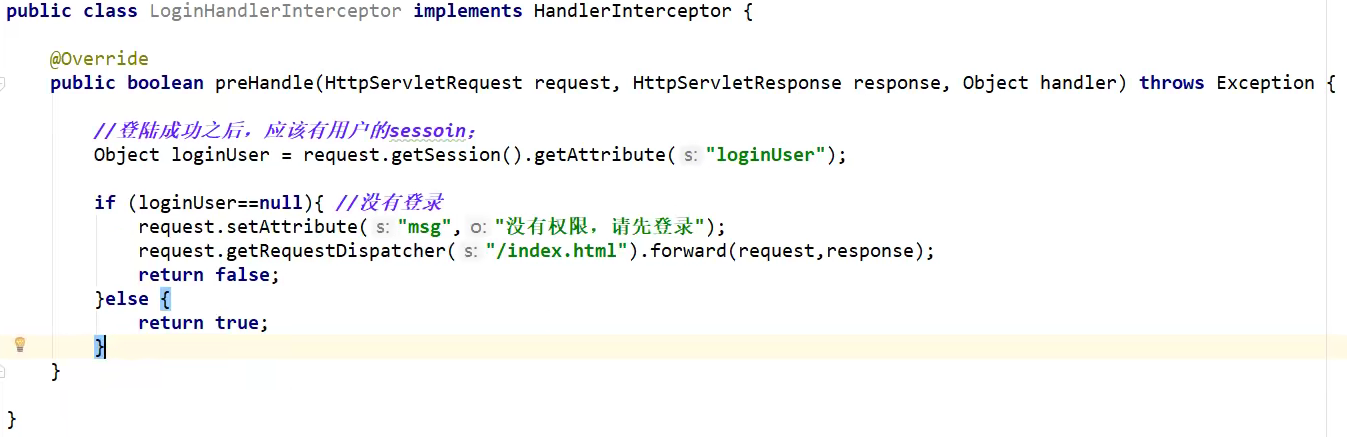
在自定义配置类继承
WebMvcConfigurer中实现方法,注册拦截器
防止拦截静态资源:
添加排除拦截
registry.addInterceptor(new LoginHandlerInterceptor()).exclude(...)配置文件中添加
spring.mvc.static-path-pattern,并将所有静态文件放置在/static路径下注意:使用这种方法在访问静态资源时,必须在static目录下新建一层static目录,静态资源路径默认不显示第一层static
文件上传
文件上传与MultipartAutoConfiguration相关,文件相关属性绑定:
1 | spring: |
1 | <form th:action="@{/upload}" enctype="multipart/form-data" method="post"> |
只需要以MultipartFile接收传输的参数即可
1 | //单文件及多文件上传 |
错误处理
具体实现在原理部分
注入原生组件
一般用于转化老项目
Servlet3.0注解:主程序类上注解
1
组件类上注解
@WebServlet, @WebFilter, @WebListener进行自动扫描注入容器RegistrationBean进行添加
1
2
3
4
5
6
7
8
9
10
11
12
13
14
15
16
17
18
19
20
21
22
23
24
25
26
27
28//由于SpringBoot内置了servlet容器,没有web.xml文件,因此使用替代方法:ServletRegistrationBean将需要的Servlet注册进容器
//使用代理模式,生成单实例
public class MyRegistConfig{
public ServletRegistrationBean myServlet(){
MyServlet myServlet = new MyServlet();
return new ServletRegistrationBean<>(myServlet,"/myrequest");
}
public FilterRegistrationBean myFilter(){
MyFilter myFilter = new MyFilter();
//设置拦截的Servlet
//FilterRegistrationBean bean = new FilterRegistrationBean(myFilter, myServlet());
//或设置拦截url
FilterRegistrationBean bean = new FilterRegistrationBean(myFilter);
bean.setUrlPatterns(Arrays.asList("/myrequest","/css/"));
return bean;
}
public ServletListenerRegistrationBean myListener(){
MyListener myListener = new MyListener();
return ServletListenerRegistrationBean(myListener)
}
}ServletRegistrationBean, FilterRegistrationBean, ListenerRegistrationBean
拓展
容器中的DispatcherServlet也是通过RegistrationBean的方法注册进来,对应配置文件的前缀spring.mvc,默认映射/路径
多个Servlet能够处理同一路径时,采用精确优先原则
因此当我们向容器中注册Servlet路径为/的子目录时默认以我们的Servlet更为优先
使用AOP
导包
1 | <dependency> |
切面类
1 | //同时标注这两个注解才能生效 |
jar包启动springboot
1 | java -jar -Xdebug -Xrunjdwp:transport=dt_socket,server=y,suspend=n,address=配置的debug端口号 -Dspring.profiles.active=prod 包名.jar |
数据访问
JDBC
1 | <dependency> |
切换mysql-connector-java版本方法:
直接指定
<version></version>由maven就近优先原则在最外层Pom中配置
1
2
3
4<properties>
<java.version>1.8</java.version>
<mysql.version>5.1.49</mysql.version>
</properties>
一些相关的自动配置类:

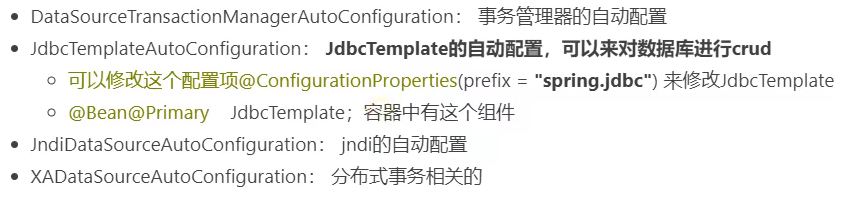
配置项
1 | spring: |
Druid数据源
1 | <dependency> |
可以通过导入starter或自定义注入的方式导入数据源
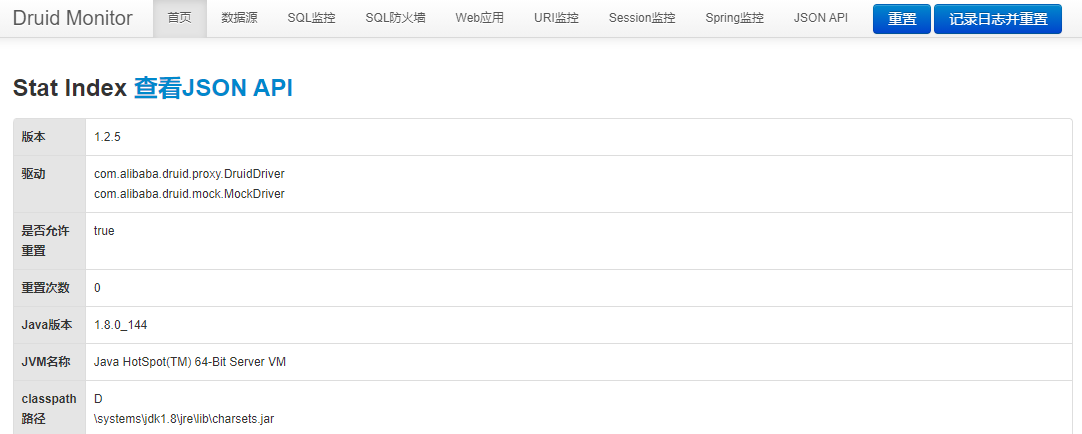
配置完成druid后台监控之后可以根据配置的路径访问数据源后台监控页面
如:配置了url为/druid/*,项目启动之后我们在浏览器中访问http://localhost:8080/druid/就可以进行后台监控了
自行导入
不进行配置这些设置会有默认值
由于Druid后台监控必须通过特定Servlet进行开启,因此选用ServletRegistrationBean方式进行注入
1 |
|
当然,我们配置这些JavaBean的过程也可以用配置文件所代替
1 | spring: |
Starter方式导入
1 | <dependency> |
start方式也需要配置类来注入
1 |
|
1 | spring: |
Mybatis
1 | <dependency> |
注册Mapper方式
- 在Mapper类上方添加
@Mapper注解 - 在主类上方添加
@MapperScan("com.lan5th.mapper")自动扫描包注解
配置文件
1 | mybatis: |
一般方式
使用方式与之前相似
1 | //如果是包扫描方式需要@Repository注解 |
Mapper.xml需要在配置文件中所确定的路径下进行编写,不能像之前放在Mapper类的同级目录下
然后在对应的xxxMapper.xml中编写sql
1 |
|
注解方式
直接在mapper接口的方法中添加sql相关注解
1 |
|
当然也可以使用混合方法,即两种方法同时使用
使用方法:
- 引入
mybatis-spring-boot-starter - 配置
application.yaml指明mapper-location位置 - 编写Mapper接口,标注@Mapper注解(或使用包扫描)
- 简单操作使用注解方式(如单表select)
- 复杂操作使用mapper.xml进行绑定映射
MybatisPlus
1 | <dependency> |
MybatisPlusProperties已经默认配置好了mapper映射文件的路径
1 | private String[] mapperLocations = new String[]{"classpath*:/mapper/**/*.xml"}; |
即任意路径下的mapper包都会被扫描
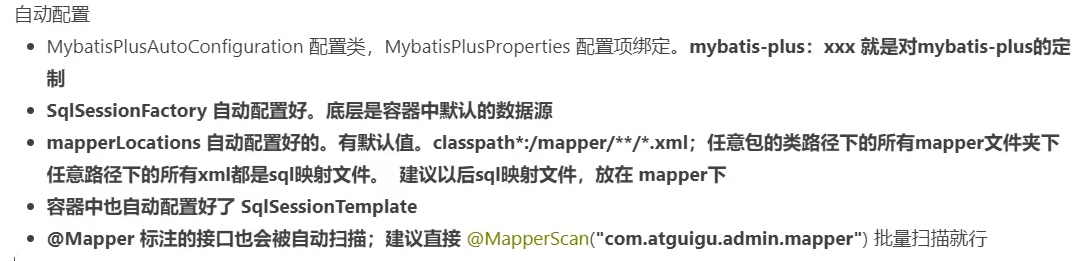
Mapper接口继承BaseMapper,其中已经实现了一些简单的CRUD方法
UserMapper.java继承BaseMapper<>
1 |
|
UserService.java继承IService<>
1 | public interface UserService extends IService<User> { |
UserServiceImpl.java继承ServiceImpl<>
1 |
|
分页功能
1 |
|
Redis
1 | <dependency> |
配置文件
1
2
3
4
5spring:
redis:
host: 47.113.225.244
port: 6379
password: xxxxxx #这个是redis-server的密码redis需要的连接工厂已经自动配置完成:LettuceConnectionConfiguraion和JedisConnectionConfiguration
Redis模板
- RedisTemplate:可以实现Redis基本操作
- StringRedisTemplate:由于String类型是常用类型,因此springboot将其提取为一个单独的组件
SpringBoot2.0以上默认使用lettuce作为默认客户端,如果要使用jedis,需要自行导入jedis的依赖包并在配置文件中手动指定客户端类型
spring.redis.client-type
操作实例
1 |
|
阿里云redis连接失败的原因
- 阿里云安全组策略是否开启对应端口?
- redis-server配置文件中是否绑定0.0.0.0?
- server密码问题
- 服务器防火墙是否开放对应端口,如CentOS7系统:
- 开放防火墙对应端口
firewall-cmd --zone=public --add-port=6379/tcp --permanent - 查看端口开放情况
netstat -ntlp
- 开放防火墙对应端口
连接失败与protected-mode联系不大,请勿轻易关闭
单元测试Junit5
1 | <dependency> |
- 编写测试方法:
@Test注解(使用Junit5的注解) - Junit具有Spring的功能如
@AutoWired,@Transactional测试方法,完成后自动回滚
常用测试注解
1 | //单元测试注解 |
断言机制
检查业务逻辑返回的数据是否合理,所有测试运行结束后会有一个详细的运行报告
简单断言
使用Assertions包下的相关方法,也可以直接导入Assertions的静态方法,在编写测试类时直接调用
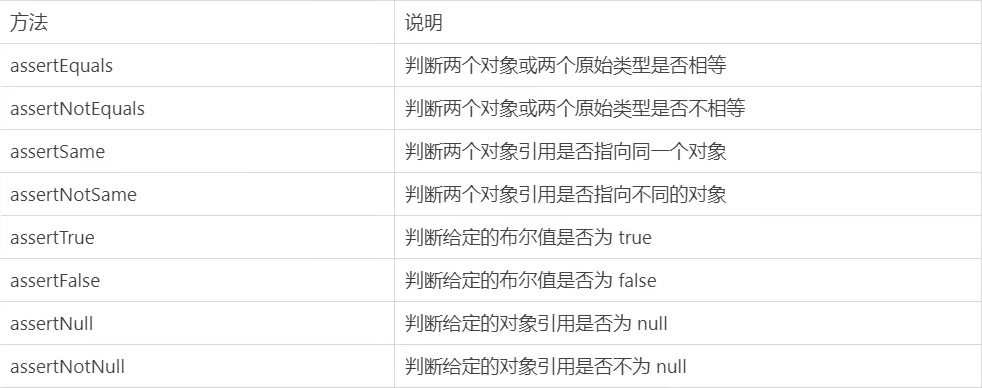
1 |
|
一个断言失败,这个方法中后续的所有代码都不会执行
组合断言
1 | //这里的静态方法都已经import调用 |
异常断言
1 |
|
快速失败
1 |
|
前置条件
1 |
|
嵌套测试
嵌套测试中,外层Test不能驱动内层Test的@BeforeEach之类的方法,内层的Test能够驱动外层Test的@BeforeEach方法
嵌套测试即多个测试内部类层层嵌套
1 | class OuterTest{ |
参数化测试
静态数据参数
1 |
|
方法返回值参数
1 |
|
指标监控
开启Actuator
1 | <dependency> |
actuator的所有监控功能称为EndPoints,开启所有功能即暴露所有端点信息
1 | management: |
最常用的EndPoint
- health
- Metric
- loggers
SpringBootAdmin
是一个开源的后台监管应用程序,如果添加了SpringSecurity,还需要作一些其他配置
新建一个springboot项目作为adminServer服务端,只需要引入这两个依赖
1 | <dependency> |
主程序类添加注解
1 |
|
防止端口冲突更改端口号server.port=8888
为我们需要监控的项目添加依赖作为adminServer客户端
1 | <dependency> |
1 | spring: |
深层原理剖析
自定义Starter
新建项目包含一个maven模块和SpringBoot模块
mystarter-spring-boot-starter
starter负责导入Autoconfiguration模块
1 |
|
mystarter-spring-boot-starter-autoconfigure
1 |
|
首先我们定义一个逻辑应用HelloService
1 | public class HelloService { |
HelloService需要HelloServiceAutoConfiguration来给容器中进行注入,同时HelloServiceAutoConfiguration会绑定HelloProperties来读取配置文件的信息
1 |
|
1 |
|

我们还需要在这个路径下新建spring.factories来告诉springboot应该导入哪些自动配置类
1 | # Auto Configure |
在starter和autoconfigure编写完成后使用maven操作clean和install,此时我们自己编写的包就被安装在了本地的maven库,可以供其他程序进行调用
实际应用程序
引入依赖
1 | <dependency> |
通过配置文件来注入属性
1 | lan5th: |
测试Controller进行调用
1 |
|
实际效果
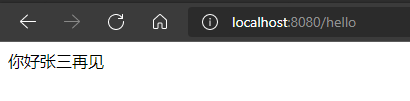
到此我们已经能够编写我们自己的starter来适应各种情况了!
Springboot启动原理
getSpringFactoriesInstances()一般都指从各个依赖的spring.factories文件中取值
创建SpringApplication
保存一些信息
使用ClassUtils判断当前应用类型
寻找Bootstrappers:初始化引导器
获取
List<Bootstrapper>:从spring.factories中寻找寻找ApplicationContextInitializer:初始化器
获取
List<ApplicationContextInitializer<?>>从spring.factories中寻找寻找ApplicationListener:应用监听器
获取
List<ApplicationListener>从spring.factories中寻找
运行SpringApplication
StopWatch
记录应用启动时间
创建引导上下文
createBootstrapContext()- 获取之前所有的Bootstrappers遍历执行
inititialize()来完成对引导启动器的上下文环境配置 - 让当前应用进入headless模式
java.awt.headless
- 获取之前所有的Bootstrappers遍历执行
获取所有的SpringApplicationRunListener:运行监听器
获取
List<SpringApplicationRunListener>从spring.factories中寻找遍历所有的SpringApplicationRunListener调用starting方法
相当于通知所有关注系统启动过程的Listener进行监听
保存命令行参数:ApplicationArgument
准备环境:
prepareEnvironment()- 返回或创建基础环境信息:StandardServletEnvironment
- 配置环境信息:读取所有的配置源属性的配置属性值(包括命令行和外部配置文件)
- 绑定环境信息
- 监听器调用
environmentPrepared():通知所有Listener当前环境准备完成
创建IOC容器
createApplicationContext()- 根据当前项目类型创建容器(当前为servlet),因此会创建AnnotationConfigServletWebServerApplicationContext
准备ApplicationContext IOC容器的基本信息
prepareContext()保存环境信息
IOC容器的后置处理流程
应用初始化器applyInitializers()
遍历所有的ApplicationContextInitializer,调用initialize方法对IOC容器进行初始化扩展功能
调用所有的监听器的
contextPrepared(),EventPublishRunListener(),通知所有的Listener上下文准备完成
调用所有的监听器的
contextLoaded()通知所有Listener上下文已经加载完成
刷新IOC容器
refreshContext()- 创建容器中的所有组件Bean(Spring注解)
调用所有的监听器的
started(context)方法,通知所有Listener项目已经启动调用所有的Runners:callRunners()
- 获取容器中的ApplicationRunner
- 获取容器中的CommandLineRunner
- 合并所有Runner并按照
@Order进行排序 - 遍历所有的Runner,调用
run()方法
调用所有的监听器的
running()方法,通知Listener应用开始运行如果以上出现任何异常,调用所有的监听器的
failed()方法,通知Listener出现异常
自定义Listener
1 | public class MyApplicationContextInitializer implements ApplicationContextInitializer { |
1 | public class MyApplicationListener implements ApplicationListener { |
1 | public class MySpringApplicationRunListener implements SpringApplicationRunListener { |
1 | /** |
1 | /** |
spring.factories
1 | # Run Listeners |