Spring缓存 缓存原理
缓存自动配置类CacheAutoConfiguration,导入CacheConfigurationImportSelector
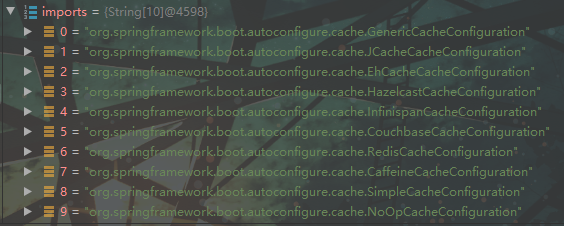
CacheConfigurationImportSelector,获取所有的CacheConfiguration
默认SimpleCacheConfiguration生效:给容器中注册了一个CacheManager:ConcurrentMapCacheManager
ConcurrentMapCacheManager可以获取和创建ConcurrentMapCache类型的缓存组件,将数据保存在ConCurrentMap中
运行流程
方法运行之前,先去查询缓存组件,按照cacheNames指定的名字获取相应的缓存(如果没有Cache组件则会自动创建)
去Cache中查找缓存内容,使用key(默认方法参数)默认使用simpleKeyGenerator生成key
simpleKeyGenerator策略:
如果没有参数,key=new SimpleKey();
如果只有一个参数,key=参数值
如果有多个参数,key=new SimpleKey(params);
没有查到缓存就会调用目标方法,如果缓存中存在key,则从缓存中获取值
将目标方法返回的结果放回缓存中
使用缓存 注解属性
1
2
3
4
5
6
7
8
cacheNames/value key keyGenerator cacheManager cacheResolver condition unless sync
主类注解@EnableCaching开启缓存功能
方法注解@Cacheable缓存返回结果,如果有缓存直接查询缓存而不调用方法
key
1
2
@Cacheable(value = "userInfo", key = "#root.method.getName() + '[' + #id + ']'") public User getById (Serializable id)
自定义keyGenerator
1
2
3
4
5
6
7
8
9
@Bean("myKeyGenerator") public KeyGenerator keyGenerator () return new KeyGenerator(){ @Override public Object generate (Object o, Method method, Object... objects) return method.getName()+ Arrays.asList(objects); } }; }
1
2
@Cacheable(value = "userInfo", keyGenerator = "myKeyGenerator") public User getById (Serializable id)
condition&unless
1 2 3 @Cacheable(value = "userInfo", condition = "#a0>1", unless = "#a0==2") public User getById (Serializable id)
方法注解@CachePut调用方法之后保存或更新缓存结果
1
2
@CachePut(value = "userInfo", key = "'userInfo' + '[' + #entity.id + ']'") public boolean updateById (User entity)
方法注解@CacheEvict缓存清除
1
2
@CacheEvict(value = "userInfo", key = "'userInfo' + '[' + #id + ']'") public boolean removeById (Serializable id)
AllEntries属性:默认为false,为true时清空所有缓存beforeInvocation属性:默认为false,是否在方法之前执行
方法注解Caching配置复杂的缓存情景
1
2
3
4
5
6
7
8
9
10
11
@Caching( cacheable = { @Cacheable(value = "byName", key = "name") }, put = { @CachePut(value = "byId", key = "id"), @CachePut(value = "byAge", key = "age"), } ) @Override public boolean save (User entity)
类注解CacheConfig,用来配置一整个类中的缓存配置,如下例类中所有的缓存注解都不需要再次配置cacheNames/value属性
1
2
3
@CacheConfig(cacheNames = "user") @Service public class UserServiceImpl extends ServiceImpl <UserMapper , User > implements UserService
如果要使用同一个缓存,需要注意这些注解的key是否含义相同(不是简单的代码相同!!)
切换缓存中间件 一般来说,只要容器中注入了相应的Bean,SpringBoot就会自动切换CacheManager,如注入RedisTemplate组件之后RedisCacheManager会自动开启,并关闭默认的ConcurrentMapCacheManager
自定义RedisTemplate和RedisCacheManager,使用json序列化替代默认的jdk序列化
1
2
3
4
5
6
7
8
9
10
11
12
13
14
15
16
17
18
19
20
21
22
23
24
25
26
27
28
29
30
31
32
33
34
@Configuration public class RedisConfig @Bean public RedisTemplate<String, Object> redisTemplate (RedisConnectionFactory factory) RedisTemplate<String, Object> template = new RedisTemplate<>(); template.setConnectionFactory(factory); Jackson2JsonRedisSerializer jsonRedisSerializer = new Jackson2JsonRedisSerializer(Object.class); template.setDefaultSerializer(jsonRedisSerializer); ObjectMapper objectMapper = new ObjectMapper(); objectMapper.setVisibility(PropertyAccessor.ALL, JsonAutoDetect.Visibility.ANY); objectMapper.activateDefaultTyping(LaissezFaireSubTypeValidator.instance, ObjectMapper.DefaultTyping.NON_FINAL); jsonRedisSerializer.setObjectMapper(objectMapper); template.afterPropertiesSet(); return template; } @Bean public RedisCacheManager redisCacheManager (RedisConnectionFactory redisConnectionFactory) RedisCacheWriter redisCacheWriter = RedisCacheWriter.nonLockingRedisCacheWriter(redisConnectionFactory); RedisSerializer<Object> jsonSerializer = new GenericJackson2JsonRedisSerializer(); RedisSerializationContext.SerializationPair<Object> pair = RedisSerializationContext.SerializationPair.fromSerializer(jsonSerializer); RedisCacheConfiguration defaultCacheConfig = RedisCacheConfiguration.defaultCacheConfig().serializeValuesWith(pair) .entryTtl(Duration.ofSeconds(10 )); return new RedisCacheManager(redisCacheWriter, defaultCacheConfig); } }
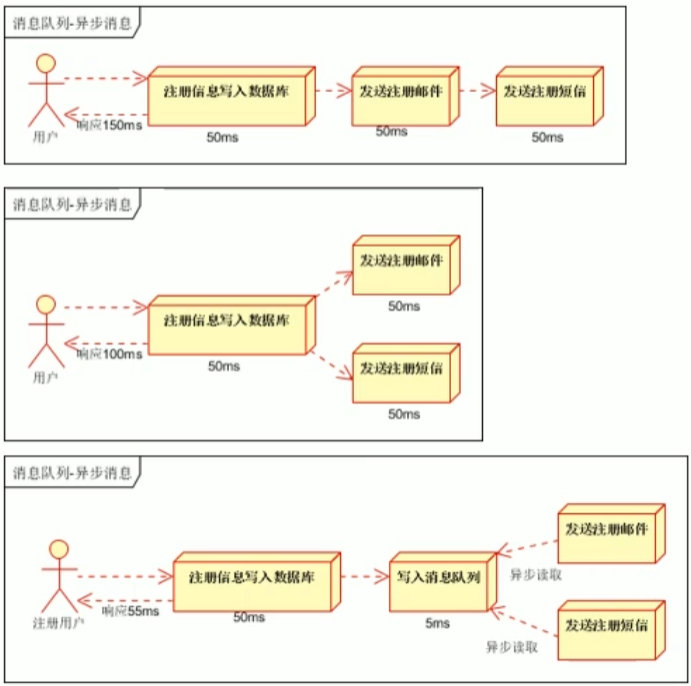
消息队列 概念图解
基础概念
消息服务的对象两个类型
消息代理message broker
目的地destination
消息发送这发送消息后由消息代理接管并传递到目的地
消息队列的目的地形式
消息代理规范
JMS(Java Message Service)
基于JVM消息代理的规范,代表:ActiveMQ,HornetMQ
AMQP(Advanced Message Queing Protocol)
高级消息队列协议,兼容JMS,代表:RabbitMQ
原理简析
RabbitAutoConfiguration配置了连接工厂ConnectionFactory
RabbitProperties封装了RabbitMQ的配置,对应前缀spring.rabbitmq
注入了模板RabbitTemplate
注入了AmqpAdmin:RabbitMQ的系统管理组件
配置环境 包依赖
1 2 3 4 5 <dependency > <groupId > org.springframework.boot</groupId > <artifactId > spring-boot-starter-amqp</artifactId > </dependency >
配置文件
1
2
3
4
5
spring: rabbitmq: host: x.x.x.x username: guest password: xxx
RabbitTemplate 使用RabbitTemplate发送和接收消息
1
2
3
4
5
6
7
8
9
10
11
12
13
14
15
16
17
18
19
20
21
22
23
24
25
26
27
28
29
30
31
32
33
34
35
36
37
38
39
40
41
42
43
@SpringBootTest class Springboot02ApplicationTests @Autowired RabbitTemplate rabbitTemplate; @Test void sendTest () HashMap<String, Object> map = new HashMap<>(); map.put("msg" , "this is a msg from client" ); map.put("list" , Arrays.asList(true , 2 , "object3" )); rabbitTemplate.convertAndSend("springboot.mq" ,"user.warning" ,map); System.out.println("=========>消息发送完成" ); } @Test void getTest1 () Object que1 = rabbitTemplate.receiveAndConvert("que1" ); System.out.println(que1.getClass()); System.out.println(que1); } @Test void getTest2 () Object que2 = rabbitTemplate.receiveAndConvert("que2" ); System.out.println(que2.getClass()); System.out.println(que2); } }
由于默认使用的是jdk序列化,如果我们需要可以注入我们自己的MessageConverter,使其转换为json序列化
1
2
3
4
5
6
7
@Configuration public class MQConfig @Bean public Jackson2JsonMessageConverter messageConverter () return new Jackson2JsonMessageConverter(); } }
注解开发RabbitMQ 主类上添加@EnableRabbit以开启注解功能
使用注解监听队列
1
2
3
4
5
6
7
8
9
10
11
12
13
14
15
16
@Service public class RabbitService @RabbitListener(queues = "que1") public void listenQue1 (User user) System.out.println(user.getClass()); System.out.println(user.toString()); } @RabbitListener(queues = "que2") public void listenQue2 (Message message) System.out.println(message.getClass()); System.out.println(message.toString()); } }
AmqpAdmin 通过AmqpAdmin就可以进行消息队列的一系列操作
1
2
3
4
5
6
7
8
9
10
11
12
13
14
15
16
17
18
19
20
21
22
23
24
25
26
27
28
29
@SpringBootTest class Springboot02ApplicationTests @Autowired AmqpAdmin amqpAdmin; @Test void createExchange () amqpAdmin.declareExchange(new DirectExchange("amqpadmin.exchange" )); } @Test void createQue () amqpAdmin.declareQueue(new Queue("amqpadmin.que" ,true )); } @Test void createBinding () amqpAdmin.declareBinding(new Binding("amqpadmin.que" , Binding.DestinationType.QUEUE, "amqpadmin.exchange" ,"amqp.info" ,null )); } }
ElasticSearch检索 SpringBoot支持两种交互技术:
Jest(默认不生效)
需要导入工具包
SpringData Elasticsearch
使用ElasticsearchTemplate来操作ES
编写ElasticsearchRepository子接口来操作ES
Jest 1 2 3 4 5 <dependency > <groupId > io.searchbox</groupId > <artifactId > jest</artifactId > <version > 6.3.1</version > </dependency >
注入JestClient
1 2 3 4 5 6 7 8 9 10 11 12 13 @Configuration public class JestConfig @Bean public JestClient jestCline () JestClientFactory factory = new JestClientFactory(); factory.setHttpClientConfig(new HttpClientConfig .Builder("http://47.113.225.244:9200" ) .multiThreaded(true ) .build()); return factory.getObject(); } }
实体类
1 2 3 4 5 6 7 8 9 10 11 @Data @AllArgsConstructor @NoArgsConstructor public class Article @JestId private Integer id; private String author; private String title; private String content; }
测试类
1 2 3 4 5 6 7 8 9 10 11 12 13 14 15 16 17 18 19 20 21 22 23 24 25 26 27 28 29 @SpringBootTest class JestApplicationTests @Autowired JestClient jestClient; @Test void testPut () throws IOException Article article = new Article(1 , "张三" , "title" , "hello,world!" ); Index index = new Index.Builder(article).index("docs" ).type("news" ).build(); DocumentResult result = jestClient.execute(index); System.out.println(result); } @Test void testSearch () throws IOException String json = "{\n" + " \"query\": {\n" + " \"match\": {\n" + " \"author\": \"张三\"\n" + " }\n" + " }\n" + "}" ; Search search = new Search.Builder(json).addIndex("docs" ).addType("news" ).build(); SearchResult result = jestClient.execute(search); System.out.println(result); } }
实现Repository接口 1 2 public interface UserRepository extends ElasticsearchRepository <User , Integer > }
实体类
1 2 3 4 5 6 7 8 9 10 11 12 @Document(indexName = "docs2") @Data @AllArgsConstructor @NoArgsConstructor public class User @Id private int id; private String name; private int age; }
测试类
1 2 3 4 5 6 7 8 9 10 11 12 13 14 15 16 17 @SpringBootTest public class RepositoryTest @Autowired UserRepository userRepository; @Test void testIndex () User user = new User(1 ,"张三" ,3 ); userRepository.save(user); } @Test void testSearch () Iterable<User> users = userRepository.findAll(); System.out.println(users); } }
使用Template 这部分的使用,以及ElasticSearch的安装的其他事项在我的另一篇博客ElasticSearch中有详细介绍
异步 异步任务 主运行类上添加注解开启异步功能@EnableAsync
处理访问请求
1 2 3 4 5 6 7 8 9 10 11 @RestController public class AsyncController @Autowired AsyncService asyncService; @RequestMapping("/hello") public String hello () asyncService.hello(); return "success" ; } }
假设AsyncService类处理后台业务需要三秒时间(这里使用线程睡眠表达含义),访问/hello路径需要等待三秒才能访问页面内容
1 2 3 4 5 6 7 8 9 10 11 12 13 @Service public class AsyncService @Async public void hello () try { Thread.sleep(3000 ); } catch (InterruptedException e) { e.printStackTrace(); } System.out.println("处理数据中......" ); } }
当标识异步方法之后,访问/hello路径不再需要等待三秒才能访问页面内容
定时任务 运行主类上添加注解开启定时功能@EnableScheduling
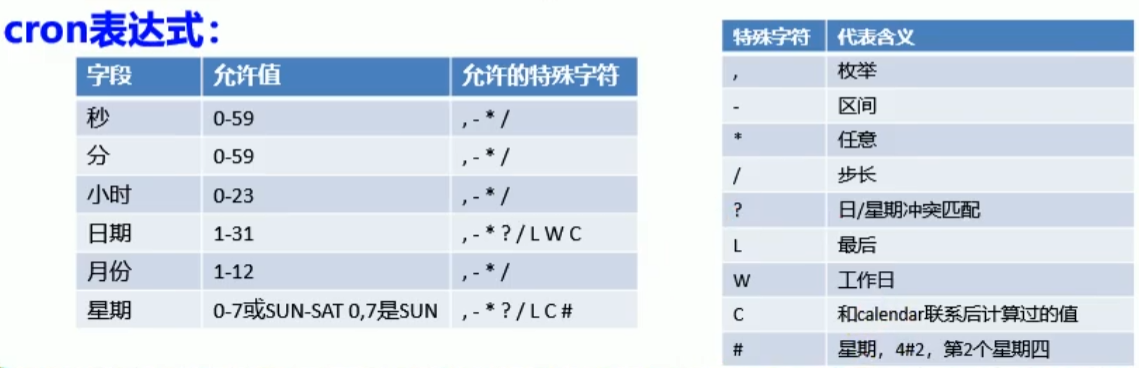
1 2 3 4 5 6 7 8 9 10 11 12 13 14 15 16 @Scheduled(cron = "0 * * * * MON-FRI") public void scheduled () System.out.println("Scheduled Hello......" ); }
一些常用参数举例
邮件任务 1 2 3 4 <dependency > <groupId > org.springframework.boot</groupId > <artifactId > spring-boot-starter-mail</artifactId > </dependency >
使用发送邮箱的服务,需要自己在对应邮箱设置中开启smtp服务并获取授权码,这里的password不是登录邮箱用的密码,而是开启服务时获得的授权码
配置文件
1 2 3 4 5 6 7 8 9 10 11 spring: mail: host: smtp.163.com username: jteam6register@163.com password: xxx properties: mail: smtp: ssl: enable: true
安全 安全框架的主要作用:
认证Authentication:建立用户
授权Authorization:给用户授予访问权限
SpringSecurity 1 2 3 4 5 6 7 8 9 10 <dependency > <groupId > org.springframework.boot</groupId > <artifactId > spring-boot-starter-security</artifactId > </dependency > <dependency > <groupId > org.thymeleaf.extras</groupId > <artifactId > thymeleaf-extras-springsecurity5</artifactId > </dependency >
配置类
1 2 3 4 5 6 7 8 9 10 11 12 13 14 15 16 17 18 19 20 21 22 23 24 25 26 27 28 29 30 31 32 33 34 35 36 37 38 39 40 41 42 43 @EnableWebSecurity public class SecurityConfig extends WebSecurityConfigurerAdapter @Override protected void configure (HttpSecurity http) throws Exception http.authorizeRequests().antMatchers("/" ).permitAll() .antMatchers("/level1/**" ).hasRole("vip1" ) .antMatchers("/level2/**" ).hasRole("vip2" ) .antMatchers("/level3/**" ).hasRole("vip3" ); http.formLogin().loginPage("/loginPage" ).usernameParameter("user" ).passwordParameter("pwd" ); http.logout().logoutSuccessUrl("/" ); http.rememberMe(); } @Override protected void configure (AuthenticationManagerBuilder auth) throws Exception auth.inMemoryAuthentication().passwordEncoder(new BCryptPasswordEncoder()) .withUser("lan5th" ).password(new BCryptPasswordEncoder().encode("123456" )).roles("vip1" ,"vip2" ,"vip3" ) .and() .withUser("zhangsan" ).password(new BCryptPasswordEncoder().encode("123456" )).roles("vip1" ); } }
视图解析类
1 2 3 4 5 6 7 8 9 10 11 12 13 14 15 16 17 18 19 20 21 22 23 24 25 26 27 @Controller public class ModelController @RequestMapping("/") public String hello () return "index" ; } @RequestMapping("/level1") public String level1 () return "level1/vip1" ; } @RequestMapping("/level2") public String level2 () return "level2/vip2" ; } @RequestMapping("/level3") public String level3 () return "level3/vip3" ; } @RequestMapping("/loginPage") public String loginPage () return "login" ; } }
权限分流页面
1 2 3 4 5 6 7 8 9 10 11 12 13 14 15 16 17 18 19 20 21 22 23 24 25 26 27 28 29 30 31 32 33 34 <!DOCTYPE html > <html lang ="en" xmlns:th ="http://www.thymeleaf.org" xmlns:sec ="http://www.thymeleaf.org/extras/spring-security" > <head > <meta charset ="UTF-8" > <title > 首页</title > </head > <body > <div sec:authorize ="isAuthenticated()" > 当前用户:<span sec:authentication ="name" > </span > <br > 当前角色:<span sec:authentication ="principal.authorities" > </span > </div > <div > <a th:href ="@{/level1}" > vip1</a > <a th:href ="@{/level2}" > vip2</a > <a th:href ="@{/level3}" > vip3</a > </div > <div > <form th:action ="@{/upload}" enctype ="multipart/form-data" method ="post" > <input type ="file" name ="headerImg" > <br > <input type ="file" name ="photos" multiple > <br > <input type ="submit" > </form > </div > <div > <div sec:authorize ="!isAuthenticated()" > <a th:href ="@{/loginPage}" > 登录</a > </div > <div sec:authorize ="isAuthenticated()" > <a th:href ="@{/logout}" > 注销</a > </div > </div > </body > </html >
登录页
1 2 3 4 5 6 7 8 9 10 11 12 13 14 15 16 17 18 19 <!DOCTYPE html > <html lang ="en" xmlns:th ="http://www.thymeleaf.org" xmlns:sec ="http://www.thymeleaf.org/extras/spring-security" > <head > <meta charset ="UTF-8" > <title > 登录</title > </head > <body > <div > 这是登录页面</div > <div > <form th:action ="@{/loginPage}" method ="post" > 用户名:<input name ="user" > <br > 密码:<input type ="password" name ="pwd" > <br > <input type ="checkbox" name ="rememberme" > 记住我<br > <input type ="submit" value ="登录" > </form > </div > </body > </html >
使用数据库中的数据来进行用户授权 UserDetailsService实现类
1 2 3 4 5 6 7 8 9 10 11 12 13 14 15 16 17 18 19 20 21 22 23 24 25 26 public class UserDetailImpl implements UserDetailsService @Autowired private UserService userService; @Override public UserDetails loadUserByUsername (String s) throws UsernameNotFoundException QueryWrapper<com.example.mybatisplus.model.domain.User> wrapper = new QueryWrapper<>(); wrapper.eq("name" , s); com.example.mybatisplus.model.domain.User userInfo = userService.getOne(wrapper); if (userInfo == null ) { System.out.println("用户不存在" ); return null ; } BCryptPasswordEncoder encoder = new BCryptPasswordEncoder(); return new User(userInfo.getName(), encoder.encode(userInfo.getPassword()), AuthorityUtils.commaSeparatedStringToAuthorityList("ADMIN" )); } }
配置类
1 2 3 4 5 6 7 8 9 10 11 12 13 14 15 16 17 18 19 20 21 22 23 24 25 26 27 28 29 30 31 32 33 34 @EnableWebSecurity public class SecurityConfig extends WebSecurityConfigurerAdapter @Override protected void configure (HttpSecurity http) throws Exception http.authorizeRequests().antMatchers("/" ).permitAll() .antMatchers("/api/user/test" ).hasRole("ADMIN" ); http.formLogin().usernameParameter("user" ).passwordParameter("pwd" ); http.logout().logoutSuccessUrl("/" ); http.rememberMe(); } @Bean public UserDetailImpl userDetails () return new UserDetailImpl(); } @Override protected void configure (AuthenticationManagerBuilder auth) throws Exception auth.userDetailsService(userDetails()).passwordEncoder(new BCryptPasswordEncoder()); } }
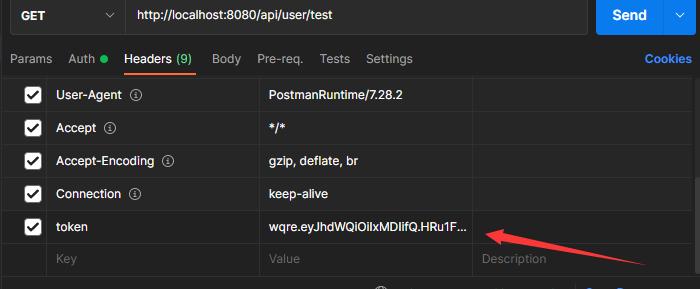
单点登录 token简介 token一般包含三部分:
最后组合起来的token格式为:header.payload.signature
服务器进行token的有效验证时,先将收到的前两部分header和payload用相应算法形成结果签名,再将得到的签名与第三部分的signature进行对比,如果相同则验证通过
JWT 导包
1 2 3 4 5 <dependency > <groupId > com.auth0</groupId > <artifactId > java-jwt</artifactId > <version > 3.18.2</version > </dependency >
自定义注解
@PassToken跳过token验证
1 2 3 4 5 @Target({ElementType.METHOD, ElementType.TYPE}) @Retention(RetentionPolicy.RUNTIME) public @interface PassToken { boolean required () default true }
@UserLoginToken进行用户token验证
1 2 3 4 5 @Target({ElementType.METHOD, ElementType.TYPE}) @Retention(RetentionPolicy.RUNTIME) public @interface UserLoginToken { boolean required () default true }
获取JWT token
1 JWT.create().withAudience(String.valueOf(user.userId)).sign(Algorithm.HMAC256(user.getPassword()));
自定义拦截器
1 2 3 4 5 6 7 8 9 10 11 12 13 14 15 16 17 18 19 20 21 22 23 24 25 26 27 28 29 30 31 32 33 34 35 36 37 38 39 40 41 42 43 44 45 46 47 48 49 50 51 52 53 54 55 56 57 58 59 60 61 62 63 64 65 66 public class AuthenticationInterceptor implements HandlerInterceptor @Autowired UserService userService; @Override public boolean preHandle (HttpServletRequest httpServletRequest, HttpServletResponse httpServletResponse, Object object) throws Exception String token = httpServletRequest.getHeader("token" ); if (!(object instanceof HandlerMethod)) { return true ; } HandlerMethod handlerMethod = (HandlerMethod) object; Method method = handlerMethod.getMethod(); if (method.isAnnotationPresent(PassToken.class)) { PassToken passToken = method.getAnnotation(PassToken.class); if (passToken.required()) { return true ; } } if (method.isAnnotationPresent(UserLoginToken.class)) { UserLoginToken userLoginToken = method.getAnnotation(UserLoginToken.class); if (userLoginToken.required()) { if (token == null ) { throw new RuntimeException("无token,请重新登录" ); } String userId; try { userId = JWT.decode(token).getAudience().get(0 ); } catch (JWTDecodeException j) { throw new RuntimeException("401" ); } User user = userService.getById(userId); if (user == null ) { throw new RuntimeException("用户不存在,请重新登录" ); } JWTVerifier jwtVerifier = JWT.require(Algorithm.HMAC256(user.getPassword())).build(); try { jwtVerifier.verify(token); } catch (JWTVerificationException e) { throw new RuntimeException("401" ); } return true ; } } return true ; } @Override public void postHandle (HttpServletRequest httpServletRequest, HttpServletResponse httpServletResponse, Object o, ModelAndView modelAndView) throws Exception } @Override public void afterCompletion (HttpServletRequest httpServletRequest, HttpServletResponse httpServletResponse, Object o, Exception e) throws Exception } }
配置类
1 2 3 4 5 6 7 8 9 10 11 12 @Configuration public class JWTConfig implements WebMvcConfigurer @Bean public AuthenticationInterceptor authenticationInterceptor () return new AuthenticationInterceptor(); } @Override public void addInterceptors (InterceptorRegistry registry) registry.addInterceptor(authenticationInterceptor()).addPathPatterns("/**" ); } }
自定义注解
进行访问时带上之前服务器签名过的token就能进行用户信息的验证
分布式 分布式架构遇到的四个核心问题:
这么多服务,客户端应该如何去访问
api网管,服务路由
这么多服务,服务之间应该如何通信
Http或RPC框架,异步调用
这么多服务,如何管理
服务注册与发现
服务宕机应该怎么做
熔断机制,服务降级
注重原因:网络是不可靠的
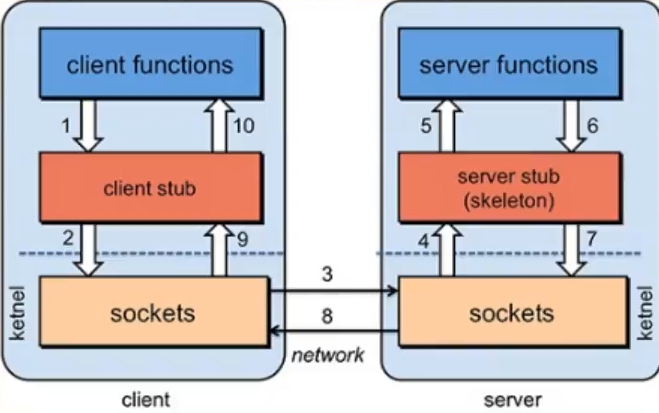
RPC Remote Procedure Call:远程过程调用
是一种进程间的通信方式,是一种技术思想,不是规范,突出程序调用另一个网络空间中的过程或函数
两个核心:
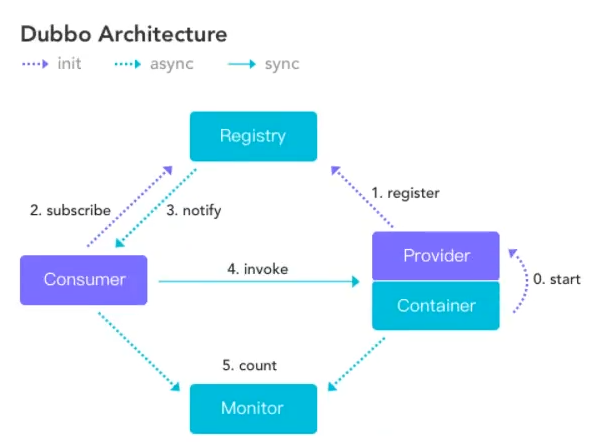
Dubbo+Zookeeper Dubbo
Dubbo是一个高性能、轻量级的RPC通信框架,提供了三大核心能力:
面向接口的远程方法调用
智能容错和负载均衡
服务启动注册和发现
现在已经被Apache基金会接管
Dubbo默认端口20880
ZooKeeper
zookeeper是一款Dubbo的注册中心服务器程序
docker安装zookeeper,默认端口2181
1 2 docker pull zookeeper:3.7.0 docker run --name zookeeper -p 2181:2181 --restart always -d zookeeper:3.7.0
Dubbo-admin
dubbo-admin是一个监控管理后台,可以查看我们注册和消费了的服务的具体信息
1 2 3 4 5 6 7 8 9 docker pull chenchuxin/dubbo-admin docker run -it -d --name dubbo-admin \ -v /xxx/xxx/dubbo-admin:/data \ -p 8080:8080 \ -e dubbo.registry.address=zookeeper://47.113.225.244:2181 \ -e dubbo.admin.root.password=root \ -e dubbo.admin.guest.password=root \ chenchuxin/dubbo-admin
这时访问8080端口并输入用户名和密码就能看到管理页面了
依赖
服务端和客户端都需要引入dubbo和zkclient的依赖
服务端和客户端都需要引入dubbo和zkclient的依赖
1 2 3 4 5 6 7 8 9 10 11 12 13 14 15 16 17 18 19 20 21 22 23 24 25 26 27 28 29 30 31 32 33 34 <dependency > <groupId > org.apache.dubbo</groupId > <artifactId > dubbo-spring-boot-starter</artifactId > <version > 2.7.3</version > </dependency > <dependency > <groupId > com.github.sgroschupf</groupId > <artifactId > zkclient</artifactId > <version > 0.1</version > </dependency > <dependency > <groupId > org.apache.curator</groupId > <artifactId > curator-recipes</artifactId > <version > 2.12.0</version > </dependency > <dependency > <groupId > org.apache.curator</groupId > <artifactId > curator-framework</artifactId > <version > 2.12.0</version > </dependency > <dependency > <groupId > org.apache.zookeeper</groupId > <artifactId > zookeeper</artifactId > <version > 3.4.14</version > <exclusions > <exclusion > <groupId > org.slf4j</groupId > <artifactId > slf4j-log4j12</artifactId > </exclusion > </exclusions > </dependency >
服务端
引入依赖dubbo和zkclient的依赖
配置dubbo扫描包和注册中心地址
使用@Service发布服务
启动应用
配置文件
1 2 3 dubbo.application.name =provider dubbo.registry.address =zookeeper://47.113.225.244:2181 dubbo.scan.base-package =com.example.provider.service
服务接口
1 2 3 4 5 package com.example.provider.service;public interface TicketService public String getTicket () }
服务实现类
1 2 3 4 5 6 7 8 9 10 @Component @Service public class TicketServiceImpl implements TicketService @Override public String getTicket () return "一张电影票" ; } }
消费者 配置文件
1 2 dubbo.application.name =provider dubbo.registry.address =zookeeper://47.113.225.244:2181
服务接口
==警告:这里的全类名路径(包路径)必须与服务端完全相同,不然会报错==
1 2 3 4 5 package com.example.provider.service;public interface TicketService public String getTicket () }
用户服务类
1 2 3 4 5 6 7 8 9 10 11 12 @Service public class UserService @Reference TicketService ticketService; public String getTicket () return ticketService.getTicket(); } }
测试类
1 2 3 4 5 6 7 8 9 10 11 @SpringBootTest class ConsumerApplicationTests @Autowired UserService userService; @Test void contextLoads () String ticket = userService.getTicket(); System.out.println("买到票了:" +ticket); } }
SpringCloud
待补充
热部署 四种情况实现热部署
禁用模板引擎的缓存,项目运行过程中build就可以重新编译页面并生效
SpringLoaded:Spring官方的热部署程序
JRebel:收费的热部署插件
SpringBoot Devtools
SpringBoot Devtools
1 2 3 4 5 6 <dependency > <groupId > org.springframework.boot</groupId > <artifactId > spring-boot-devtools</artifactId > <scope > runtime</scope > <optional > true</optional > </dependency >
在运行项目时修改文件后只需要Build Project(快捷键ctrl+F9)就可以将改动部署到运行中的应用上,实时查看效果,不需要重启项目