基本概念
基本概述
ELK:Elasticsearch+Logstash+Kibana
基本特征
- Elasticsearch基于Lucene,java开发的,而Lucene是一套信息检索工具包(jar),不包含搜索引擎
- 开源高扩展的分布式搜索引擎,近乎实时的存储和检索数据,可以处理PB级别的数据
- 主要功能:全文搜索、结构化搜索、分析
最低要求jdk1.8
默认端口9200,集群通信端口9300
ES数据结构
- 索引indices
- types(逐渐弃用)
- documents
- fields
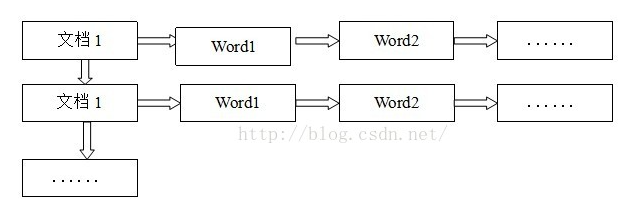
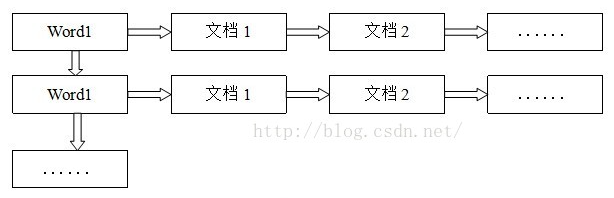
倒排索引
开始ES
安装ES
这里使用docker安装
限制系统进程的虚拟内存区域大小,否则可能无法运行
1
2
| sysctl -w vm.max_map_count=262144
cat /proc/sys/vm/max_map_count
|
服务器运存小,因此设置虚拟机最大内存Xms为256m
1
2
3
4
|
docker pull elasticsearch:7.14.1
docker run --name elasticsearch -d -e ES_JAVA_OPTS="-Xms256m -Xmx256m" -e "discovery.type=single-node" -p 9200:9200 -p 9300:9300 elasticsearch:7.14.1
|
访问9200端口,能够返回提示信息json即运行成功

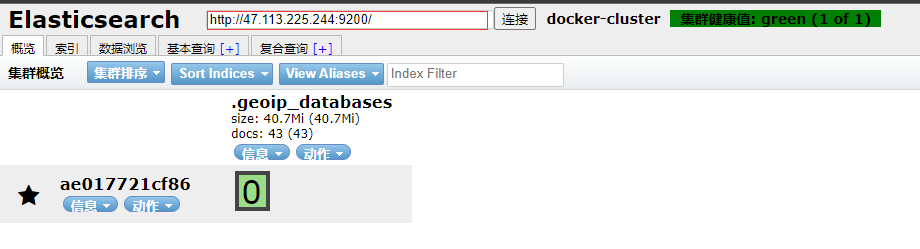
elasticsearch-head是一个简单的的es可视化界面,可以用来查看数据,默认端口9100
1
2
3
4
5
|
docker pull mobz/elasticsearch-head:5
docker run --name elasticsearch-head -p 9100:9100 -d mobz/elasticsearch-head:5
|
这时访问9100端口就可以看到可视化界面了
这时9100端口的ES-header是无法访问到9200端口的ES,存在跨域问题
需要修改ES的配置文件,默认在/config下的elasticsearch.yml
1
| vi config/elasticsearch.yml
|
如果不能用vi,就在外部编写配置文件然后cp进容器
在末尾添加配置
1
2
| http.cors.enabled: true
http.cors.allow-origin: "*"
|
因为docker容器的ip是内部ip,因此我们需要手动连接,将上方连接栏的http://localhost:9200/改为我们自己的ip
ES-header无法查询数据问题
修改/usr/src/app/_site下的vendor.js文件
1
2
| docker cp elasticsearch-head:/usr/src/app/_site/vendor.js vendor.js
vim vendor.js
|
vim快捷键:行号跳到指定行
修改
1、6886行
contentType: "application/x-www-form-urlencoded"
改成
contentType: “application/json;charset=UTF-8”
2、7573行
var inspectData = s.contentType === “application/x-www-form-urlencoded” &&
改成
var inspectData = s.contentType === “application/json;charset=UTF-8” &&
1
| docker cp vendor.js elasticsearch-head:/usr/src/app/_site/vendor.js
|
无需重启,刷新页面就可以显示索引数据了
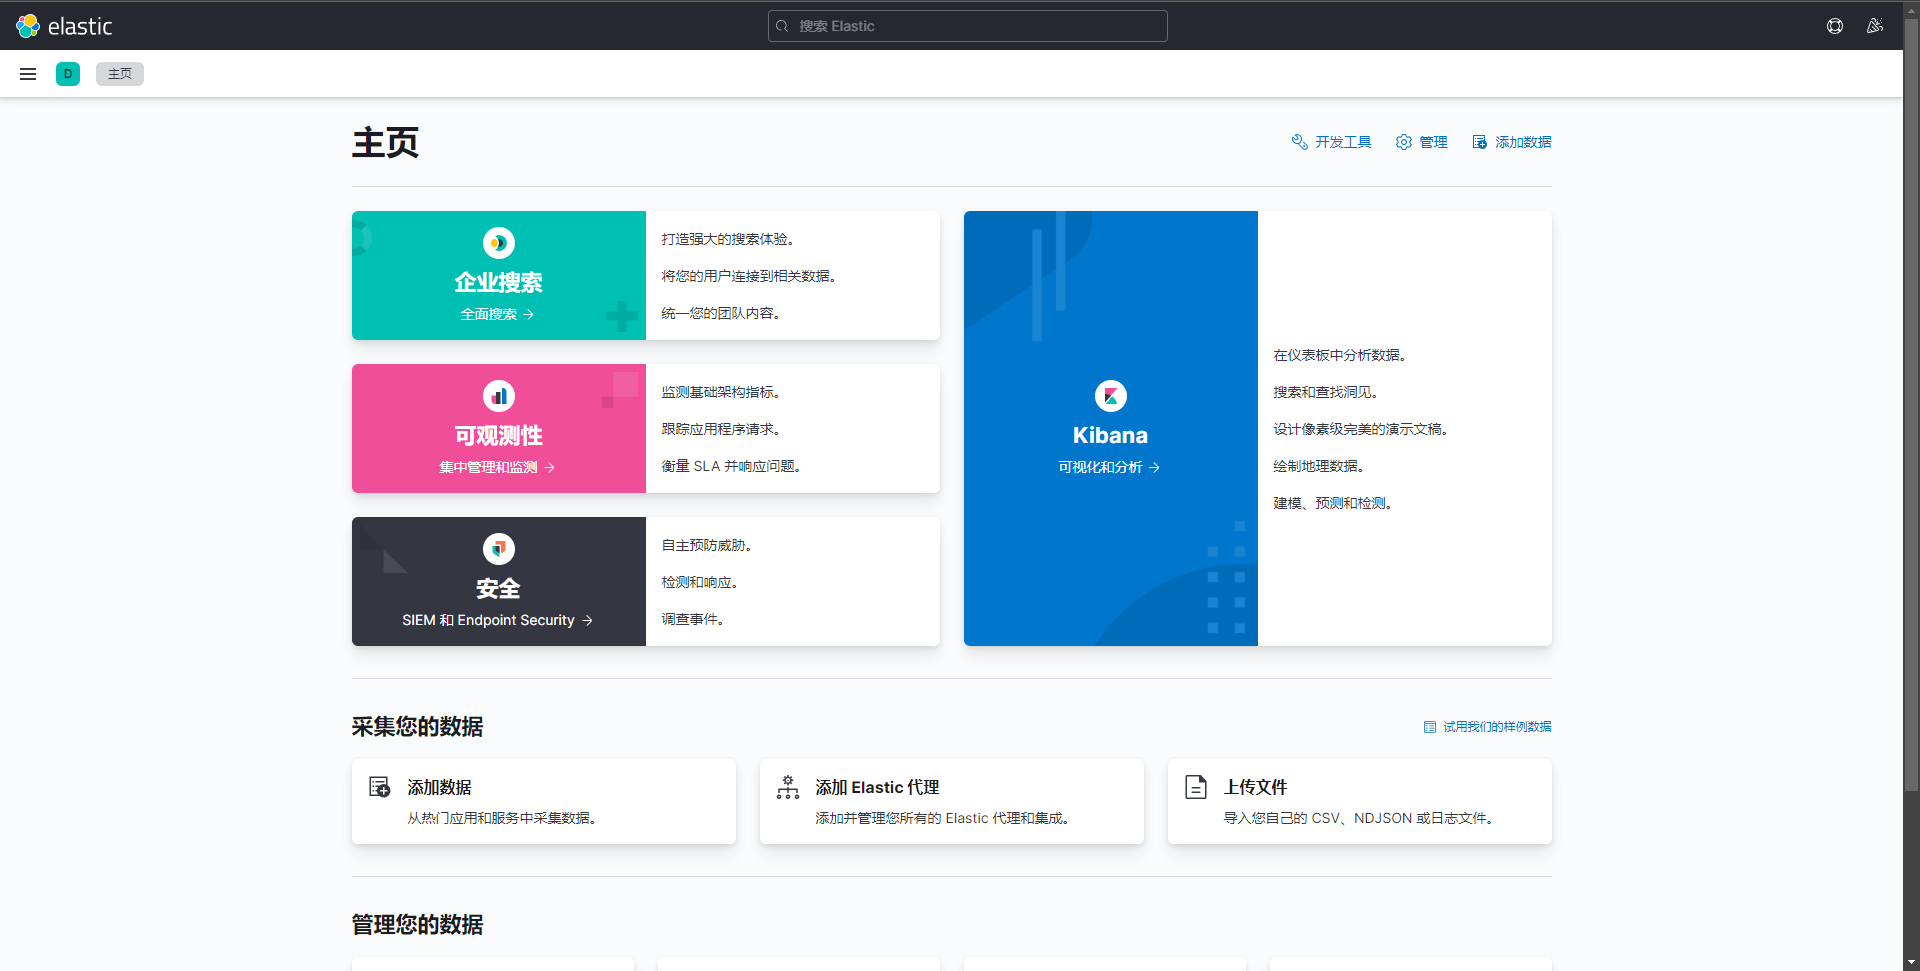
安装kibana
kibana是一个好用的es可视化界面,可以用来发送请求,默认端口5601
1
2
3
4
|
docker pull kibana:7.14.1
docker run --name kibana -e ELASTICSEARCH_URL=http://47.113.225.244:9200 -p 5601:5601 -d kibana:7.14.1
|
这时访问5601端口,显示Kibana server is not ready yet,我们需要进一步的配置
进入kibana容器修改文件
1
2
| docker exec -it kibana bash
vi /opt/kibana/config/kibana.yml
|
将elasticsearch.hosts修改为自己ES的IP
1
| elasticsearch.hosts: [ "http://47.113.225.244:9200" ]
|
再次访问,发现可以正常访问了
启用汉化
1
2
| docker exec -it kibana bash
vi /usr/share/kibana/config/kibana.yml
|
在文件末尾追加
这时我们重启kibana就能看到中文界面了
IK分词器
IK分词器可以帮助我们分解中文词句
因为是需要在ES内部安装的插件,因此需要我们手动下载,github地址:
Releases · medcl/elasticsearch-analysis-ik (github.com),下载完成后传输到服务器
==这里也需要注意版本对应,否则会报错==
1
2
3
4
5
6
7
8
9
10
11
12
13
14
|
docker cp elasticsearch-analysis-ik-7.14.1.zip elasticsearch:/usr/share/elasticsearch/plugins
docker exec -it elasticsearch bash
mkdir /usr/share/elasticsearch/plugins/ik
mv /usr/share/elasticsearch/plugins/elasticsearch-analysis-ik-7.14.1.zip /usr/share/elasticsearch/plugins/ik
cd /usr/share/elasticsearch/plugins/ik/
unzip elasticsearch-analysis-ik-7.14.1.zip
rm -rf elasticsearch-analysis-ik-7.14.1.zip
|
然后重启ES容器
可以在容器中使用命令来查看是否启用成功,路径/usr/share/elasticsearch/bin

简单使用
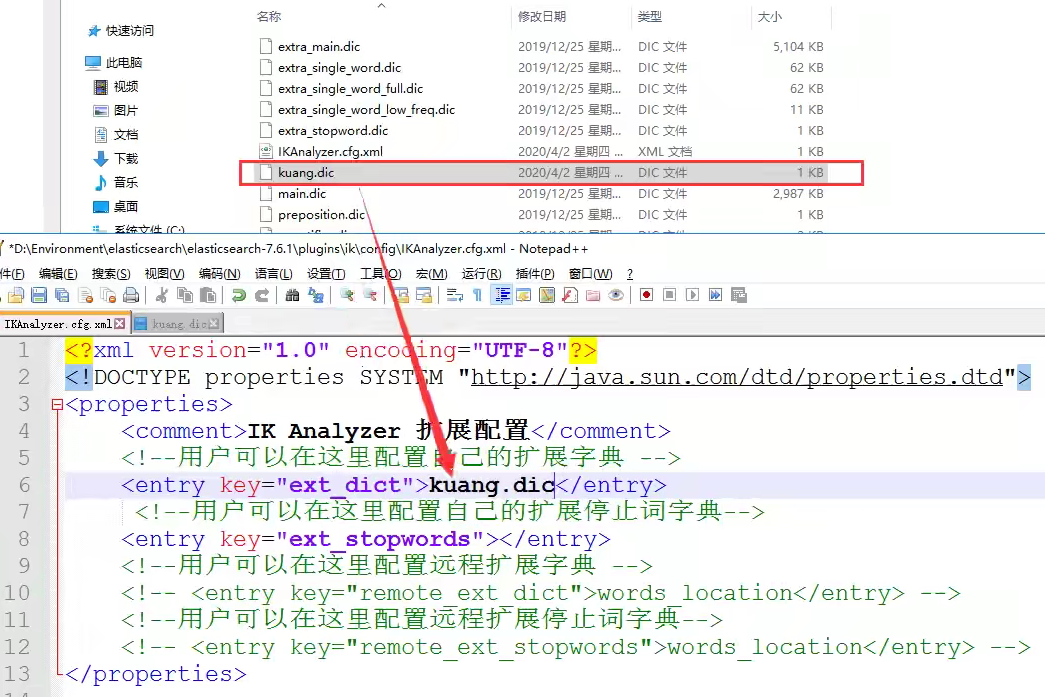
ik分词器是从它的字典中进行词句匹配的,如果想让分词结果中能够包含我们自己的词语就需要向字典中添加
在容器内/usr/share/elasticsearch/plugins/ik/config路径下先编写自己的.dic文件,然后将其添加到配置文件IKAnalyzer.cfg.xml中
基本操作
索引操作
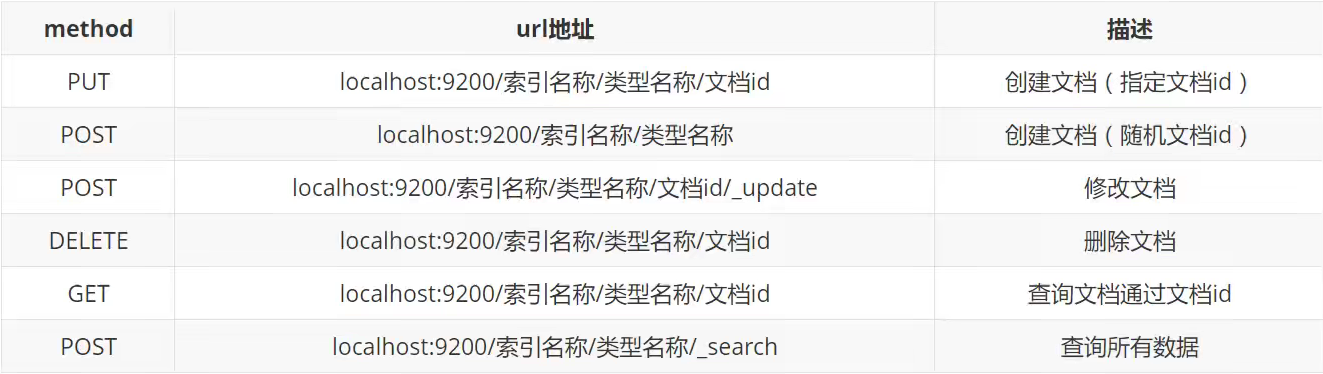
基本方法表
PUT创建索引
注意以后类型名type会逐渐弃用
存入或覆盖数据(如果没有索引则会自动创建,并自动指定字段类型)
1
2
3
4
5
| PUT /test_index/test_id
{
"name": "lan5th",
"age": 3
}
|
创建索引并定义规则
1
2
3
4
5
6
7
8
9
10
11
12
13
14
15
16
| PUT /test01
{
"mappings": {
"properties": {
"name":{
"type": "text"
},
"age":{
"type": "long"
},
"birthday":{
"type": "date"
}
}
}
}
|
GET获取信息(索引、type或文档id)
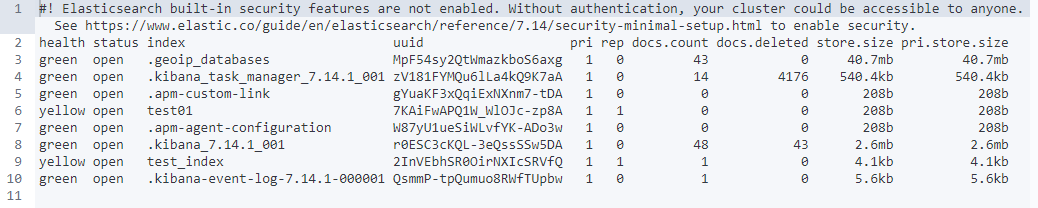
查看所有索引
修改信息
1
2
3
4
5
6
| UPDATE /test01/1
{
"name": "张三",
"age": 18,
"birthday": "2021-9-29"
}
|
使用UPDATE或PUT方式实际上是覆盖原有数据,如果有字段漏填会造成数据丢失
可以使用POST指定方法的方式进行更新,仅修改指定了的字段
1
2
3
4
| POST /test01/1/_update
{
"name": "张三"
}
|
无论使用怎样的方式,修改信息后默认version字段都会自增
DELETE删除信息(索引、type或文档id)
查询
1
| GET /test01/_search?q=name:lan5th
|
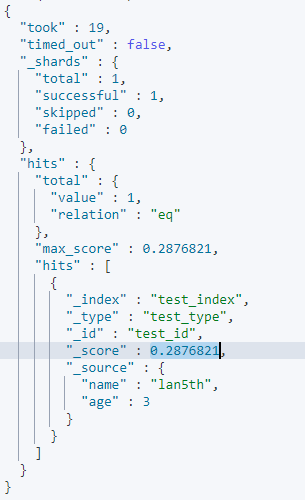
查询结果中的score代表匹配度
标准的查询
1
2
3
4
5
6
7
8
9
10
11
12
13
14
15
16
17
18
19
20
21
| GET /test01/_search
{
"query": {
"match": {
"name": "lan5th"
}
},
"_source": [
"name",
"birthday"
],
"sort": [
{
"age": {
"order": "desc"
}
}
],
"from": 0,
"size": 1
}
|
bool查询
1
2
3
4
5
6
7
8
9
10
11
12
13
14
15
16
17
18
19
| GET /test01/_search
{
"query": {
"bool": {
"must": [
{
"match": {
"name": "lan5th"
}
},
{
"match": {
"age": 3
}
}
]
}
}
}
|
过滤器
1
2
3
4
5
6
7
8
9
10
11
12
13
14
15
16
17
18
19
20
21
22
| GET /test01/_search
{
"query": {
"bool": {
"must": [
{
"match": {
"name": "lan5th"
}
}
],
"filter": {
"range": {
"age": {
"gt": 13,
”lte“: 33 //可以使用多个条件进行过滤
}
}
}
}
}
}
|
多标签匹配
1
2
3
4
5
6
7
8
| GET /test01/_search
{
"query": {
"match": {
"tags": "测试 吃瓜"
}
}
}
|
高亮查询:将查询结果高亮
1
2
3
4
5
6
7
8
9
10
11
12
13
14
15
| GET /test01/_search
{
"query": {
"match": {
"name": "lan5th"
}
},
"highlight": {
"pre_tags": "<p class='key' style='color:red'>",
"post_tags": "</p>",
"fields": {
"name": {}
}
}
}
|
查询方法:
- match:查询条件通过分词器解析
- term:通过倒排索引查询,查询条件不被分词
数据类型:
- text:查询结果可以被分词解析
- key-word:查询结果不能被分词解析
ES集成SpringBoot
SpringBoot支持两种交互技术:
- Jest(默认不生效,需要导入工具包)
- SpringData Elasticsearch
依赖与配置
1
2
3
4
5
6
7
8
9
10
11
|
<dependency>
<groupId>org.springframework.boot</groupId>
<artifactId>spring-boot-starter-data-elasticsearch</artifactId>
</dependency>
<dependency>
<groupId>com.alibaba</groupId>
<artifactId>fastjson</artifactId>
<version>1.2.76</version>
</dependency>
|
一定要保证导入的依赖与ES版本一致,如果不一致需要自定义ES依赖版本
1
2
3
4
| <properties>
<java.version>1.8</java.version>
<elasticsearch.version>7.14.1</elasticsearch.version>
</properties>
|
编写配置类
1
2
3
4
5
6
7
8
9
10
11
12
| @Configuration
public class ElasticSearchConfig {
@Bean
public RestHighLevelClient restHighLevelClient() {
RestHighLevelClient client = new RestHighLevelClient(
RestClient.builder(
new HttpHost("47.113.225.244", 9200, "http")
)
);
return client;
}
}
|
索引api
测试类
1
2
3
4
5
6
7
8
9
10
11
12
13
14
15
16
17
18
19
20
21
22
23
24
25
26
27
28
29
30
31
| @SpringBootTest
class ElasticsearchApplicationTests {
@Autowired
private RestHighLevelClient restHighLevelClient;
@Test
void testCreateIndex() throws IOException {
CreateIndexRequest request = new CreateIndexRequest("index01");
CreateIndexResponse response = restHighLevelClient.indices().create(request, RequestOptions.DEFAULT);
System.out.println(response.toString());
}
@Test
void testExistIndex() throws IOException {
GetIndexRequest request = new GetIndexRequest("index01");
boolean exists = restHighLevelClient.indices().exists(request, RequestOptions.DEFAULT);
System.out.println(exists);
}
@Test
void testDeleteIndex() throws IOException {
DeleteIndexRequest request = new DeleteIndexRequest("index01");
AcknowledgedResponse response = restHighLevelClient.indices().delete(request, RequestOptions.DEFAULT);
System.out.println(response);
}
}
|
文档api
实体类
1
2
3
4
5
6
7
| @Data
@AllArgsConstructor
@NoArgsConstructor
public class User {
private String name;
private int age;
}
|
测试类
1
2
3
4
5
6
7
8
9
10
11
12
13
14
15
16
17
18
19
20
21
22
23
24
25
26
27
28
29
30
31
32
33
34
35
36
37
38
39
40
41
42
43
44
45
46
47
48
49
50
51
52
53
54
55
56
57
58
59
60
61
62
63
64
65
66
67
68
69
70
71
72
73
74
75
76
77
78
79
80
81
82
83
84
85
86
87
88
89
90
91
92
93
94
95
96
97
98
99
100
101
| @SpringBootTest
public class DocTest {
@Autowired
RestHighLevelClient restHighLevelClient;
@Test
void testAddDoc() throws IOException {
IndexRequest request = new IndexRequest("index01");
User user = new User("lan5th", 3);
request.id("1").timeout(TimeValue.timeValueSeconds(1)).timeout("1s")
.source(JSON.toJSONString(user), XContentType.JSON);
IndexResponse response = restHighLevelClient.index(request, RequestOptions.DEFAULT);
System.out.println(response.toString());
System.out.println(response.status());
}
@Test
void testExistsDoc() throws IOException {
GetRequest request = new GetRequest("index01", "1");
request.fetchSourceContext(new FetchSourceContext(false))
.storedFields("_none_");
boolean exists = restHighLevelClient.exists(request, RequestOptions.DEFAULT);
System.out.println(exists);
}
@Test
void testGetDoc() throws IOException {
GetRequest request = new GetRequest("index01", "1");
GetResponse response = restHighLevelClient.get(request, RequestOptions.DEFAULT);
String source = response.getSourceAsString();
System.out.println(response);
System.out.println(source);
}
@Test
void testUpdateDoc() throws IOException {
UpdateRequest request = new UpdateRequest("index01", "1");
request.timeout("1s");
User user = new User("lanstanger", 18);
request.doc(JSON.toJSONString(user),XContentType.JSON);
UpdateResponse response = restHighLevelClient.update(request, RequestOptions.DEFAULT);
System.out.println(response.status());
}
@Test
void testDeleteDoc() throws IOException {
DeleteRequest request = new DeleteRequest("index01", "3");
request.timeout("1s");
DeleteResponse response = restHighLevelClient.delete(request, RequestOptions.DEFAULT);
System.out.println(response.status());
}
@Test
void testBulkDoc() throws IOException {
BulkRequest request = new BulkRequest();
request.timeout("1s");
ArrayList<User> userList = new ArrayList<>();
userList.add(new User("user2", 2));
userList.add(new User("user3", 3));
userList.add(new User("user4", 4));
userList.add(new User("user5", 5));
userList.add(new User("user6", 6));
for (int i = 0; i < userList.size(); i++) {
request.add(new IndexRequest("index01").id(""+(i+2))
.source(JSON.toJSONString(userList.get(i)),XContentType.JSON));
}
BulkResponse response = restHighLevelClient.bulk(request, RequestOptions.DEFAULT);
System.out.println(response.hasFailures());
}
@Test
void testSearch() throws IOException {
SearchRequest request = new SearchRequest("index01");
SearchSourceBuilder sourceBuilder = new SearchSourceBuilder();
TermQueryBuilder termQueryBuilder = QueryBuilders.termQuery("name", "lan5th");
sourceBuilder.query(termQueryBuilder);
sourceBuilder.timeout(new TimeValue(60, TimeUnit.SECONDS));
request.source(sourceBuilder);
SearchResponse response = restHighLevelClient.search(request, RequestOptions.DEFAULT);
System.out.println(JSON.toJSONString(response.getHits()));
System.out.println("=================================");
for (SearchHit documentFields : response.getHits().getHits()) {
System.out.println(documentFields.getSourceAsMap());
}
}
}
|